Exo Time and Attendance uses Daily Rules to apply settings to each day. These settings include anchoring limits for employees' times, the pay type breakdown for hours worked in the day, pay rates received for specific times during the day as well as rostering breaks during the day.
The following can help guide through the process for creating a new Daily Rule in Exo Time & Attendance.
To create a new daily rule
-
Go to the Maintenance menu.
-
Select Daily Rules.
-
Click on the Add:F4 button.
-
If the data from an existing Daily Rule is to be copied to this new rule, click on Yes then find the rule to be copied. When not copying from an existing rule then click on No and this will create a blank rule.
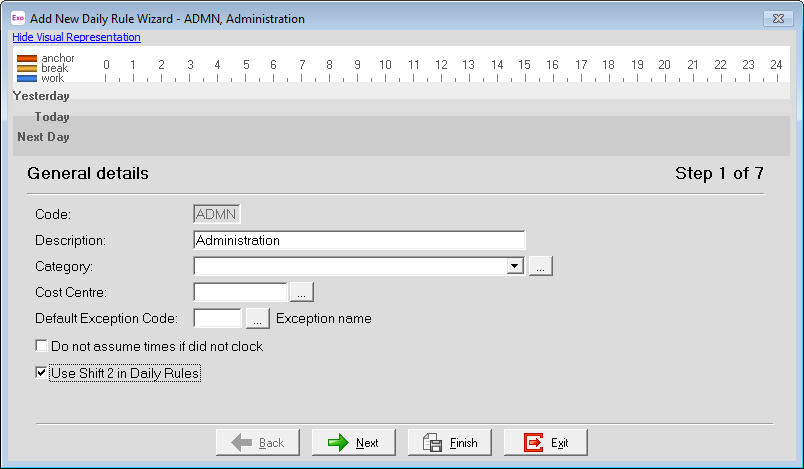
The "Add New Daily Rule Wizard" screen now appears. -
Enter in the Code for this Daily Rule, e.g. ADMN
-
Enter a Description for this Daily Rule, e.g. Administration.
-
If the "Category" is being used then select the appropriate Category for this Daily Rule
-
If all time worked by employees using this Daily Rule are to be costed to a particular Cost Centre then enter that specific Cost Centre in the Cost Centre field.
-
When the Daily Rule is to apply an exception to the day, such as when paying leave, enter the appropriate Exception code in the Default Exception Code field.
-
If Exo Time and Attendance is not to show the "Rostered Times" for the day when an employee does not work then tick "Do not assume times if did not clock".
-
For any employees working a split shift, tick Use Shift 2 in Daily Rules so that it enables the 2nd shift start and finish times screens.
When this option is ticked, it will apply to all Daily Rules.
Step 2
Step 2 deals with the setup of the Start and Finish Times for Shift 1 for the day, the "Day" that the Start Time applies to and the Anchoring rules for this Daily Rule. For further information click here.
Step 3
Step 3 handles the setup of the employee's breaks for Shift 1 including when the breaks occur, the length of the breaks and whether the employee must work any hours before and/or after the break time. For further information click here.
If Shift 2 is being used in the Daily Rules then Step 4 and Step 5 will deal with the setup of the Shift 2 rules.
Step 4 (or Step 6 if using Shift 2 rules)
This is the Daily Maximum Hours section. This section is where the maximum number of hours for each pay rate type to be paid is setup. For further information click here.
If "Daily Rate Limits by Time" has been enabled in Exo Time and Attendance Setup then Step 5 (or Step 7 if using Shift 2 rules) will allow the configuring of these limits. For further information click here.
The final step of the Wizard is where the Scheduling is setup such as the Display Colour, Minimum staff, Maximum staff, etc. For further information click here.
Once the Daily Rule has been created, it can be used such as being added to an employee's Roster, assigned to employees in Staff Scheduler, added to employees in Maintain Times, etc.
Need more help? You can open the online help by pressing F1 on your keyboard while in your software.
You can also find more help resources on the MYOB Exo Employer Services Education Centre for Australia or New Zealand.