Standard Pay - Wages
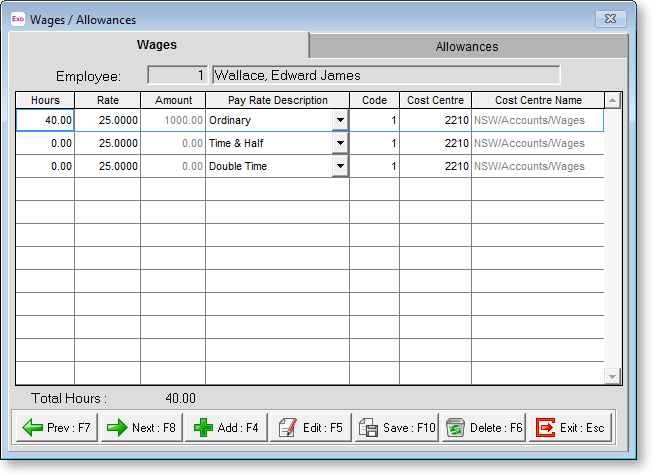
Clicking the Wages button on the Standard Pay tab open this window, where an employee's wage information is entered. It shows the standard number of hours the employee works for their selected pay frequency. If the employee works a varying number of hours or is a casual/part time employee this can be left as zero in the Standard Pay and the hours can be entered on a pay period by pay period basis. Standard Pay also displays the hourly rate, the amount (if a number of hours are entered), the pay rate type (as per the Payroll Setup window) and the pay rate description.
If no hours are entered here in the Standard Pay, then every time that a pay is created, the employees hours to be paid will have to be entered. We recommend that you enter at least the employees' base hours, as this speeds up the Payroll processing on pay day, as the standard pay is copied and becomes the current pay. Therefore on pay day you will only need to alter the hours if they vary from the standard pay.
If the Auto load wage lines option was selected during Step One: Payroll Setup, then the pay rate types that were selected then will appear here. No hours are listed beside each line, just the ability to be paid that pay rate type.

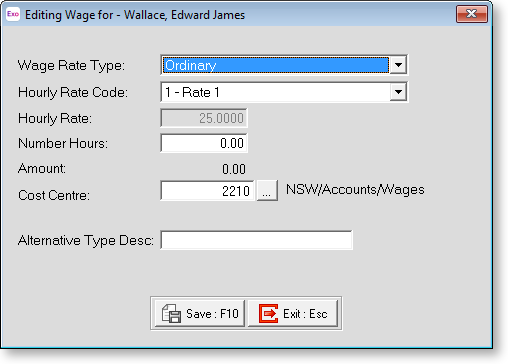
To alter the details of any wages line, click on a field for the line concerned and enter the new details. Alternatively, double-click the line or highlight it and press F5/click Edit. This opens a window that allows you to enter new details or change existing details. (The same window is used for adding new wage lines.)

Wage Rate Type Choose the pay rate type you want to allocate. These are listed from the types created in the Payment setup section of the Payroll Setup window. They show the rate type number, the description and the multiplier of the hourly rate. This window defaults to Pay Rate Type 1.
Hourly Rate Code Where you are using multiple Hourly Rates (enabled or disabled in the Other section of the Payroll Setup window) this field represents the code or number of the rate that is being used.
Hourly Rate Where multiple Hourly rates are used, this field is read-only and shows the rate specified for the selected Hourly Rate Code.
If multiple Hourly Rates are not used, this field shows the employee's base hourly rate. It defaults to the hourly rate entered in the Hourly Rate window. It can be changed at any time. To change the hourly rate, enter the new rate over the top of the old. The Base Rate is used for each Rate Type i.e. if the employee's Hourly Rate is $10.00 per hour then this shows up against each line that was applicable.
Rates used for overtime always display the base rate, as the system will multiply this by the Rate factor as set up in the Payment setup section of the Payroll Setup window. Note that if the hourly rate is changed after a pay period has been opened the new hourly rate will not take effect until the next pay period is opened.
Number Hours For the purposes of the Standard Pay, the number of hours line is where you type the number of hours for each pay rate type the employee would get for an average pay period. The reason for doing this is so that when a pay period is created, for most pay periods you will only need to enter the Wages window if there are changes to be made, e.g. if an employee normally works a 40 hour week, but they can occasionally work overtime at 1.5 times the hourly rate. In this case, load 40 hours for ordinary time and leave the overtime hours field blank.
Amount This is an automatically calculated field that is the result of the Hourly Rate multiplied by the Number Hours.
Cost Centre Use this field to enter the cost centre number if it is different from the employee's default cost centre.
Cost Centre Name This is the Cost Centre Name or Description for this Cost Centre.
Alternative Type Desc In this field you can enter an alternative description to be used instead of the Pay Rate Description. This is useful when you want to differentiate different hours paid at the same pay rate multiplier, e.g. overtime paid during the week vs. overtime paid on Saturday.
Once you have entered all the required information, click Save or press F10 to save and return to the Wages window.
If further standard hours are to be loaded or edited for this employee repeat the above process for each new or existing wage line.
