The Payment Setup section of the Setup Payroll window enables you to define how the payroll expenditure is paid and costed. Settings are divided across the following sub-sections:
-
Cost centre structure
-
Pay rate multipliers
-
Pay item liabilities
-
Payment structure
-
Hourly rate
-
Termination payments
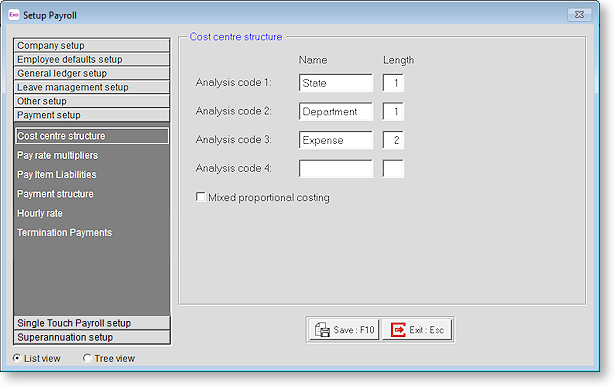
Cost centre structure
This section determines the overall structure of the field sizes and number of sub-groups for Cost Centres generally - it is not for setting up the Cost Centres themselves (this is done in Step Six of the Payroll Setup Cycle). The Cost Centre structure is based on a 12-digit number broken down into separate levels. The 12-digit number can be divided into up to 4 separate levels with any number of digits in each level, as long as the total number of digits does not exceed 12.
For example, the total cost centre number of 12 digits could be set up as:
|
Code |
Name |
Length |
|
Code 1 |
Area |
2 digits (Up to 99 different) |
|
Code 2 |
Lab type |
3 digits (Up to 999 different) |
|
Code 3 |
Job type |
3 digits (Up to 999 different) |
|
Code 4 |
Job no. |
4 digits (Up to 9999 different) |
For this 12-digit number the code/level breaks would look like this:
99 / 999 / 999 / 9999
So the number 100010505645 could mean this when broken down into its particular levels:
10 / 001 / 050 / 5645 meaning Area code 10 = Sydney
10 / 001 / 050 / 5645 meaning Lab type 001 = Microbiology
10 / 001 / 050 / 5645 meaning Job type 050 = Cosmetics
10 / 001 / 050 / 5645 meaning Job no 5645 = J/N 5645
You can set up names for the supported codes in each part of the structure by selecting Costing > Cost Centre Structure Names from the Maintenance menu. This is how you specify that Area code 10 stands for Sydney and Lab type 001 stands for Microbiology, etc.
A cost centre can be as complex or as simple as required - it all depends on your particular analysis needs. If you have any further questions, call the MYOB Employer Services Support Team for advice.
To set up the structure for your company's cost centres, type in the description for a code, then type in the length of the number (in digits). Repeat for all four codes.
Mixed proportional costing Selecting this option activates the ability to have both proportional costing and direct costing in the same pay. With direct costing, a value is directed straight to a Cost Centre; however, with proportional costing, the values are valued to Cost Centres by either a percentage or the number of hours worked.
Payments that would otherwise be proportionally costed can be direct costed in the transaction itself, by ticking the relevant Direct Cost checkbox(es) on an employee's Leave Entitlements tab.
If mixed proportional costing is switched off (the default) then any cost valued to a Cost Centre directly is overridden by any proportional costing that has been set up for the individual employee. With mixed proportional costing switched on, any values costed to Cost Centres directly are costed to the appropriate Cost Centres, and the balance value is then proportionally costed by either percentages or by hours worked. You should only turn on mixed proportional costing if you are really sure it is appropriate. If your company has no special requirements regarding mixed proportional costing then leave this option off.
Pay rate multipliers
The dollar value obtained from a wage line equates to:
employee's hours x the employee's hourly rate x the Pay Rate Multiplier
For example, where an employee is paid $15 per hour:
37.5 Ordinary hours at an Ordinary Pay Rate = 37.50 x (15.00 x 1.00) = 37.50 x 15 = $562.50
3.5 Overtime hours at a Time & Half Rate = 3.50 x (15.00 x 1.50) = 3.5 x $22.50 = $78.75
An employee may have up to nine Cost centre structure0. A wage rate can be combined with any multiplier. You may define an unlimited number of multipliers.
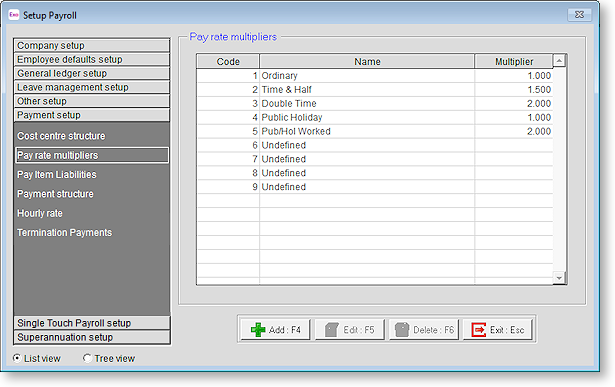
The standard hourly rate should be considered as having a multiplier of 1. In most cases the default multipliers will be sufficient:
|
Name |
Multiplier |
|
Ordinary |
1.00 |
|
Time & Half |
1.50 |
|
Double Time |
2.00 |
You can add an unlimited number of Pay rate multipliers. Click on the Add button in order to add a new code and rate.
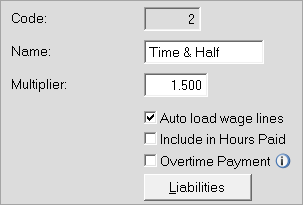
Code Enter the new code, or enter the code of any existing undefined multiplier.
Name Enter a descriptive name for this pay rate multiplier, e.g. Night Shift.
Multiplier Enter the number by which the employee's hourly rate is to multiplied, 1 for Ordinary, 2 for Double, 3 for Triple, etc.
Auto load wage lines To ensure that all new waged employees have a pay rate multiplier loaded in their Standard Pay, these can be auto loaded. If this option is enabled, it will automatically place the appropriate wage line in the Cost centre structure1 of employees' Standard Pay. It will not allot any hours, only the ability to pay an employee this pay rate multiplier. This will save time when entering an employee's Standard Pay as you will have no need to load wage lines manually. It will also load the same lines into a waged employee's Wages window when entering a Cost centre structure2.
The auto load option does not affect the Wage windows for employees who have already been added. It will only apply to employees who are added after auto load is enabled.
Include in Hours Paid If the system is set up to accrue leave based on the employee's actual hours of work, you must specify the hours that should be taken into account for this calculation. By selecting this option, any hours paid against this pay rate multiplier will be included in the calculation.
Overtime Payment As of Exo Employer Services 2021.09 onwards, with the introduction of STP Phase 2, payments related to overtime have to be reported separately.
For waged employees, any wage lines that are subsequently added using this multiplier will be reported in Single Touch Payroll as overtime.
For salaried employees, there may be an Identifiable Overtime component of Annualised Salary.
For salaried employees who have Allow Overtime ticked in the Open Employee screen, Employee Details tab, any wage lines that are subsequently added using this multiplier will also be reported in Single Touch Payroll as overtime.
Liabilities Certain pay rate multipliers have an effect on other payment items, e.g. hours paid at ordinary time rates are liable for Superannuation, whereas hours paid at overtime rates are not. Clicking this button opens a window that lets you select the pay items this pay rate multiplier is liable for.
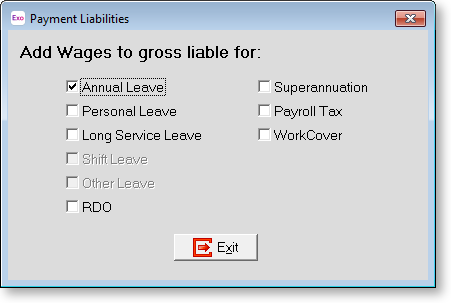
Pay item liabilities
Certain pay items have an effect on other payment items, e.g. Salaries and Annual Leave are liable for Superannuation, WorkCover levies and Payroll Tax, whereas Leave Loading paid on termination is not liable for Superannuation.
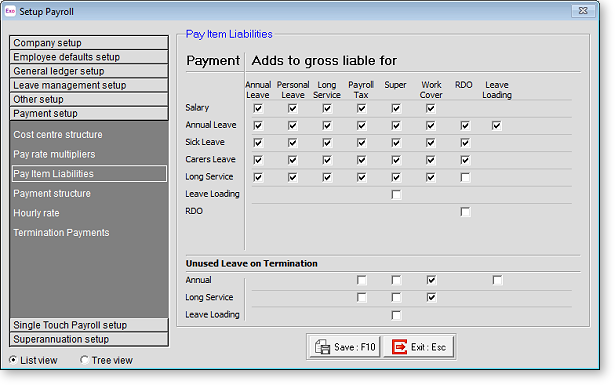
This sub-section lets you select the pay items that each payment is liable for.
Payment structure
This sub-section deals with rounding conditions and bank-note distribution.
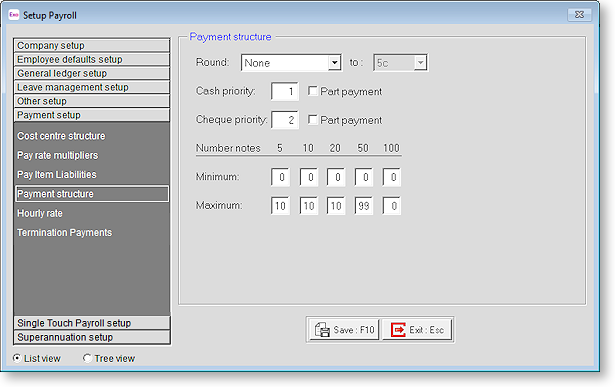
Round Rounding of pays is an option that is generally used only if you pay employees in whole or part by cash. In these cases, you may want to set a rounding rule, to be applied to the employees' net pay calculation. Select one of the following:
-
None - If pay rounding is set to None, the Payroll will automatically round cash pays only, to the nearest 5c. Pay rounding is tracked on the Cost centre structure3 of the Edit Employee window.
-
All Pays - round all of the pays: cash, cheque, and direct credits.
-
Cash Pays - round the cash portion of the pays only.
The Priority options relate to the values that are paid out when the employee does not work their regular hours during the pay period.
Cash Priority Setting this value to 1 will result in fixed dollar cash payments being paid out in preference to cheque payments (with a value of 2 or greater), if there are insufficient funds to meet both fixed dollar payments. Ticking the Part Payment box will result in fixed dollar cash payments being partially paid out if the sufficient funds are enough to pay out only part of the fixed dollar amount.
Cheque Priority Setting this value to 1 will result in fixed dollar cheque payments being paid out in preference to cash payments (with a value of 2 or greater), if there are insufficient funds to meet both fixed dollar payments. Ticking the Part Payment box will result in fixed dollar cheque payments being partially paid out if the sufficient funds are enough to pay out only part of the fixed dollar amount.
If you select "All Pays" or "Cash Pays", you must specify a rounding increment. You can round to the nearest 5c, $1, $2, or $5.
If you pay cash, you are able to select the Minimum and Maximum of each dollar denomination from $5 to $100. If, for example, you want at least 2 $5 dollar bills, 3 $50 dollar bills and no $100 dollar bills in every pay, enter 2 in the $5 dollar column of the Minimum line, 3 in the $50 dollar column of the Maximum line, and a 0 in the $100 dollar column of the Maximum line.
Hourly rate
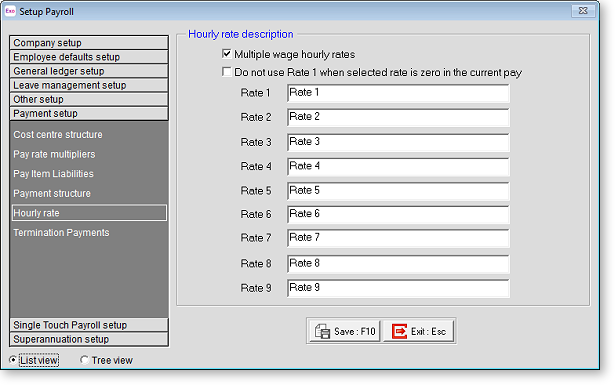
Multiple wage hourly rates Selecting this option allows you to define up to nine different Cost centre structure4 for any individual employee. If this option is not selected, employees can only have a single hourly rate defined.
Do not use Rate 1 when selected rate is zero in the current pay If this option is not ticked (this is the default), then when a user selects a rate with a zero value on the Add/Edit Wage window, the "Rate 1" rate is used instead. If this option is ticked, then in this case, the selected zero value rate will always be used.
Enter names for each of the Hourly Rates defined in the system, as they will appear on the Add/Edit Wage window. By default, rates are named "Rate 1", "Rate 2", etc - this sub-section allows you to give them more user-friendly names.
Termination payments
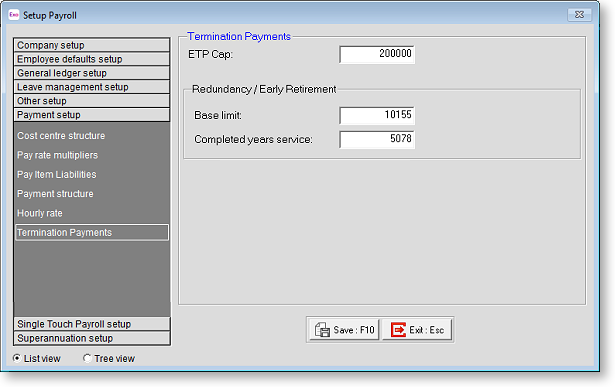
The values on this tab are used to calculate the tax free limit for employee termination payments (ETPs) on the Cost centre structure5.