This Special Clock Function is only beneficial when the Timeclock is being used for Job Costing. When Job Costing is enabled on the Timeclock, the normal card or fingerprint reading will be taken, and a secondary prompt will appear on the digital display, requesting a Cost Centre code. The Timeclock will check the secondary input against the list of valid codes that you have relayed via this Special Clock Function, and then reject any invalid codes.
Preparing to send cost centres to clocks
Before performing this Special Clock Function, you will need to review various aspects of your Exo Time and Attendance setup.
-
First of all, you will need to review your Cost Centre Structure Setup. In that screen, you will have the option to automatically create codes for cost centres that are input into the Timeclock, but do not already exist in Exo Time and Attendance. So instead of rejecting an invalid code, Exo Time and Attendance will simply assume that the code is valid, and cost the transaction to the newly-generated code. Exo Time and Attendance inherently supports a cost centre code of up to 12 digits. The cost centre code can optionally be broken down, i.e. structured into a maximum of four meaningful levels.
-
Having defined a suitable length for your Costing Structure, you will now be ready to add Cost Centre Structure Codes and Names for each type of component that may form a complete cost centre code - refer to the topic on Job Costing.
-
Having defined a suitable naming convention for your Costing Structure, you will now be ready to add Cost Centre Codes to the Cost Centre masterfile - refer to the topic on Cost Centres.
-
Once the Cost Centres have been added to Exo Time and Attendance, they now need to be transmitted to the Timeclock. You will need to review the Timeclock Setup screen, and make sure that the Send Cost Centres to Clock option is enabled for each Timeclock that is to be used for job costing.
-
The next step is to transmit the list of cost centres from your PC to the TimeClock. From the Special Clock Functions screen, click on "Send Cost Centres to Clocks, in order to see a picklist of Timeclocks:
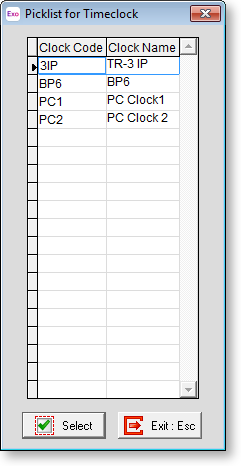
MYOB BundyPlus G6 Series timeclocks must have the Send Cost Centres to Clock option enabled on the Timeclock Setup Maintenance screen before you can send Cost Centres to them.
-
Then, select the Timeclock to which you want to send cost centres.
-
Once the operation is complete, a confirmation message will appear. Click the OK button to proceed - Cost Centres will now be synchronised, and the TimeClock will now verify all Cost Centres/Job Numbers as entered.
-
You will need to activate one more Special Clock function, which is to Switch Job Costing on at the TimeClock.
Having turned this option on, the employee will be prompted to enter a Cost Centre/Job Number each time they clock in or out or between jobs. Depending on what the employee is doing at the time will determine what they do when they swipe -
If they are clocking In and they have no Job to work on, they can either enter a "Non Productive" code which will have be set up or they can push enter and they will be costed to their Home Cost Centre until they start their first Job.
It is recommended that you use a "Non Productive" code as this gets the employee in the habit of entering Job numbers.
If they are clocking In and they know the Job they are working, they enter the Job number which will have been set up and they push enter.
The employee must push the Enter button on the Timeclock every time they swipe their card, or the clocking will not be accepted. If they are clocking between Jobs they simply swipe their card once and enter the Job number which will have been set up and they push enter. This will clock them off their last Job and on to the next one automatically. If they are going to lunch or finishing for the day they simply swipe their card and push enter. They do not need to enter a job number.
-
Whenever you add new Cost Centre Codes via the Exo Time and Attendance or Payroll Cost Centre maintenance screen, ensure that you perform the Send Cost Centres function again, before employees are due to start on the new jobs - this avoids the situation of the TimeClock working with an out-of-date data.