This page is to act as a quick form reference/setting reference for settings on the Company Settings screen.
Company Details /settings/company/company-details

Company Details are set based on Company Legal Name as part of MYOB billing processes. If you need this updated, please file a request with the Operations Team.
This name is visible for some email & onboarding communications, and if you have access to multiple companies it is the name in the dropdown company list.
Roster /settings/company/roster
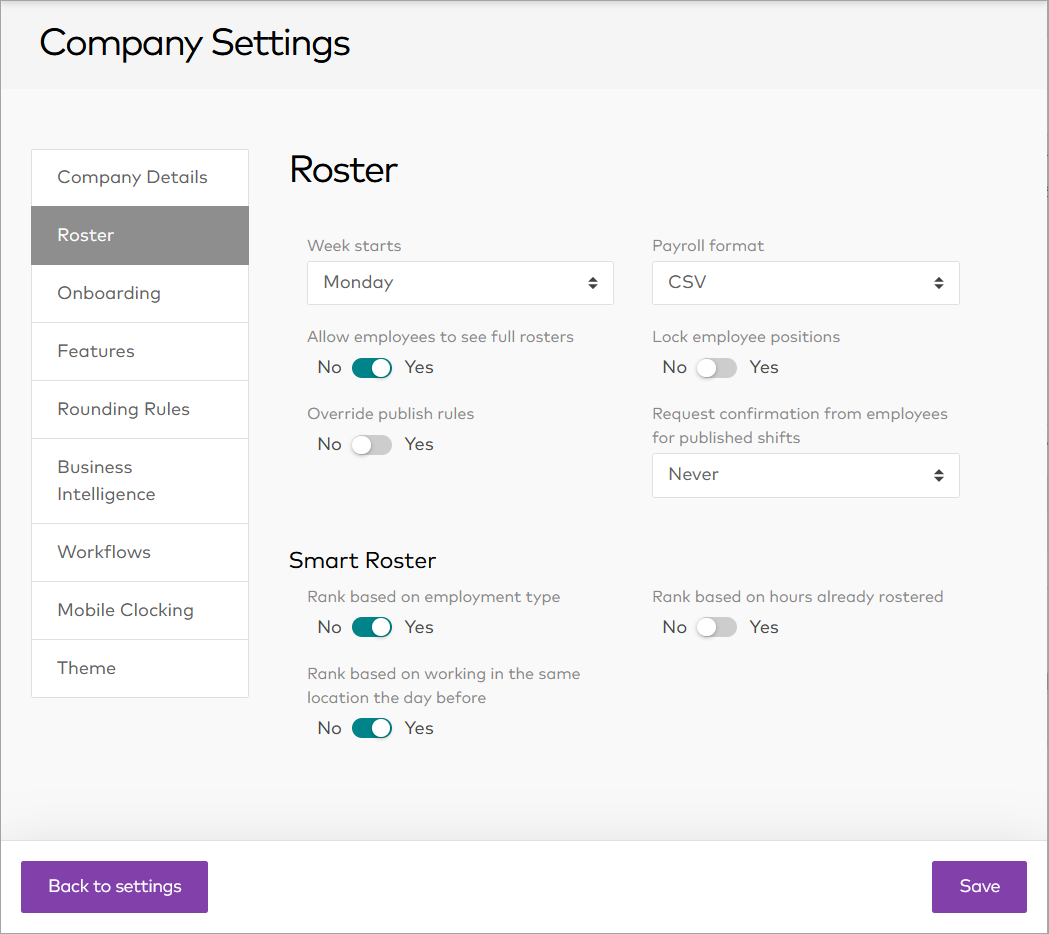
Roster settings
|
Option |
Description |
|---|---|
|
Week starts |
Week start should match to the company’s rostering, usually matches to their payroll cycle.
|
|
Payroll format |
CSV is default, and is appropriate for Advanced Payroll. |
|
Allow employees to see full rosters |
This allows employees to see the full roster for the locations they have access to, including other employees' rosters for this location. Permission information: This applies to all inbuilt permission groups, and to any custom permission groups which have "View Own Employee Roster" set to Yes. This means that those employees can now see rosters for all employees at the locations they can access. |
|
Lock employee positions |
When on, this makes users unable to change positions allocated to employee. This mostly affects Rostering. |
|
Request confirmation from employees for published shifts |
These settings define when shift confirmation should occur after shifts are published;
|
|
Override published rules |
Relates to publishing of Employee shifts. - Ticking this allows alerts to be overridden by managers for publishing. Most organizations should leave this set to No, and require alerts to be resolved before being published. When on, users will see a warning before they publish shifts with alerts, and can choose to "Publish anyway". |
|
Smart Roster |
These 3 settings only relate to the Smart Rostering function. See Using Smart Roster for help on Smart Rostering. |
|
Rank based on employment type |
Roster employees in the order of full time, then part-time, then casual. |
|
Rank based on hours already rostered |
Roster employees of various work types and criteria evenly over the week. |
|
Rank based on working in the same location the day before |
Roster employees based on factors such as licenses, qualifications and rankings. |
Onboarding /settings/company/onboarding
Onboarding Settings
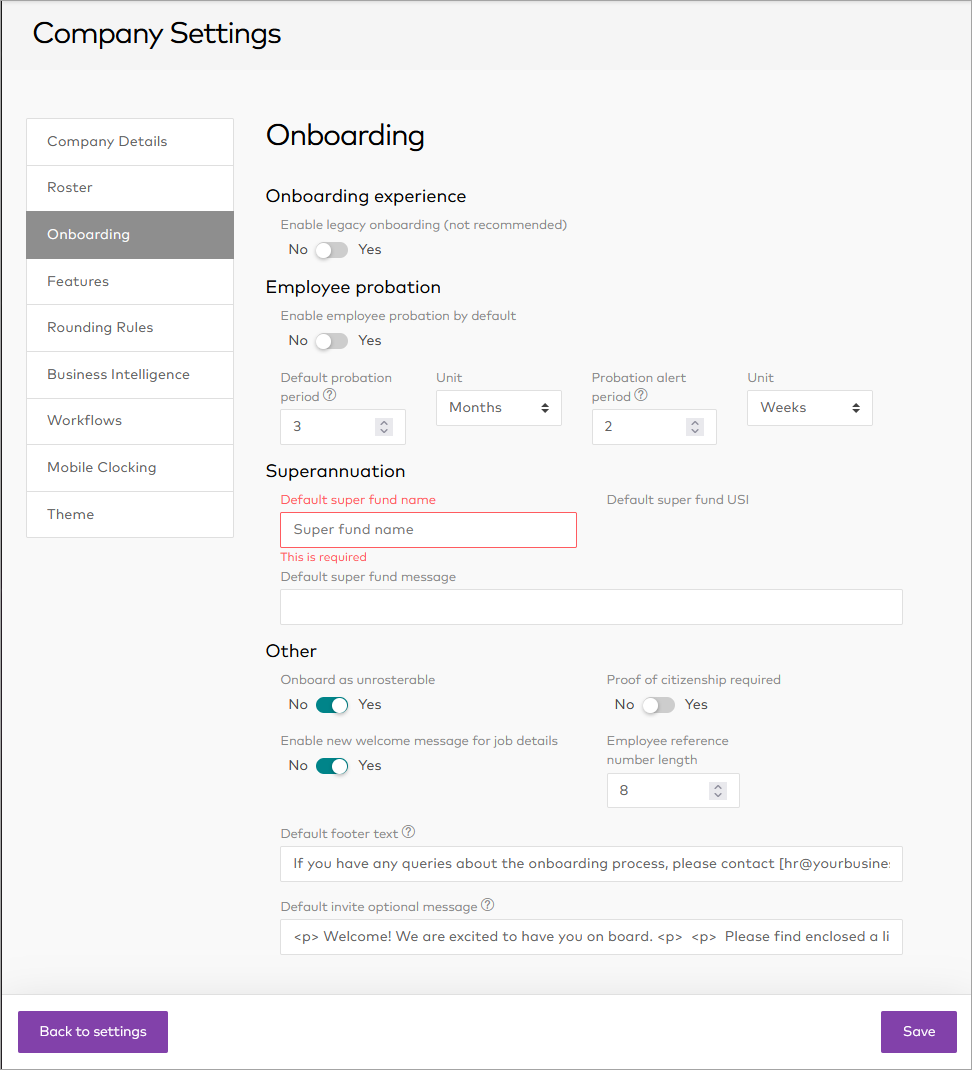
These are the onboarding settings that apply to the whole company
Selecting a Default Super Fund
When selecting a Default Super Fund, it is important to click on the option you want that appears below the field once you start typing.
So type part of the name, then click on the one you want, instead of free typing the entire name.
|
Option |
Description |
|---|---|
|
Onboarding Experience Enable Legacy Onboarding (Not recommended) |
Swaps onboarding mode from current to Legacy. Legacy onboarding is no longer supported, and will be removed completely in a future update. This should always be set to no. |
|
Employee Probation Enable employee probation by Default |
Employee probation periods can be set by default so when hiring new employees, this will be automatically completed. This can be set for; Default probation period
|
|
Superannuation / Kiwisaver |
Will show depending on country (Australia = Superannuation, Kiwisaver = New Zealand). |
|
Default super fund (AU only) |
Select your default super fund. Employees can choose this fund if they do not have a fund already. Please note, as of November 2021, super stapling requirements mean that employers cannot allocate the default super fund to employees who have not chosen a fund. Instead, they will need to contact the ATO to get the employee's "stapled" fund details. |
|
Default super fund message (AU only) |
This will be displayed in the footer during the onboarding process, advising employees of the default superannuation fund. We recommend something like the below. Our default superannuation fund is Sunsuper. The USI is 98503137921001. |
|
Default Kiwisaver employer contribution (%) |
Default contribution percentage for Kiwisaver employer contributions. For information on what this rate should be consult your contracts, the IRD or MBIE directly. Standard IRD guidance for employers is here. |
|
Other |
All general Onboarding settings. |
|
Required Qualifications Legacy Only |
(if everyone who works at the company needs certain qualifications.). Enter any required qualifications to force ALL staff to upload proof of this qualification during the onboarding process. |
|
Onboard as unrosterable |
When ticked (Recommended) new employees can’t be rostered until someone reviews their settings. |
|
Proof of citizenship required |
This will makes it mandatory for the user to upload proof they can work in your country. Most customers turn this on and this will prompt the employee to add proof of citizenship or work rights. |
|
Enable new welcome message for job details |
This will prompt the user to enter a customised welcome message each time a new employee is onboarded - overriding the default welcome message which is set under the separate Onboarding settings tile. |
|
Employee reference length |
Defines the length of your Employee References in Advanced Payroll, this should be set to exactly match for integration purposes. |
|
Default footer Text |
This will be displayed in the footer during the onboarding process. We recommend something like the below. If you have any queries about the onboarding process, please contact [hr@yourbusiness.com.au] |
|
Default invite optional message |
Here you can set a customised onboarding message for your business using HTML. We recommend something like the below. Please note, there is a maximum limit of 2000 characters. <p> Welcome! We are excited to have you on board. <p> <p> Please find enclosed a link to your onboarding, as well as some important policy information. We ask that you enter all relevant details as prompted, and upload documentation including [enter documentation here]. </p> <p> We recommend you complete the onboarding process on your desktop using Google Chrome. Once you finish this process, you will be able to access MYOB Advanced Workforce Management and view your payslips, roster and personal details, and apply for leave. </p> <p> If you have any questions or problems with this online form, please contact [hr@yourbusiness.com.au] </p> <p> |
Features
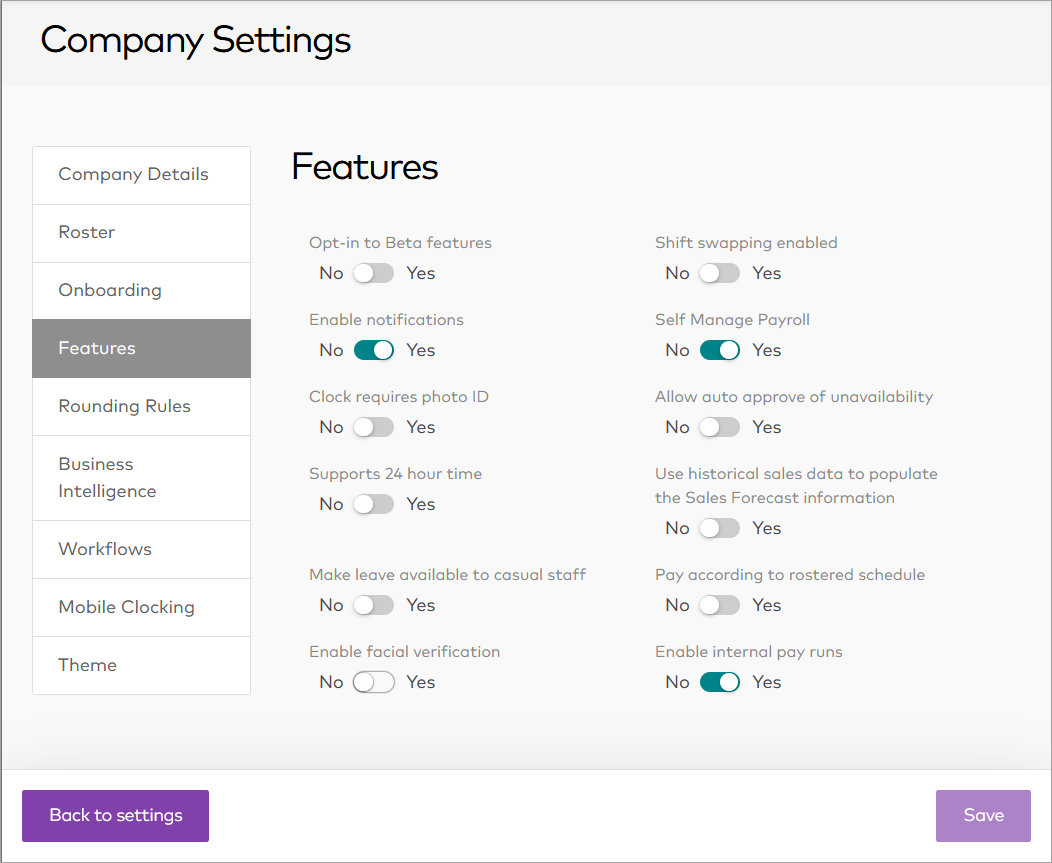
Features (General settings)
|
Option |
Description |
|---|---|
|
Opt in to Beta Features |
Not used for MYOB sites. Please do not turn this on, beta features are not available for public testing at this time. |
|
Shift swapping enabled |
This enables all staff to swap shifts with their colleagues, without managers having to do this for them.. |
|
Enable notifications |
Controls if WFM sends emails to users. Should be on except during bulk updates or during early setup. When on staff will receive the various emails associated with rostering, time and attendance, leave and onboarding. |
|
Self Manage Payroll |
Should always be on for Advanced Payroll customers. If this is off only Super Users can Submit/Commit Timesheets to Payroll. (Payroll Integration doesn't work without it) |
|
Clocking requires photo ID |
This will require employees to take a photo of themselves when they clock in and clock out, which managers can then check later to confirm that the correct person clocked in. |
|
Allow auto approve of unavailability |
This will automatically approve unavailability for all staff when enabled. Unavailability is a type of leave that allows staff to mark that they won't be able to work in a given period. |
|
Use historical sales data to populate the sales forecast information |
This is where the user can specify whether historical sales data will be used to populate the sales forecast, for use in the roster and business intelligence features. |
|
Supports 24 hour time |
Displays the roster, time and attendance and leave as 24 hour time. |
|
Make leave available to casual staff |
Needs to be ticked if Casual staff can apply for leave. When unticked casual staff will only be shown the leave type of 'Unavailable" |
|
Pay according to rostered schedule |
Ignores rounding rules/timesheet and pay only for rostered hours. This enables timesheets to be automatically created based on published shifts in the roster. |
|
Enable Facial Verification |
Checks photo ID and verifies if face is the same. Please note: The Facial Verification feature requires activation by MYOB Staff, and may incur an additional charge. Please speak to your implementing consultant if you desire this feature. |
|
Enable internal pay runs |
Must be on to allow for Advanced Payroll integration. Allows solution to generate timesheets to Advanced Payroll via Export |
Rounding Rules /settings/company/rounding-rules
Rounding Rules (Clock settings / Automatic Breaks)
Also see the full articles at Adjusting clock rounding and Adding breaks to shifts and timesheets automatically
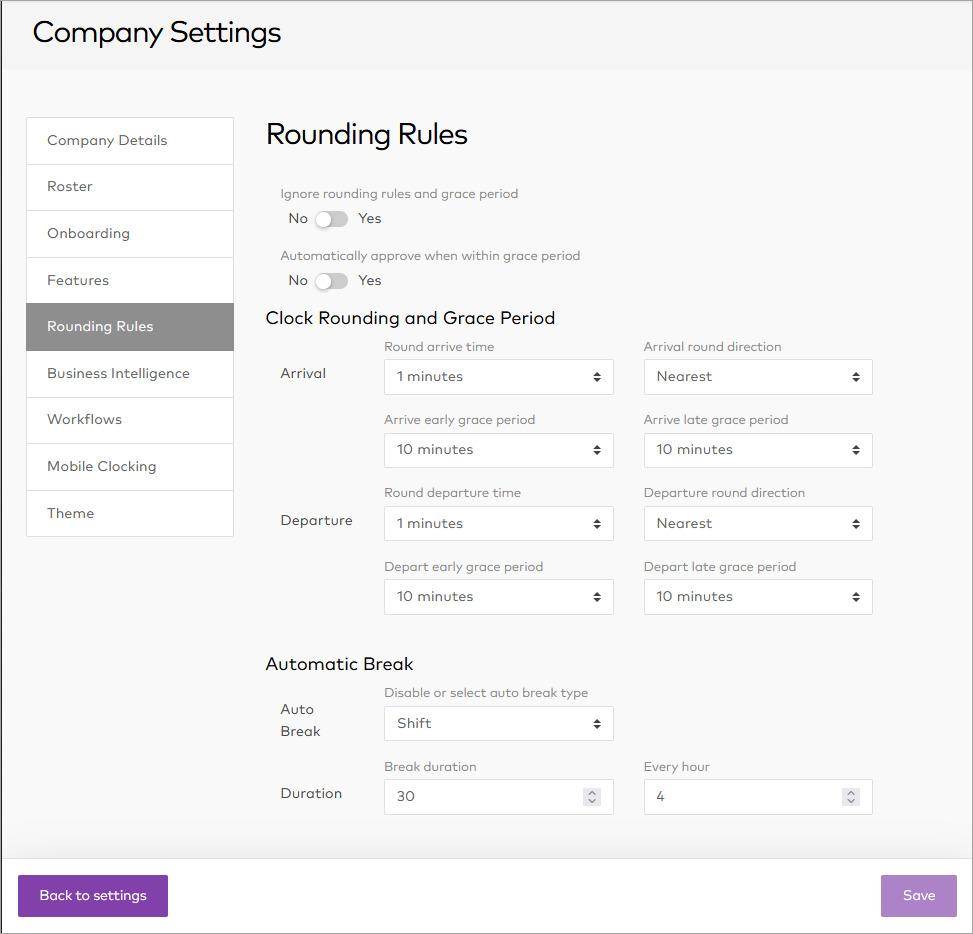
Rules relating mostly to Clock Rounding, but also Automatic Break settings.
|
Option |
Description |
|---|---|
|
Ignore rounding rules |
If Ignore rounding rules is set to yes, ignore the following Clock Rounding rules. (Feature is off )
|
|
Automatically approve when within grace period |
Allows automatic approval when employees clock in close enough to their shift start/stop. |
|
Clock Rounding and Grace Period settings: |
|
|
Round arrive time |
1,5,8,10,15 or 30 minutes
|
|
Arrival round direction |
Backwards, Nearest or Forwards |
|
Arrival early Grace period |
1,5,8,10,15 or 30 minutes This refers to the grace period given to the early arrivals |
|
Arrive late grace period |
1,5,8,10,15 or 30 minutes this refers to the grace period given to the late arrivals. |
|
Round departure time |
1,5,8,10,15 or 30 minutes |
|
Departure round direction |
Backwards, Nearest or Forwards |
|
Depart early grace period |
1,5,8,10,15 or 30 minutes This refers to the grace period given if employees leave before their shift ends. |
|
Depart late grace period |
1,5,8,10,15 or 30 minutes This refers to the grace period given for overtime. |
|
Automatic Break settings: |
|
|
Auto Break Disable or select Auto Break |
Defines whether Automatic Breaks apply, Automatic breaks are applied universally to all employees within Workforce Management. They can be applied to Timesheets and/or Shifts (Rostering). Options are: Disabled, Shift, Timesheet, Timesheet & Shift
|
|
Duration - Break Duration |
How long automatic breaks are in minutes. |
|
Duration - Every X Hours |
How frequently you would like to enforce a break in hours. |
Business Intelligence /settings/company/business-intelligence
Business Intelligence settings
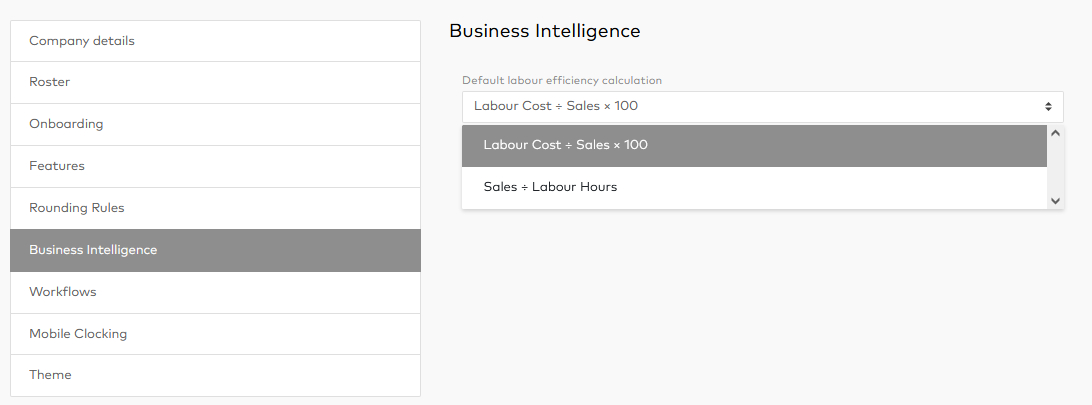
Default Labour Efficiency Calculation -
This is where you can define how you would like your labour efficiency to be calculated. This is displayed in the business intelligence feature in the "efficiency" graph.
The options are:
-
Labour cost / Sales x 100
-
Sales / Labour hours
Work Flows /settings/company/workflows
Work flow settings
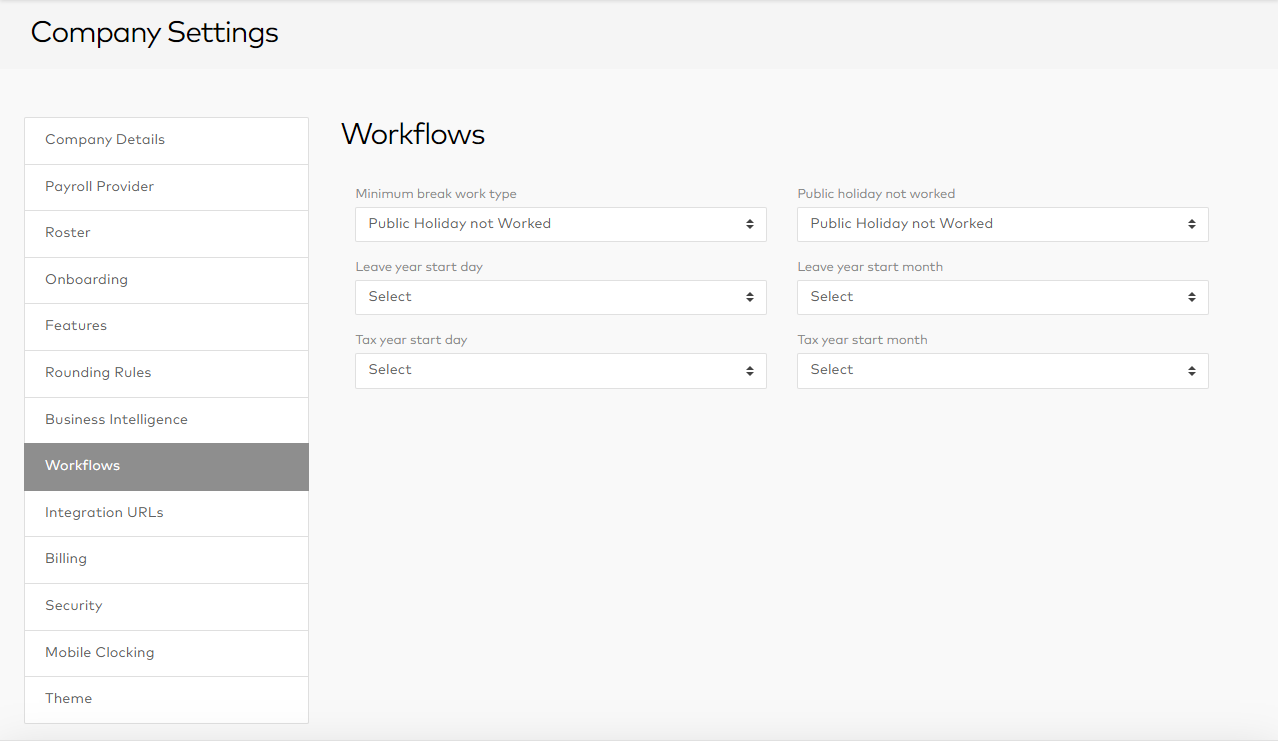
Allows for automatic allocation of Work Types when an employee is working with either no minimum break that overrides Award Rules or Pay Rules.
|
Option |
Description |
|---|---|
|
Minimum Break Work Type |
Mostly for Australian Award calculations around minimum break missed, rate goes up, etc. |
|
Public Holiday Not Worked |
Sets employees to receive appropriate type per pay rule. This should be set for all sites. |
|
Currently unused settings |
|
|
Leave year start day |
Should be left blank for MYOB Customers.
|
|
Leave year start month |
Should be left blank for MYOB Customers.
If set, “Used” counters for leave reset at the Leave Year start day, making it hard to project future booked leave correctly for employees. |
|
Tax year start day |
Generally leave blank.
|
|
Tax year start month |
Generally leave blank.
|
Integration URLs /settings/company/integration-urls
Consultant only settings.
Integration URLs
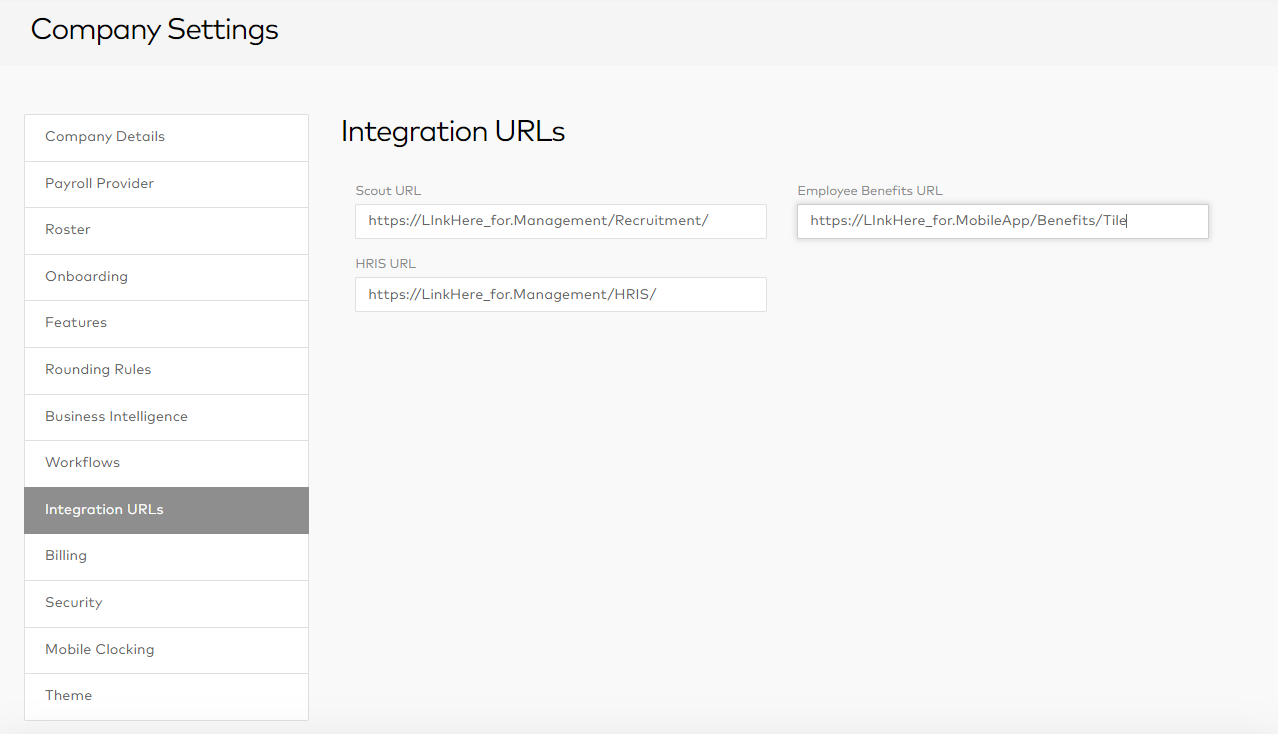
When filled out, some extra links are visible in product.
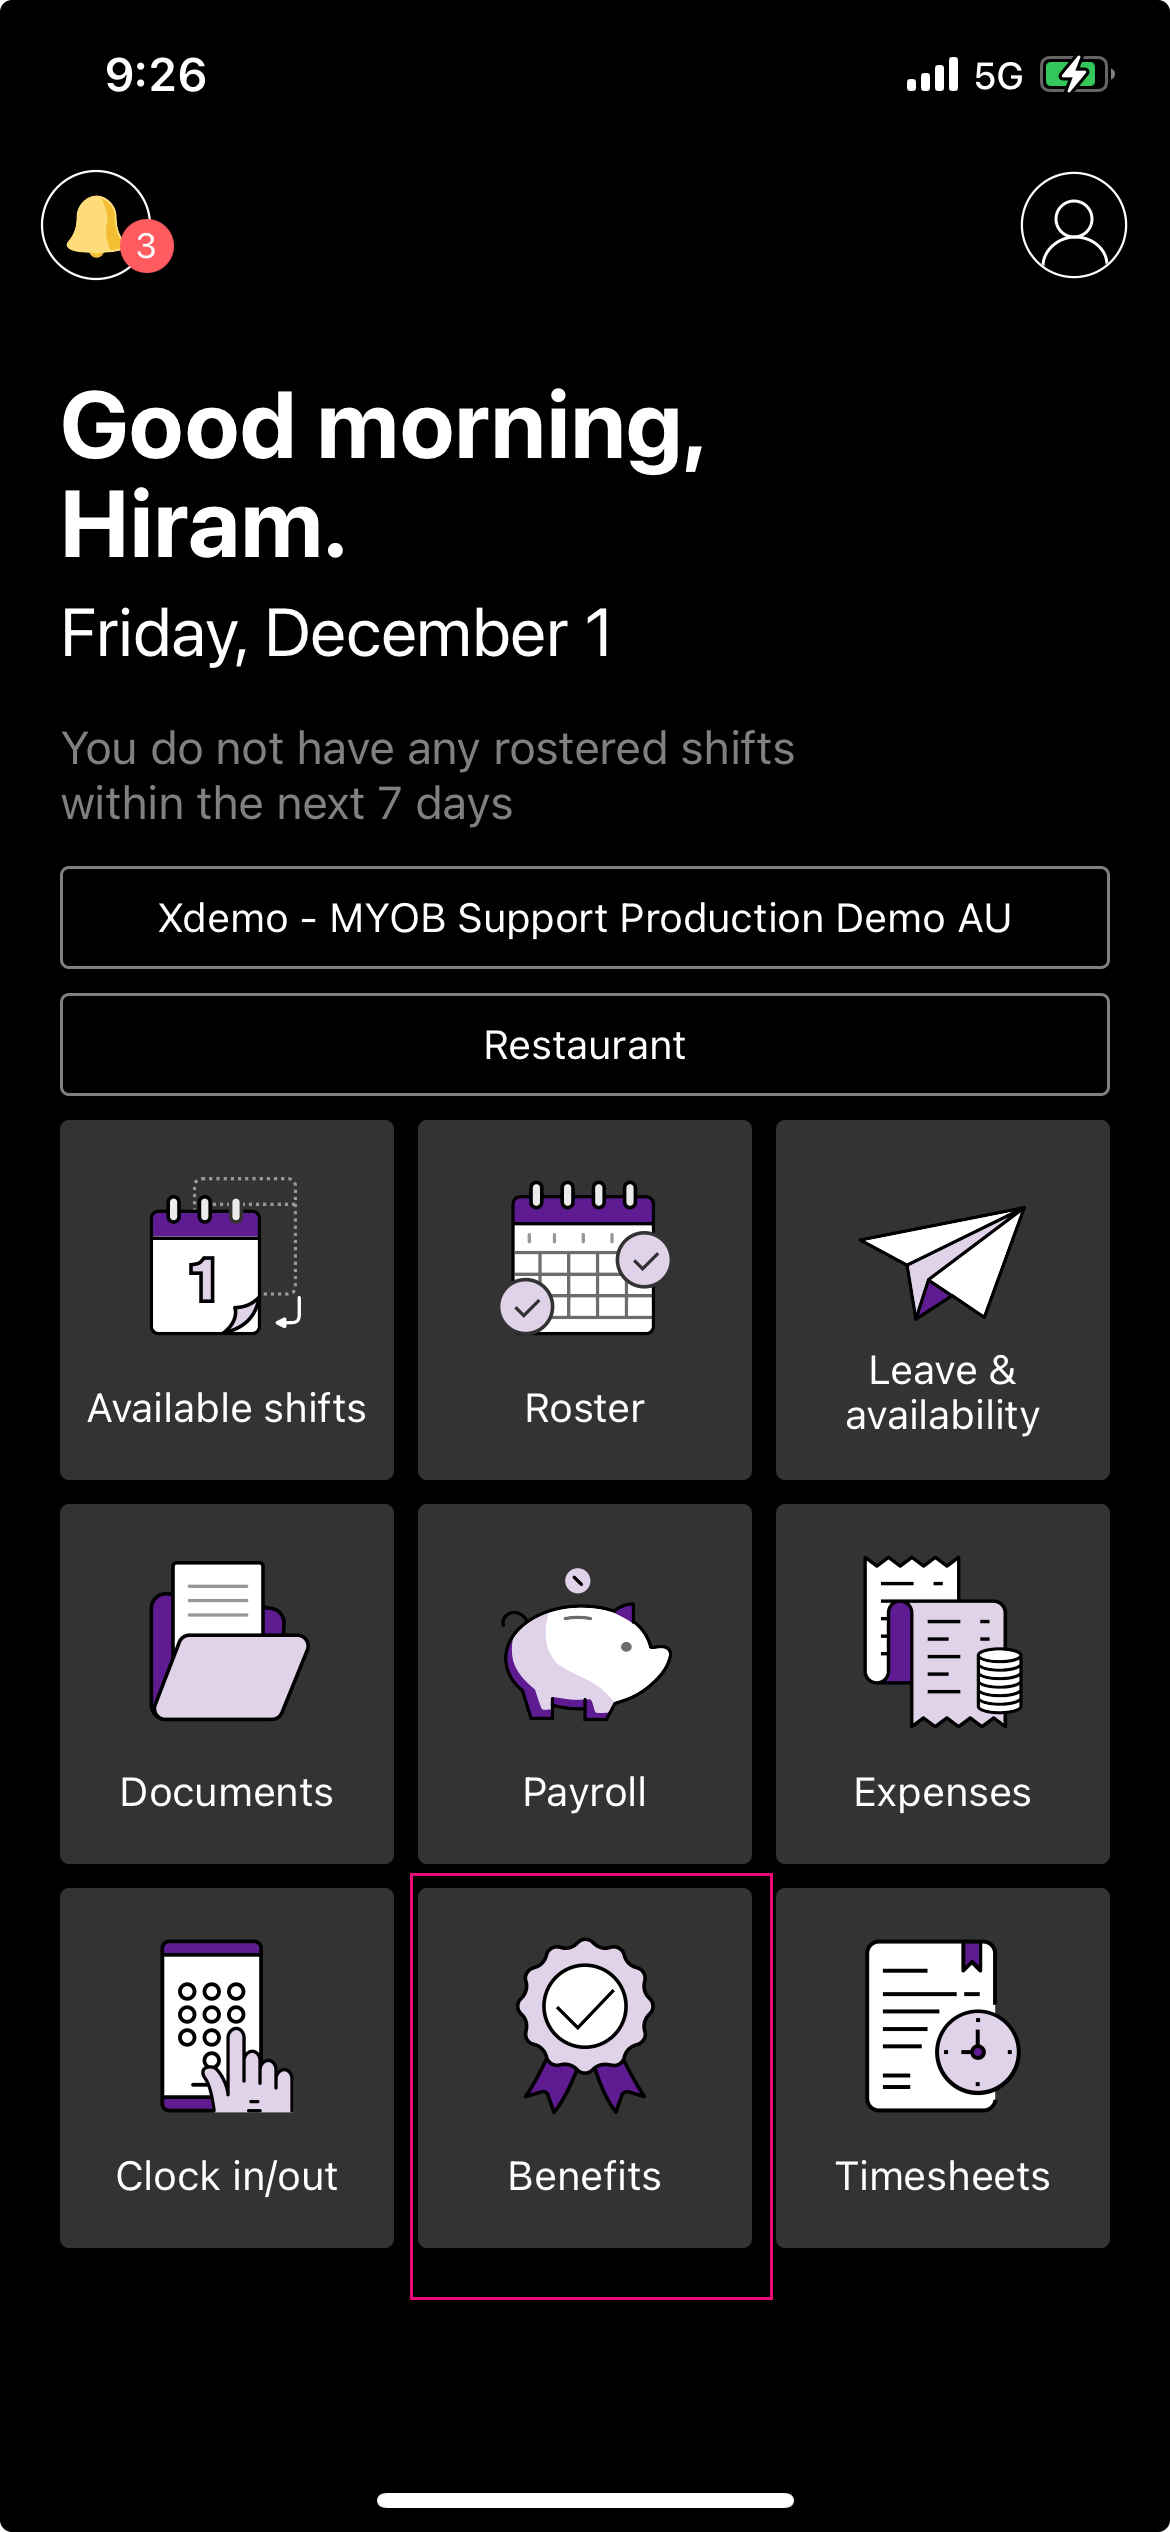
Filling out the Employee benefits URL adds a tile to the Mobile App:
Mobile Clocking /settings/company/mobile-clocking
Mobile clocking settings
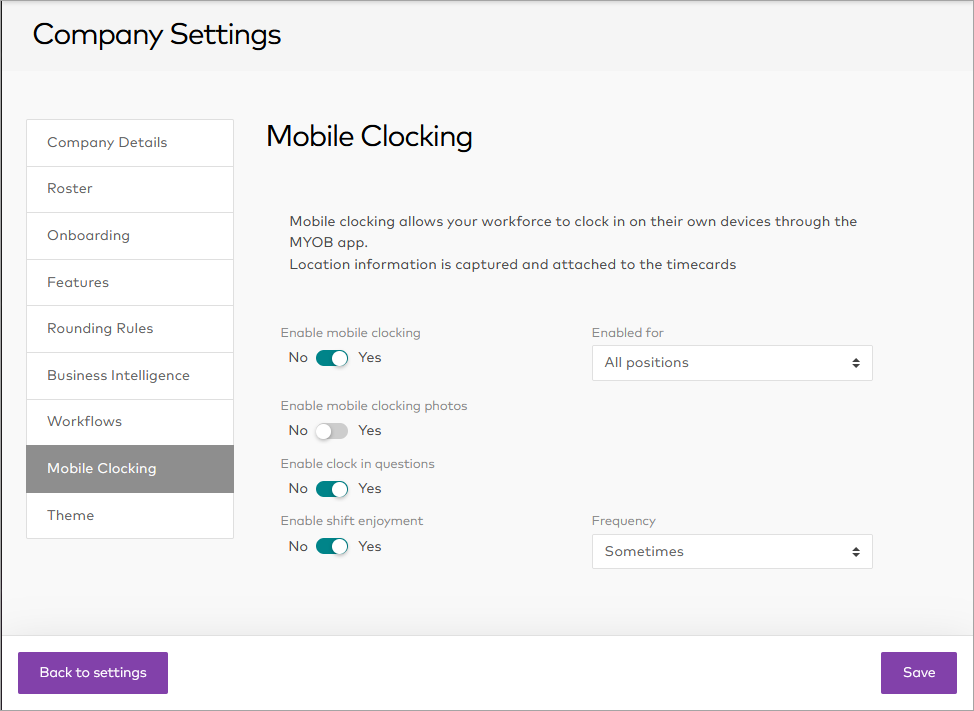
If Mobile Clocking is not enabled here, employees do not have access to the Clocking icon on their mobile app.
|
Option |
Description |
|---|---|
|
Enable mobile clocking |
If Mobile Clocking is not enabled here, employees do not have access to the Clocking icon on their mobile app. |
|
Enabled for |
This enables you to choose whether you would like this to be enabled for specific positions (for example only mobile staff or delivery drivers) or for all positions business-wide. |
|
Enabled Positions |
Visible if Enabled for is set to Specific Positions. |
|
Enable mobile clocking photos |
This enables you to ask employees to take a photograph of themselves while clocking in, so you can check whether the correct employee has clocked in. Note, this is different to our facial verification feature which checks these photos automatically using artificial intelligence. |
|
Enable clock in questions |
This enables you to ask employees to answer specific questions as they clock in. This can be used in a number of ways, including as a quick health check, or to ensure employees have seen company-wide announcements. These are configured separately, for details Setting up and reporting on clock questions. |
|
Enable shift enjoyment |
This enables a feature where employees will be asked to rate their shift, as they clock out. |
|
Frequency |
This is where you choose how often you'd like to ask employees to rate their shift. |
Theme /settings/company/theme
Themes

Allows choosing the Logo to appear in the top-left hand corner of the screen, and on email correspondence, as well as the Primary and Secondary color of the website/app for all logged in users.