
When running a pay, you open a new pay period - the Current Pay - and make any changes for that specific period e.g. enter overtime, add any one-off allowances, enter annual leave or sick leave taken etc.
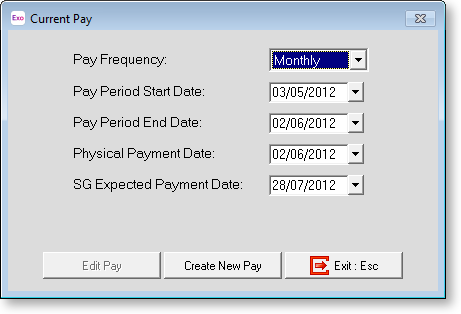
Select Step Two from the Pay Cycle and the following window appears:
You can also edit the Current Pay by selecting Current Pay from the Pay menu or clicking the Current Pay button on the Toolbar.
Select the Pay Frequency you want to run and, if this is your first pay, enter the Pay Period Start Date and Pay Period End Date (representative of the accounting period that this pay falls into) and the Physical Payment Date (representative of when the employees receive their pay). The Physical Payment Date should be the date on which the bulk of your employees get paid, i.e. the date the money is transferred out of the company wages account.
Specify the SG Expected Payment Date, which is the date that employees can expect their Superannuation Guarantee (SG) contributions to be paid by. This date will be displayed to employees on their payslips. It cannot be earlier than the Physical Payment date, and cannot be later than the SG cut-off date for the current quarter. The cut-off dates for each quarter are:
-
For the quarter 1 January - 31 March, the date is 28 April
-
For the quarter 1 April - 30 June, the date is 28 July
-
For the quarter 1 July - 30 September, the date is 28 October
-
For the quarter 1 October - 31 December, the date is 28 January
Once the first pay has been set up, the pay dates will roll over automatically when you update the Pay. If you ever need to change your Pay Period End Date you can do so, but only if the Current Pay has not been created.
Having entered the date, click the Create New Pay button. You will be asked to confirm that you want to create the new pay. Click Yes.
Once a Pay is created, the Edit Pay button becomes available, allowing you to go back and make changes to the pay at any time.
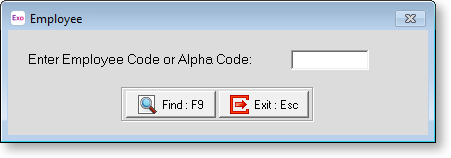
You will be presented with the Staff selection window. Enter the Employee Code or Alpha Code of the first employee whose pay you want to edit.
The Current Pay window appears, showing the Current Pay for the selected employee. All of the information in the employee's Current Pay defaults to the values specified in their Standard Pay. You can edit this information as required. Exo Payroll dynamically calculates the pays as data is entered, so you see the results immediately.
Under normal circumstances you would not need to go into every window for every employee. Usually, the most that is necessary is to edit the Wages window to enter any overtime. If there are no changes that need to be made to an employee this pay period, their pay is automatically created based on the Standard Pay.
The column of buttons down the left of the window is used to edit various aspects of an Employee's Current Pay. You cannot edit the fields on the right.
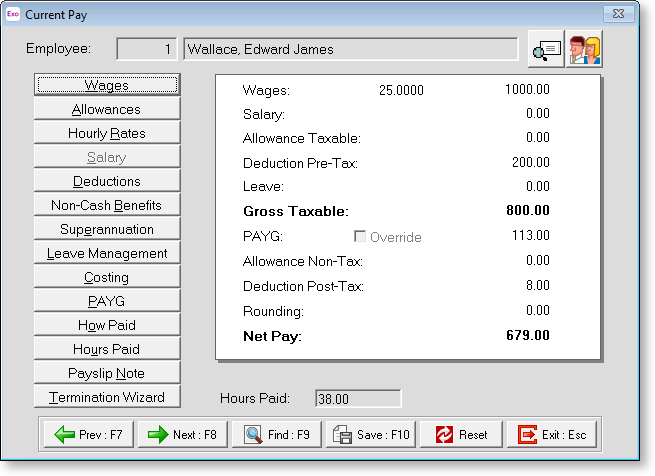
The following buttons are available on the left of the window:
-
Wages - This is where the employee's wage hours for the Current Pay are entered. This option is only enabled if the employee has been setup as Waged in the Employee Details tab of the Employee Maintenance window.
-
Allowances - This is where allowances for the Current Period are entered.
-
Hourly Rates - This is where the employee's hourly rates are entered or maintained. This option is only enabled if the employee has been setup as Waged in the Employee Details tab of the Employee Maintenance window.
-
update the Pay0 - This is where the employee's salary for their matching pay frequency is entered. This option is only enabled if the employee has been setup as Salaried in the update the Pay1 of the Employee Maintenance window.
-
update the Pay2 - This is where any deductions that are to be taken out of the employee's pay for the Current Pay are entered.
-
update the Pay3 - This allows to you add extra items to the employee's salary package such as fringe benefits and salary sacrifice other than superannuation, without affecting the employee's gross pay.
-
update the Pay4 - This is where you set the applicable superannuation contributions for the employee. These contributions can be made up of Employer Contributions, Salary Sacrifice Contributions and Employee Contributions.
-
update the Pay5 - This is where you pay the employee leave for the Current Pay period.
-
update the Pay6 - If you want to proportionally cost an employee's wages or salary by hours or by percentages to different Cost Centres then this is where it is switched on at both the employee level and setup.
-
update the Pay7 - If left unaltered, the computer will automatically calculate the PAYG payable on the employees' gross taxable amount, based on the tax code selected in the Employee Details Tab. If required, you do have the ability to override the PAYG with your own amounts.
-
update the Pay8 - This is where you set up the way an employee's net pay is to be handled for the Current Pay. You can set up payment by direct credit, cash or by cheque or a combination of these.
-
update the Pay9 - This shows the number of hours that the Current Pay represents.
-
Employee Code or Alpha Code0 - This is a specific note for the currently selected employee, which will appear on the employee's current payslip.
-
Employee Code or Alpha Code1 - This starts a wizard that determines the final pay for an employee whose employment has been terminated this period.
A Reset button is available at the bottom of the Current Pay window. Clicking this button opens the following window:
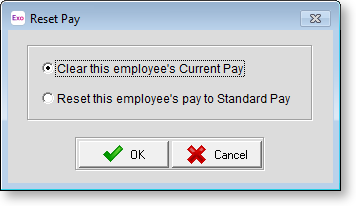
Select an option and click OK to either clear all pay information for the employee, or reset the information to their Standard Pay.
View Employee Details
Two buttons are available for viewing additional information about the employee.
|
Button |
Description |
|
|
This button generates a preview of the employee's payslip for this pay. |
|
|
This button opens the Employee Code or Alpha Code2 in a read-only capacity. This is handy for referencing an employee's personal details, which you may need to know about before processing the employee's pay. |

