The Employee Details tab of the Employee Maintenance window contains basic identification and remuneration information about the employee.
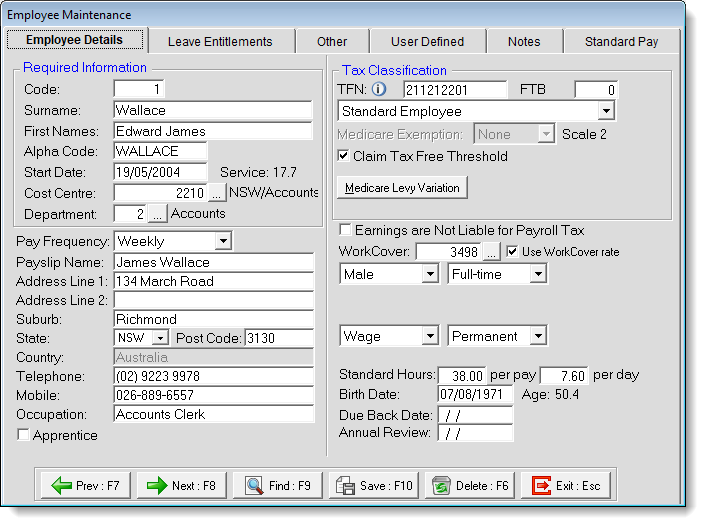
Required Information
When adding a new employee you will note that the only tab available is Employee Details. This is due to the fact that there are details required on this tab before you can continue. This data is in the box headed Required Information.
Code The Employee Code is automatically entered here when the employee is added.
Reinstate If the employee's employment has been terminated, a Reinstate button is available next to the Code field. If you need to reinstate an employee who has been terminated, click this button. The following window appears:
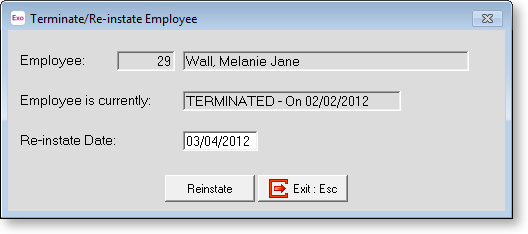
Enter the Reinstatement Date and press enter. You will be asked to confirm that you want to proceed.
Surname Enter the employees' surname/family name.
First Names Enter the employees' first name(s).
Alpha Code Exo Payroll uses Alpha Codes for sorting and listing employees. The first 8 letters of the employee's surname is used as a sort code and this is shown here automatically. This alpha code must be unique. If a message appears that says "Alpha Code cannot be empty and must be unique" or "invalid input", it means that this Alpha Code is already in use, probably for an employee with the same surname. To correct this, change the Alpha Code to something else, e.g. by making the last character of the Alpha Code the employee's first initial.
Start Date This date is important, as it can also determine the default Annual Leave and Sick Pay Annual Entitlement dates. Enter the employees' actual commencement date with the company. The employee's years of service are displayed next to the start date. This value is calculated as the system date minus the Start Date.
Cost Centre This field shows the Cost Centre that the employee belongs to. This Cost Centre is chosen from the Cost Centres that were set up during Step Six: Add Cost Centres. The Cost Centre chosen for each employee acts as their default Cost Centre (which can be overridden).
Remember that if you have not created the Cost Centre that you need for any employee at this stage, you can press F2 to open the Maintenance window. Choose Cost Centres to create the Cost Centre without having to exit from the employee file.
Department Each employee must belong to a department. This department is chosen from the departments that were set up during Step Five: Add Departments. The department chosen for each employee acts as a grouping for reports or as a way of allocating costs.
Enter the code for the department you want to use. If you do not know the code for the department you want to select for an employee, click the 
If you have not created the department that you need for any employee at this stage, you can press F2 to open the Maintenance window. Choose Departments to create the department without having to exit from the employee file.
Once all of the above fields have been completed, the other tabs on the Employee Maintenance window become available, as well as with the remaining sections of the Employee Details tab.
Optional Information
Pay Frequency Select the required Pay Frequency. Choose from:
-
Weekly
-
Fortnightly
-
Bi-monthly
-
4 weekly
-
Monthly
If you change an employee's pay frequency, you will be prompted to update their Standard Hours value and the value on the Hours Paid section of their Standard Pay. If you choose to do this, these values will be updated to the value specified for the new pay frequency on the Employee Defaults Setup section of the Setup Payroll window.
Payslip Name When printing a Payslip, the payroll will print the employee's surname, then the employee's first names. If you want a different name to appear on the Payslip, enter here what you would like to appear on the Payslip. Remember to include a surname, because what goes in here is all that prints on the Payslip.
Address Line 1 Enter the employee's street name and number.
Address Line 2 Enter the remainder of the employees address if Address Line 1 is not sufficient to store the entire address.
Suburb Enter the employee's city/suburb.
State Select the state in which the employee resides. If the employee resides outside of Australia, select "OTH".
Post Code Enter the postal code pertaining to the state of residence.
Country If the employee resides outside of Australia, enter their country of residence in this field. This field is disabled be default; it is only enabled when Other ("OTH") is selected for the State.
Telephone Enter the employee's telephone number. This field is optional, but filling it in means that you are able to print a telephone list report.
Mobile Enter the employee's mobile phone number.
Occupation Enter the employee's occupation so that it will appear on the Employees report.
Apprentice Select this option if the employee is an Apprentice. Once selected, an Apprentice Details button will appear. Clicking this button opens the following window:
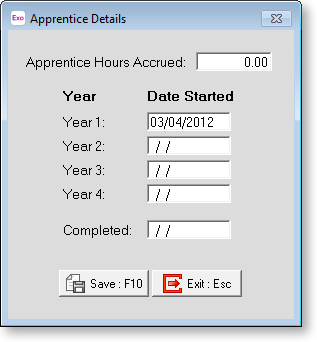
Apprentice Hours Accrued Enter the accumulated hours from commencement of the apprenticeship.
Year 1 – 4 If a year has been completed, enter the completion date here. As pays go by, more apprentice hours will be accumulated. You will need to update the dates in this window whenever an employee has completed the equivalent of a satisfactory working year. You could add a forward-dated note in the Diary (ctrl+d) to assist with this.
Tax classification
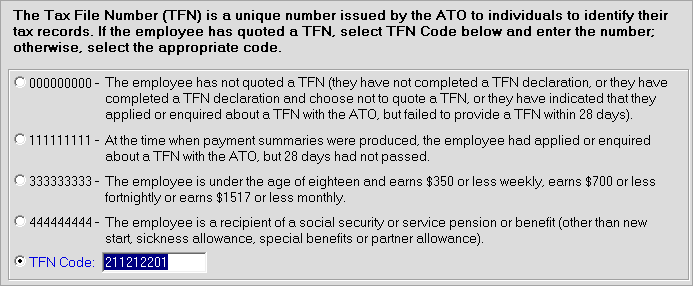
TFN/ABN Enter the employee's Tax File Number (Full-time or Part-time employees) or Australian Business Number (Contractors). TFNs and ABNs both contain a hidden computation to ensure that they are valid. If this validity check fails, then either the wrong number has been typed in or an incorrect number has been given. If an invalid number is entered the error message "The number you have entered is invalid" appears. We recommend obtaining a printed statement if any dispute arises.
An information button is available next to this field. Clicking this button opens a window that provides information about possible TFN codes:
FTB This is a placeholder for the Family Tax Benefit rebate amount that is applied each pay period. The payroll will take a percentage of this rebate out of the PAYG each period - the percentage rate that the payroll applies is dependent on the employee's pay frequency.
For example, a standard weekly employee on Scale 1 paid $400 normally would have $114 withheld each pay as PAYG. In the FTB field enter the Annual Rebate value, e.g. $100. The FTB would be calculated as:
$100 × 0.019 (1/52nd of the annual rebate) = $1.90
Rounded to the nearest dollar this becomes $2. PAYG is now adjusted by $2 becoming $112.
Annual rebates for other frequencies would be multiplied as follows:
|
Frequency |
Multiplication |
|
Fortnightly |
$100 x 0.0380 |
|
Bi-monthly |
$100 x 0.0415 |
|
4 weekly |
$100 x 0.0760 |
|
Monthly |
$100 x 0.0830 |
Tax Scale There are several different scales, which are arrived at by the employee having answered the questions in the employee declaration form.
For Example:
-
Scale 1: Standard Employee with tax free threshold not claimed
-
Scale 2: Standard Employee with tax free threshold claimed
-
Scale 3: Non-resident with TFN
-
Scale 4: Standard Employee without TFN, alternatively a non resident without TFN
-
Scale 5: Standard Employee with full Medicare exemption
-
Scale 6: Standard Employee with half Medicare exemption
-
Actors, variety artists and entertainers
-
Withholding Variation: Take tax as percentage of earnings at the rate you specify
-
Working Holiday Maker
-
Seasonal Worker Programme (includes the PALM scheme for approved employers, with tax withheld at a 15% flat rate)
If the employee is on a student loan repayment scheme, the "Standard Employee" option is extended to cover:
-
Standard Employee with HELP
-
Standard Employee with SFSS
-
Standard Employee with HELP and SFSS
-
Standard Employee with Student Loan
As of 1 July 2019, the "Standard Employee with Student Loan" option replaces the HELP and SFSS options. "Standard Employee with Student Loan" functions the same as the older HELP and SFSS scales, so there is no immediate need to update any existing employees who use the HELP and SFSS scales, but new employees with student loans should be set to the "Standard Employee with Student Loan" option.
The system will automatically calculate PAYG on the fly using in-built coefficients supplied by the ATO.
Tax Rate % If the Employee is on the Withholding Variation, enter the percentage rate you want to tax this employee at, e.g. 20.00 for 20%.
Claim Tax Free Threshold The tax-free threshold is the amount of income that an employee can earn each year that is not taxed (currently, the first $18,200 of the employee's annual income). It is intended for employees who are Australian residents (for tax purposes).
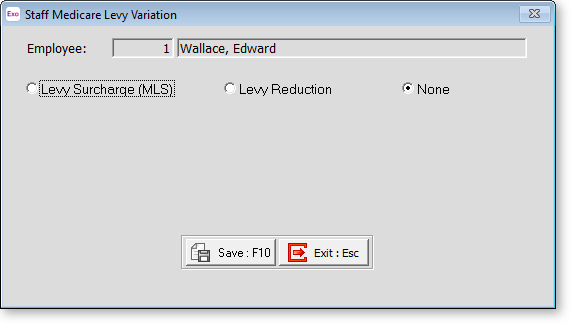
Medicare Levy Variation Click this button to open the Staff Medicare Levy Variation window, where you can specify a levy surcharge or levy reduction for the employee.
For more information, see the ATO's information on Medicare and private health insurance.
Earnings are Not Liable for Payroll Tax Some earnings incur no Payroll Tax, for example wages paid within religious organisations. There are many rulings on this, which are state-dependent.
WorkCover This field shows the WorkCover code that the system will use when calculating the amount to pay when printing the WorkCover report. The
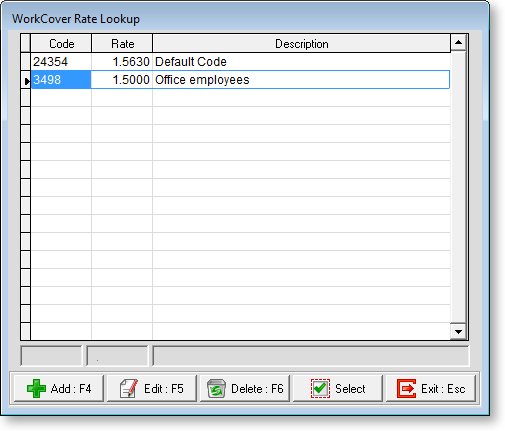
Select a code by double-clicking on one or highlighting one and clicking Select. Codes can be added or edited by clicking the appropriate buttons (remember to click Save when done). You can have as many WorkCover Rates as you like. If a rate is currently assigned to by a staff member, then you will be unable to delete it until their rate is changed.
Use WorkCover rate By selecting this option, the system will calculate the WorkCover Levies based on the rate set up against the WorkCover Code assigned to this employee. If you have set up WorkCover Levy Rates in your Cost Centre Maintenance, those rates will be ignored for this employee. The system will not calculate your WorkCover Levies based on the Cost Centres assigned to the employee's time.
Employment Type These choices show details about the status of the employee as a person and as an employee. Choose from:
|
Detail |
Options |
|
Gender |
Male or Female |
|
Hours |
Full-time, Part time or Contractor |
|
Remuneration |
Wage or Salary |
|
Term |
Permanent, Casual or Temporary |
Trade Labour Content If you are hiring a Contractor, enter the Trade Labour Content (the percentage of gross taxable earnings liable for Payroll Tax).
Standard Hours These fields specify the hourly values for the employee, which affect pay calculations. The following values must be entered:
-
per pay - This field specifies the hours per pay period for employees for any pay frequency: weekly, fortnightly, bi-monthly or monthly. The salary or wages that you enter for an employee's Standard Pay must stand for a number of hours, e.g. Weekly = 38 hours, Monthly = 173.33 hours. For new employees, this field defaults to the appropriate value from the Employee Defaults Setup section of the Setup Payroll window.
-
per day - This field specifies the number of hours that the employee would normally work in a day.
Allow Overtime This option is available if the employee is a salaried employee. Select it if you would like to pay them additional waged hours. (Waged employees are always allowed overtime by virtue of being waged employees.)
Birth Date This field shows the employee's birthday, which the software uses to calculate the employee's age.
Due Back Date This field shows the date the employee is due back from vacation. This will tell the system not to copy across their Standard Pay into the Current Pay until this date is reached. This date is usually automatically entered from the Leave Entitlements tab, but it can also be maintained from this location.
Annual Review This is a memo-only field to record the date of the annual review of wages or salary if applicable. It only appears on the Employees report.