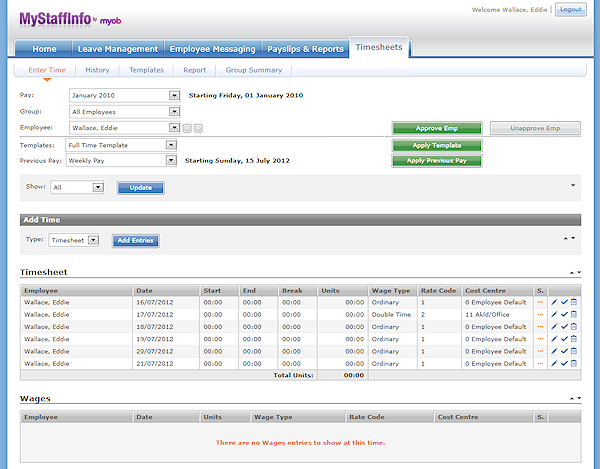
Here you can enter timesheet information for:
-
Timesheets
-
Wages
-
Leave
-
Allowances
-
Other
If you are logged in as a manager, you can add entries for other employees and approve pending entries; otherwise you can only add entries for yourself.
Adding Entries
Entries can be added to a timesheet in several ways:
-
Entries can be entered manually.
-
Entries can be loaded from a template.
-
Entries can be loaded from a previous pay.
The availability of templates and previous pay controls is determined by the Security settings set up in the Management Console. These controls can be made available to all users, restricted to managers only, or disabled completely.
Add an entry manually
-
Select the pay to add entries to from the Pay drop-down list.
-
If you are not a manager, you can only add entries for yourself. If you are a manager, you can add entries for one or more employees in addition to yourself:
-
To add entries for yourself, select "<My Details>" from the Group field.
-
To add entries for a single employee, select a group that the employee belongs to from the Group field, then select their name from the Employee field.
-
To add entries for a group of employees, select a group from the Group field, then select "<Everyone>" from the Employee field.
-
-
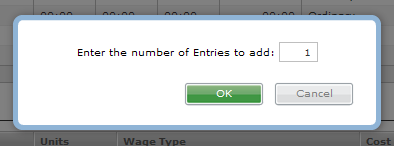
Select an entry type from the Type drop-down list, then click Add Entries. You are asked how many entries you want to add:
-
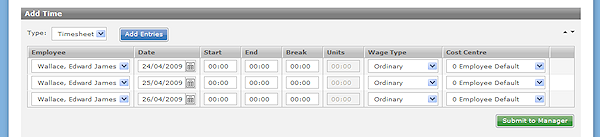
Enter the required number of entries and click OK. The specified number of entries appear as separate rows in the Add Time section:
-
Enter the required information in all fields. The available fields differ depending on the type of entry being added.
-
Optional: You can use the

-
Optional: When adding entries for <Everyone>, you can click the

-
Click Submit to Manager to send the entries for approval.
Make good use of employee groups to enable quick data entry for multiple employees. Create an employee group for any groups of employees who all work the same hours - you can then add a single entry for <Everyone> in that group. Remember that an employee can belong to multiple groups if necessary.
Use the
Field Definitions and Actions
Field definitions - Timesheet
|
Field |
Description |
|
Employee |
This is the full name of the MyStaffInfo employee, to whom the current row's timesheet transactions belong. |
|
Date |
The date that this entry pertains to. There can be multiple entries made on the same date. Normally, you would start with five entries, one for each day of the week. |
|
Start
|
The start time must be in the same actual day to match the date entered. So, for example if the employee begins a night shift at 10PM on 24/11/2009 and finishes at 6AM on 25/11/2009, the user should enter "24/11/09" in the Date field, "22:00" in the Start field and "06:00" in the End field. |
|
Break |
This is the total duration of breaks throughout the shift, expressed as a time value (HH:MM). For example, if the employee has two 15-minute breaks and one hour for lunch, the total is 1 hour 30 minutes and should be entered as "01:30". |
|
Units |
This value is automatically calculated, and equates to the End time less the Start time less the Break time. Depending on what is chosen for the Display timesheet time units as option on the Company Settings page, the value will be displayed as either a decimal amount, or in hours and minutes. |
|
Wage Type |
This field is only visible for installations that have the option to use multiple Hourly Wage Rate codes turned on in the Special Options Setup screen of Exo Payroll. This option allows an employee to have up to 9 different Hourly Rates, which are coded from 1 to 9. The actual Hourly Wage Rates are stored in the respective employee's Hourly Rates screen in Payroll, the default code being 1, for the base Hourly Rate. |
|
Cost Centre |
The Cost Centre that this transaction will be recorded against on the Costing Analysis report in Exo Payroll. If the value is left at zero, the transaction is to be costed to the employee's default Cost Centre. If you want to cost the transaction to some other Cost Centre, select a code here. |
Field definitions - Wages
|
Field |
Description |
|
Date |
The date that this entry pertains to. There can be multiple entries made on the same date. |
|
Units |
This is the amount of hours worked for this date and wage type in a decimal format. For example, eight hours and 30 minutes is entered as "8.5". |
|
Wage Type |
This corresponds to the Pay Rate Types established in Payroll, the default value being Ordinary Time. |
|
Cost Centre |
The Cost Centre that this transaction will be recorded against on the Costing Analysis report in Exo Payroll. If the value is left at zero, the transaction is to be costed to the employee's default Cost Centre. If you want to cost the transaction to some other Cost Centre, select a code here. |
Field definitions - Leave
|
Field |
Description |
|
Date |
The date that this entry pertains to. There can be multiple entries made on the same date. |
|
Leave Type |
Select a leave type from the drop-down list:
|
|
Units |
The amount of leave to be applied is entered here. This figure may represent days or hours, depending on the leave type and the setting in Exo Payroll. The |
|
Reduce |
The amount to reduce this employee's entitlement. This figure may represent days or hours. The amount to reduce will be expressed in the same manner (days or hours) as the Units data entry item. If the amount to reduce must always equal the amount paid, this data entry item will be disabled. The |
|
Cost Centre |
The Cost Centre that this transaction will be recorded against on the Costing Analysis report in Exo Payroll. If the value is left at zero, the transaction is to be costed to the employee's default Cost Centre. If you want to cost the transaction to some other Cost Centre, select a code here. |

Field definitions - Allowances
|
Field |
Description |
|
Employee |
This is the full name of the MyStaffInfo employee, to whom the current row's Timesheet transactions belong. |
|
Date |
The date that this entry pertains to. There can be multiple entries made on the same date. |
|
Code |
This corresponds to the Allowance names set up in Exo Payroll. Select an Allowance from the drop-down list. |
|
Units |
The amount of this Allowance to be applied is entered here. Depending on the type of Allowance, this may be a number of units, a dollar amount, or a percentage rate. If this field is read-only, it indicates that the amount has been pre-set in Exo Payroll. |
|
Cost Centre |
The Cost Centre that this transaction will be recorded against on the Costing Analysis report in Exo Payroll. If the value is left at zero, the transaction is to be costed to the employee's default Cost Centre. If you want to cost the transaction to some other Cost Centre, select a code here. |
Field definitions - Other
|
Field |
Description |
|
Employee |
This is the full name of the MyStaffInfo employee, to whom the current row's Timesheet transactions belong. |
|
Date |
The date that this entry pertains to. There can be multiple entries made on the same date. |
|
Other Type |
This column contains one option:
|
|
Units |
The amount of hours to be applied is entered here. |
Actions
The following action icons are available for all entry types.
|
Icon |
Description |
|
|
This icon is available when a manager is editing all members of a group, i.e. when <Everyone> is selected in the Employee column. Click this icon to "explode" this line into separate lines for each employee in the group. |
|
|
Click this icon to create copies of the selected entry. Enter the number of copies you want to make on the window that appears, then click OK to create the specified number of entries containing the same data as the original. |
|
|
Click this icon to delete the selected entry. |

Viewing and Editing Existing Entries
All existing entries are displayed in separate sections underneath the Add Time section, where they can be viewed and edited (provided they are still pending). The filters at the top of the screen let you view approved entries, unapproved (i.e. pending) entries, or all entries.
The 
The fields for each section are the same as those that are available when adding entries. Columns at the right of each section contain icons that indicate each line's status, and available actions for each entry.
|
Icon |
Description |
|
Status |
|
|
|
Pending |
|
|
Approved |
|
|
Downloaded |
|
Actions |
|
|
|
Click this icon to edit the selected pending entry. |
|
|
Click this icon to delete the selected entry. |
|
|
Click this icon to approve the selected pending entry (Managers only). |
|
|
Click this icon to unapprove the selected approved (Managers only). |


If you are logged in as a manager, buttons are available at the top of the screen to approve or unapprove all entries for the selected employee or group.
Editing Entries
Clicking the 

You can edit the information in each field in the same way as when the entries were first added.
Click the 
Click the 
Printing and Exporting Timesheets
Click the Print button at the bottom of the page to display a standard print dialog, which will allow you to print the current display of timesheet information.
Click the Export button to export the timesheet information as a CSV file.