The Templates page is only accessible to users who have the Manage My Template and/or Manage Group Templates (Manager) security settings enabled in the MyStaffInfo Management Console. You can populate the timesheet with a pattern of default values that represent the employees' regular/rostered/contracted hours. A template may be used for any regular or irregular work pattern of any duration, providing that the work pattern can be predetermined. You can create templates for weekly wages, monthly bonuses, Christmas holidays, and so on.
Adding entries to a template
-
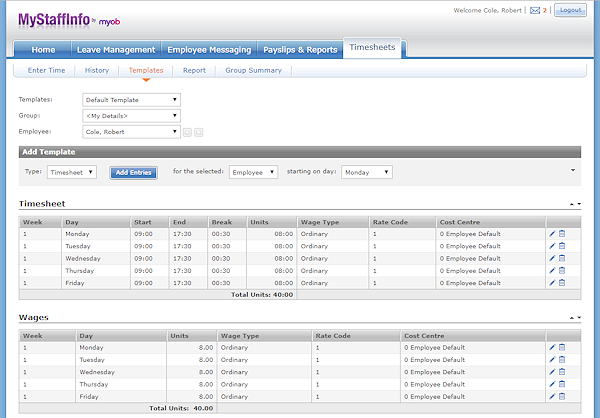
If you are a manager, you can select the template to add entries to from the Templates drop-down list. As well as the templates set up in the Management Console, there is a "<My Template>" option, which is a personal template specific to the logged on manager. If you are an employee, you cannot select a template to edit - you always edit your own personal template.
-
If you are not a manager, you can only add entries for yourself. If you are a manager, you can add entries for one or more employees in addition to yourself:
-
To add entries for yourself, select <My Details> from the Group field.
-
To add entries for one or more employees, select a group that the employee belongs to from the Group field, then select a name from the Employee field.
-
-
Specify details of the new entries:
-
Select an entry type from the Type drop-down list.
-
Managers can choose to add entries for the employee selected in the Employee field, for all employees in the group selected in the Group field or for all employees in all groups.
-
Select the day of the week that the entries should start from, e.g. if "Tuesday" is selected and three entries are added, they will default to Tuesday, Wednesday and Thursday.
-
-
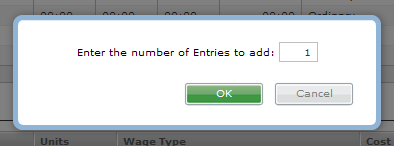
Click Add Entries. You are asked how many entries you want to add:
-
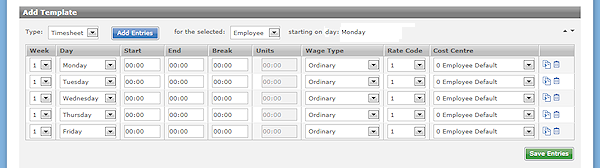
Enter the required number of entries and click OK. The specified number of entries appear as separate rows in the Add Template section:
-
Enter the required information in all fields. The available fields differ depending on the type of entry being added.
-
Optional: You can use the

-
Click Save Entries to save the new lines to the template.
Field Definitions and Actions
Field definitions for each section are mostly the same as they are when entering lines on the Enter Time screen.
Exceptions are that no Employee is specified when editing template lines, and where timesheet entries require a specific Date, templates use a generic Week and Day combination.
Templates and Days of the Week
A Week and Day are defined for each line in a template; however, when the template is applied to a pay on the Enter Time | EnterTime FieldDefinitionsandActionspage, the days specified in the template may not correspond to the days in the pay exactly, especially if the pay starts on a different day of the week than the first day specified in the template. In these cases, the template "wraps around" to the next week, so that all days in the template are included.
For example, a template is set up with one week and five days from Monday to Friday. A manager goes to the Enter Times page and applies the template to a pay starting on Wednesday the 18th; this will generate lines for the following days:
-
Wednesday the 18th
-
Thursday the 19th
-
Friday the 20th
-
Monday the 23rd
-
Tuesday the 24th
Even though the pay did not start on the same day as the template, lines are created for all days in the template - the Monday and Tuesday lines wrap around to the next week.
Viewing and Editing Existing Entries
All existing entries are displayed in separate sections underneath the Add Template section, where they can be viewed and edited (provided they are still pending). The filters at the top of the screen let you view approved entries, unapproved (i.e. pending) entries, or all entries.
The 
The fields for each section are the same as those that are available when adding entries. Columns at the right of each section contain icons that indicate available actions for each entry.
|
Icon |
Description |
|
|
Click this icon to edit the selected pending entry. |
|
|
Click this icon to delete the selected entry. |
|
|
While editing, click this icon to save your changes. |
|
|
While editing, click this icon to cancel your changes. |


Printing Templates
Click the Print button at the bottom of the page to display a standard print dialog, which will allow you to print the current display of template information.