
The Daily Rules window is used to set the rules to be used for employees' attendance on a particular day. It is also where the expected shift times are established. It is also used to set limits such as Overtime, Meal Breaks and Anchoring of employees Start or Finish times. The use of "templates" reduces the amount of time it takes to set up an employee's profile later, by allowing you to use a template for groups of employees, rather than establishing individual sets of rosters and rules per employee.
NOTE: All times on this screen must be entered in base 60, e.g. eight and a half hours would be entered as 8.30, as opposed to 8.50.
The Picklist enables you to search for and select the daily rule that you want to view or edit.
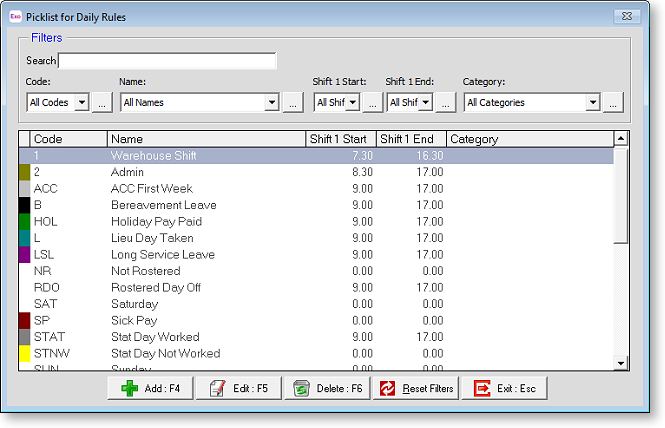
The default behaviour of the Picklist is to display all of your Daily Rules. For some businesses, this can be quite a large list - it may be more practical to exclude Daily Rules which are not of particular interest at the present time. Filter selections will be saved for future use, when you exit from the Picklist.
Search From this field you can type in the code of the Daily Rule that you wish to find - if a match is located, the list will refresh to show only the matching record. You can then press F5 or alternatively click on the Edit button, in order to edit the record.
Code A short code of up to four letters that represents the daily rule.
Name The descriptive name of the daily rule.
Shift 1 Start The time (in hours and minutes) that the employee is expected to clock in. The list of Start times will be pre-populated from the start times of your existing daily rules.
Shift 1 End The time (in hours and minutes) that the employee is expected to clock out. The list of End times will be pre-populated from the start times of your existing daily rules.
Category An optional text-based classification that is definable in nature, and may be attached to some or all daily rules.
Adding a Rule
Daily rules are added and edited using the Daily Rule Wizard. Click on the Add button to add a daily rule. You are asked if you want to copy an existing rule. Select Yes to pick a rule to base the new rule on, or No to create the new rule from scratch.
All wizard screens include a graph that illustrates the span of the daily rule. If you find the graph superfluous or clutters the screen unnecessarily, you can hide it and just work with in and out times by clicking the Hide Visual Representation option. A tri-coloured legend at the top left of the screen corresponds to the actual graph that runs from left to right.
-
anchor Red indicates periods of time during which, if clocked, the actual time will be anchored to the rostered time.
-
break Orange indicates an automatic unpaid break.
-
work Blue indicates the span of the shift, from the start time to the finish time.
-
Yesterday Meaning the time will appear in the day after it was clocked e.g. 10pm Tuesday till 6am Wednesday will show as Wednesday.
-
Today Meaning the day the time is clocked is the day in which the time will appear.
-
Next Day Meaning the time will appear in the day before it was clocked.
Step One: General Details
This screen is where you enter identification information for the daily rule.
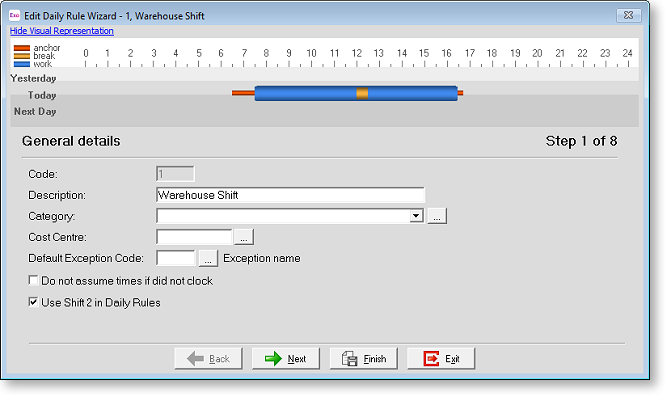
Code Enter the Daily Rule code to be added (this can be alpha numeric). You will be asked if you wish to copy an existing Daily Rule. If you have previously established a Daily Rule similar to that which you are setting up you can use it as a model. If this is the case enter on <YES> . You will be presented with a list of existing Daily Rules to choose from. Choose one and you will be presented with the Daily Rules screen as set up for the earlier Daily Rule and you can now proceed to modify it to suit. If you have not previously set up a similar code choose <No> and enter and a blank Daily Rule will be displayed.
Description Enter the description for this Daily Rule.
Category The daily rule category is an optional field, which allows you to group similar daily rules in the daily rules picklist. The naming convention for those groups can involve any key words that you like. Click the 
The Select Category screen appears. Initially, the list of categories is empty. Click on the Add button to continue.
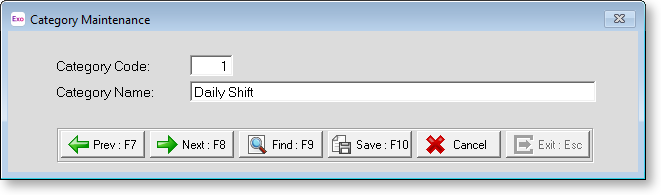
Category Code A numeric code will be suggested for the new category. You may change the suggested code, provided that the new value does not already belong to an existing code.
Category Name A description of the category helps to identify the entry, when viewed from the entire list of categories.
Cost Centre If you wish to have all time worked by employees using this Daily Rule costed to a particular cost centre, enter it here. The cost centre must have been set up previously.
Default Exception Code Where a Daily Rule is to be used to pay Holiday Pay, Sick Pay etc. the appropriate Exception Code should be entered here.
Do not assume times if did not clock Exo Time and Attendance uses the Daily Rules when working out if an employee's times are an in or an out. It will also assume the employee's "Rostered" times if they forget to clock.
In some cases an employee may not be expected to work a particular day i.e. an RDO, and therefore you do not want to assume any "Rostered Times". However, if the employee happens to come to work that day rules must be in place to cope with this. Using this option means that Time and Attendance will only use the rules if the employee works and will not assume any times if they don't.
Use Shift 2 in Daily Rules In the situation where an employee works a "split" shift on the same day, a second set of times and rules can be established. Turning this option on will cause an extra set of shift management pages to appear later on in the Wizard, in order to handle the second shift. Recommended only if you have employees who work split shifts.
TIP: This option is also available on the Other tab of the Exo Time and Attendance Setup window.
Click the Next button in order to continue.
Step Two: Shift 1 - Start and Finish Times
This is where you state the expected clock in and clock out times (in hours and minutes) for the primary shift of the day, evening, or night.

Start Time Enter the shift start time here (24hr clock format).
Finish Time Enter the shift finish time here (24hr clock format). Note that if the Shift end time falls on the next day, Exo Time and Attendance will move the finish time to the day the Start Time was allocated to using "Which Day" above.
Which Day is Shift 1 Start Time This field determines the day on which Exo Time and Attendance will put an employee's times when clocked. The options are:
-
Yesterday - The time will appear in the day after it was clocked e.g. 10pm Tuesday till 6am Wednesday will show as Wednesday.
-
Today - The day the time is clocked is the day in which the time will appear. This is the default setting.
-
Next Day - The time will appear in the day before it was clocked. In some circumstances times are moved forward or back subject to the way the business operates.
Allow ... minutes before and ... minutes after Start Time Enter the number of minutes before the scheduled time that you wish to anchor. An example of this would be an employee who always arrives 40 minutes before the expected start time and while you want them to clock in when they arrive, you only want to pay them from the shift start time. By setting a "before" limit of 45 minutes, Exo Time and Attendance will treat any clock time within 45 minutes before the scheduled start as being on time and round it to that time. If you wish to use anchoring, enter the number of minutes you want as an anchor.
As with anchoring before a scheduled start time we can also set a limit that will determine when an employee clocks in after their expected time that they are treated as "on-time". Enter the number of minutes "grace" an employee will be allowed.
Allow ... minutes before and ... minutes after Finish Time As with anchoring the starting times of an employee, it is also possible to control their finishing times. These should be set up as above with the number of minutes grace an employee will be given when clocking out before or after their scheduled finish.
Click the Next button to continue.
Step Three: Shift 1 - Automatic Breaks
Exo Time and Attendance has the ability to handle unpaid breaks such as lunch and meal automatically in a variety of ways.
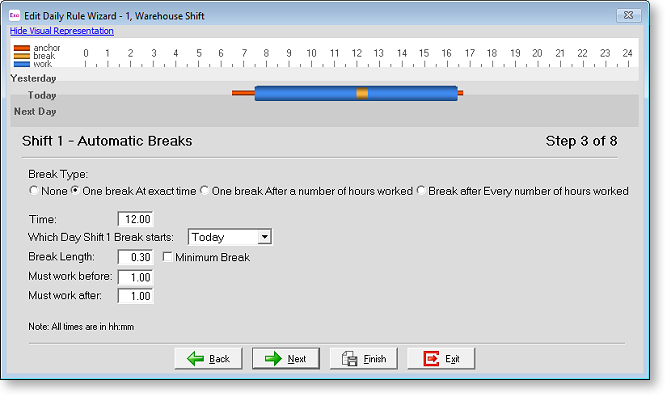
Break Type To define the policy for automatically deducting breaks from the span of in and out times, choose one of the following options.
-
None - No breaks for this day. Often used when the daily rule is for a non-worked day, e.g. paid or unpaid leave.
-
One Break At exact time - Enter the time of day at which the break is to be deducted e.g. 12:00.
-
One Break After a number of hours worked - Enter the number of hours an employee must work in order to be entitled to the break. NOTE:- The length of time specified must include the break i.e. If 5 hrs is specified then Exo Time and Attendance would pay the employee for 5hrs less the break.
-
Break after Every number of hours worked - Enter the number of hours after which each break will be deducted. The length of time specified must include the break i.e. If 5 hours is specified, Exo Time and Attendance will pay the employee for five hours less the break.
Time If the "One Break At exact time" option was selected, enter the time at which the break will occur, e.g. 12.30 for half past midday. If the "One Break After a number of hours worked" or "Break after Every number of hours worked" option was selected, enter the number of hours that must be worked for the condition to apply.
Which Day Shift 1 Break Starts This field determines the day on which Exo Time and Attendance will put an employee's break. This will always be at some time between the start of the first shift and the end of the first shift. Choose from:
-
Yesterday - Meaning that the shift started yesterday and the break is before the midnight just past.
-
Today - Meaning that the break occurs at some time today.
-
Next Day - Meaning that the shift ends tomorrow and the break is after the midnight to come.
Break Length Enter the length of the break in units of time, e.g. 0.30 for 30 minutes.
Minimum Break In some circumstances a company's rules will specify that if an employee clocks a break at lunchtime, then it must be for a minimum amount of time i.e. 30 minutes. If this is the case, select this option. Exo Time and Attendance will then extend employees' actual break times to a minimum of 30 minutes.
Must Work Before Enter the number of hours before the specified Break time that the employee must work in order for the Automatic Break to be deducted. If an employee clocks within the time limit specified here, the automatic break will not be deducted as the actual clocked break will be used.
Must Work After Enter the number of hours after the specified Break time that the employee must work in order for the Automatic Break to be deducted. If an employee clocks within the time limit specified here, the automatic break will not be deducted as the actual clocked break will be used.
Click the Next button to continue.
Step Four: Shift 2 - Start and Finish Times
This screen only appears if the Use Shift 2 in Daily Rules option was selected on the first screen of the wizard. In the situation where an employee works a "split" shift on the same day, a second set of times and rules can be established here.
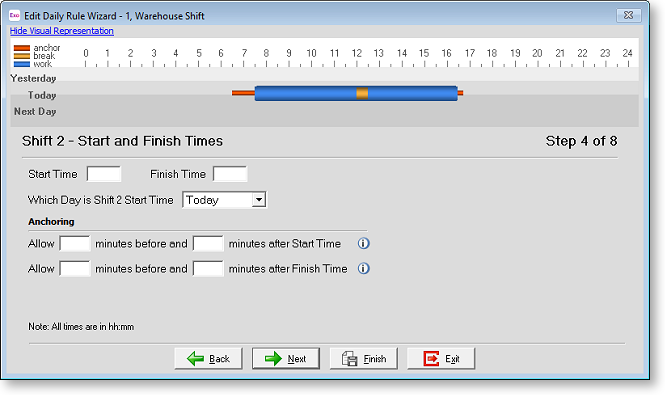
The fields on this screen behave in the same way as those on the Shift 1 - Start and Finish Times screen. Click the Next button to continue.
Step Five: Shift 2 - Automatic Breaks
This screen only appears if the Use Shift 2 in Daily Rules option was selected on the first screen of the wizard.
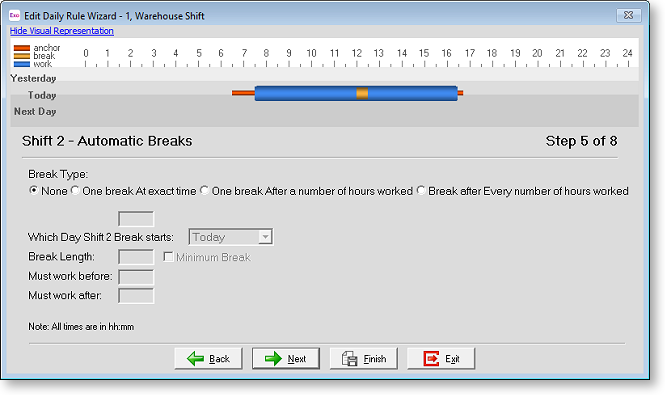
The fields on this screen behave in the same way as those on the Shift 1 - Automatic Breaks screen. Click the Next button to continue.
Step Six: Daily Maximum Hours
Under many contracts, employees have to work a certain number of hours before they move to the next rate, e.g. eight hours of ordinary time per day before they get overtime. A common rule is eight hours ordinary followed by three hours time and half with the balance being double. This would be entered as 8 OR, 3 TH, 99 DBL. Entering 99 means that the balance goes to this rate.
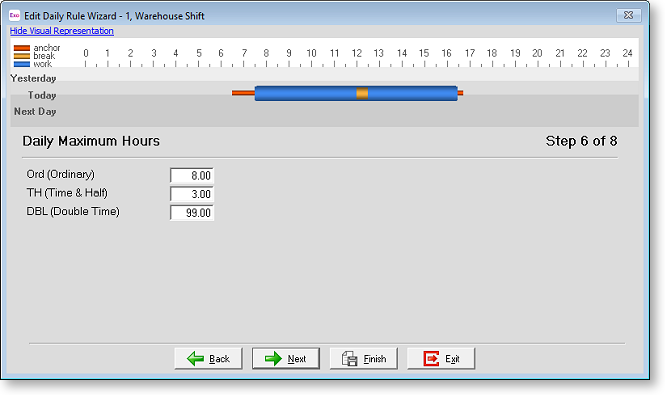
NOTE: If you are also using Weekly Groups to control employees' overtime limits then the Weekly Maximums rule will override the Daily Maximums.
Click the Next button to continue.
Step Seven: Daily Rate Limits by Time
This screen only appears if the Use Daily Rate Limits by Time option was selected on the Other tab of the Exo Time and Attendance Setup window. Exo Time and Attendance has the ability to control what rate an employee will be paid for working at different times of the day. This option is normally used where you wish to specify the rates an employee can be paid in different time bands during a day.
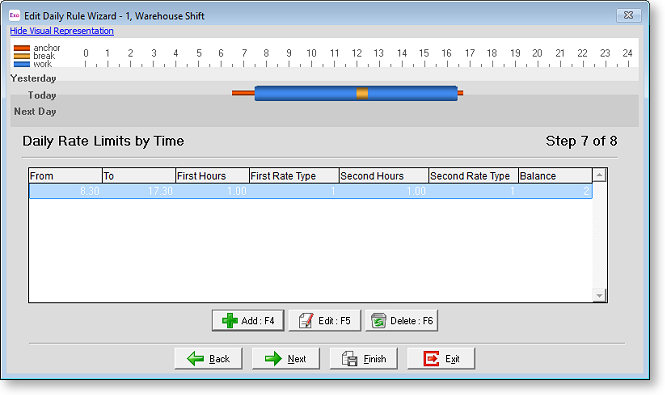
Click on the Add button to set special rules for this day.
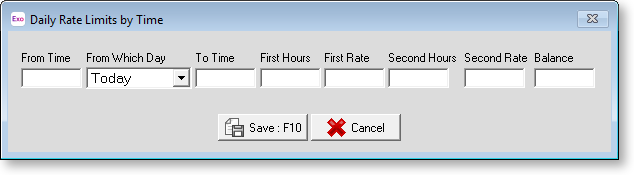
From Time This field is be used to specify the beginning of each block of time.
From Which Day This field determines the day on which Exo Time and Attendance will put an employee's times when clocked. Choose from:
-
Today - Meaning the day the time is clocked is the day in which the time will appear.
-
Yesterday - Meaning the time will appear in the day after it was clocked e.g. 10pm Tuesday till 6am Wednesday will show as Wednesday.
-
Next Day - Meaning the time will appear in the day before it was clocked. The normal setting would be Today. In some circumstances times are moved forward or back subject to the way the business operates.
To Time Enter the end time for this block of time.
First Hours Exo Time and Attendance has the ability to control what rates an employee can be paid for working at certain times of the day. If there are different rates to be paid within this time band, enter how many hours are to be paid in the first range.
First Rate Enter the rate type to be used for this first range.
Second Hours As for the First Hours field.
Second Rate As for the First Rate field.
Balance If all the hours in this time band have not been covered, enter the rate that will be applied to the balance.
Once you have made your changes, click on Save button to return to the Daily Rate Limits by Time screen. Carry on entering the various time bands as required, and then click the Next button to continue.
Step Eight: Scheduling
These options govern how the Daily Rule will be represented visually in the Staff Scheduler.
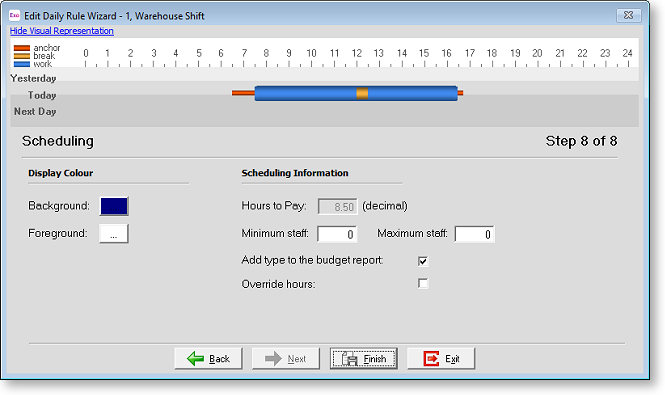
Background This is the Basic colour that fills the inside of the cell. Click the
Foreground This is the Basic colour of the text that describes the Daily Rule, plus the Start and Finish times for each shift. Click the
Hours to Pay This value is used for forecasting purposes, and will be automatically calculated from the Daily Rule's Start and Finish times as follows:
(shift 1 finish time - shift 1 start time - shift 1 break time) + (shift 2 finish time - shift 2 start time - shift 2 break time) = Hours to Pay
In the forecasting reports and screens, the Hours to Pay are in turn multiplied by the employee's hourly rate, in order to arrive at a productive cost for the dollar amount for the day. In the forecasting reports and screens, the employee's hourly rate is derived as follows:
-
For Exo Time and Attendance-only installs, the Productive Cost per Hour on the Employees window is used.
-
For Exo Payroll and Exo Time and Attendance installs, the Hourly Rate on the Standard Pay tab of the Employee Maintenance window is used.
Minimum staff Enter the minimum number of employees who must be scheduled for this leave type on any given day. e.g. for this example at least 8 employees must be on the night shift. If this condition is not met, an alert will appear as a Scheduling Problem, at the top of the list of employees, in the Staff Scheduler screen, for the day in question.
Maximum staff Enter the maximum number of employees who can be scheduled for this leave type on any given day. e.g. for this example no more than 16 employees may be on the night shift. If this condition is not met, an alert will appear as a Scheduling Problem, at the top of the list of employees, in the Staff Scheduler screen, for the day in question.
Add this type to the budget report Enable this option to show the Daily Rule in the Projected Forecast report. Some organisations choose to hide leave/unproductive days from forecasts.
Override Hours Select this option to override Exo Time and Attendance's suggested hours. The forecasted dollar amount does not take into account Overtime that is paid at penal rates. Therefore, you may wish to inflate the hours pay in order to arrive at a more accurate figures.
For example, if the worked hours are 10, but this consists of 8 ordinary hours and 2 time and a half hours, the override hours would be:
(8 x 1.00) + (2 x 1.5) = 8 + 3 = 11 override hours
To complete the Daily Rule Wizard and save your Daily Rule, click the Finish button.