Implementing Employee Self Service
This content is designed for MYOB Partners and consultants. It requires technical knowledge. If you're looking for help submitting leave requests, see Requesting leave.
Before you and your employees can start using the Employee Self Service (ESS) module, there are a few one-off setup tasks you need to complete.
Enabling ESS features
To be able to access ESS screens and set up ESS features, you need to enable the Employee Self Service feature. We also recommend enabling business events.
- Go to the Enable/Disable Features screen (CS10000).
- On the form toolbar, click Modify.
- Select the Employee Self Service checkbox.

- Select the Business Events checkbox.
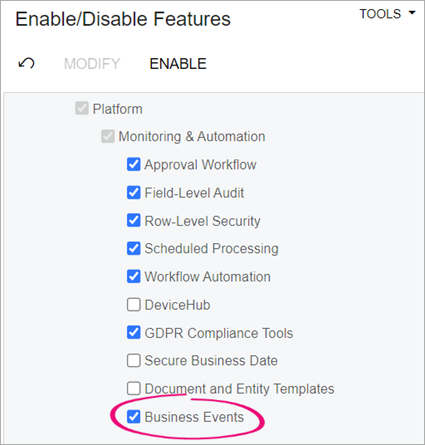
- On the form toolbar, click Enable.
Setting up approvals
MYOB recommends setting up an ESS approval map. Without one, all leave requests are approved automatically as soon as they're submitted.
The simplest way to set up an approval map is to base it on who employees report to. This lets a manager approve leave requests for all employees that report directly to them.
To accommodate more complex approval requirements, you can set up a company tree and base your approval map on it.
Need a refresher on the company tree? In MYOB Advanced, go to the Company Tree screen (EP204061) and click the Open Help icon ( ) in the top right.
- Go to the Assignment and Approval Maps screen (EP205500).
- On the form toolbar, click Add Approval Map.
- In the summary area:
- In the Name field, enter descriptive name, like "Submit a leave request".
- In the Entity Type field, select Submit a Leave Request.
- In the Steps pane, click the Add Rule icon (
 ).
).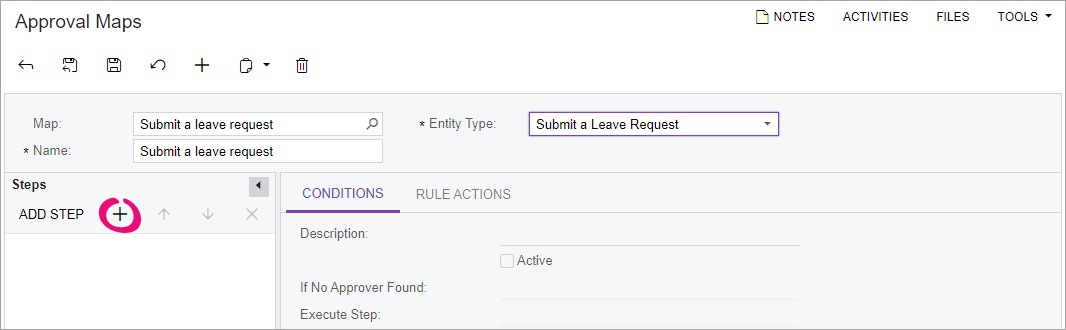
- On the Conditions tab, enter a Description for the rule, like "Reports to".
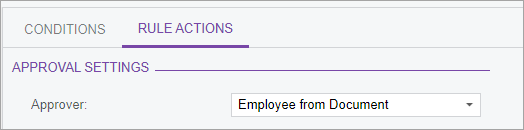
- On the Rule Actions tab:
- In the Approver field, select Employee from Document workgroup.
- In the Employee field, click the plus icon () to open the selection window.
- In the selection window, click the Employee node.

- In the Employee list, scroll down and double-click Reports to. This appears in the field as ((EPEmployee.SupervisorID)).
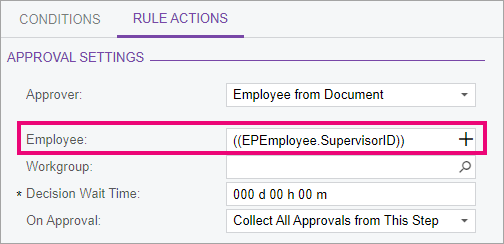
- In the Approver field, select Employee from Document workgroup.
- On the form toolbar, click the Save icon (
 ).
).
In the MYOB Advanced mobile app, approvers can get an error that prevents them from approving or rejecting the leave request: "The document cannot be processed because a comment must be entered to complete the action."
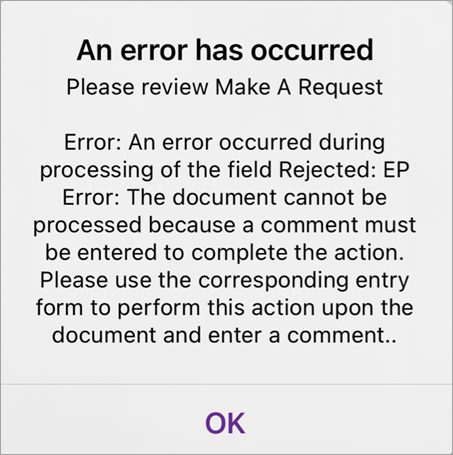
This error is caused by settings on the Rule Actions tab of the the Assignment and Approval Maps screen (EP205500). The Reason Settings section lets you choose if an approver has to enter a comment when approving or rejecting a leave request. However, in the app, there's nowhere for an approver to enter a comment.
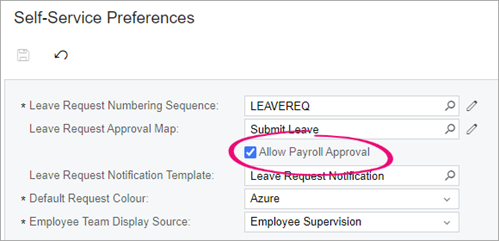
Approval by payroll administrators
You can allow payroll administrators to approve leave without adding them to an approval map. On the Self-Service Preferences screen (MPPP1010), select the Allow Payroll Approval checkbox.
This is only available on MYOB Advanced versions 2023.1.1 or later.
Setting up leave types
For each leave type you want employees to request through ESS, you need to individually set up that leave type.
You can also choose whether employee's can see their current leave balances and projected leave balances (see Checking your leave balances).
- Go to the Pay Items screen (MPPP2210).
- In the Pay Item ID field, select the leave entitlement payment pay item you want to enable in ESS.
- In the Additional Info tab, select the Allow Leave Request Selection checkbox in the Self Service section. This allows employees to submit a leave request of this type in the ESS.
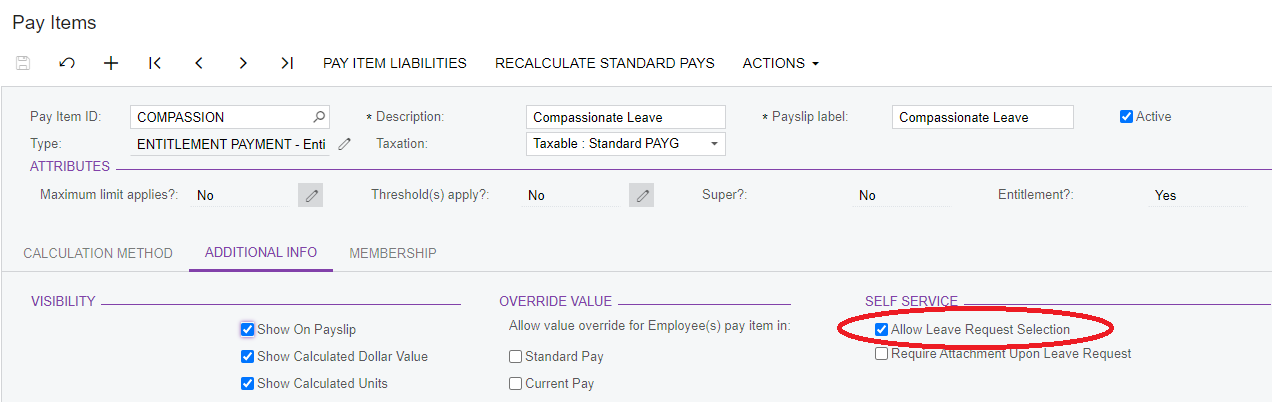
- Optionally, if you want to require employees to attach a document when they request leave, tick the Require Attachment Upon Leave Request checkbox.
- On the form toolbar, click the Save icon ().
- Go to the Entitlements screen (MPPP3300).
- In the Entitlement ID field, select the leave entitlement you want employees to see their balance for.
- Click the Rules tab.
- In the Self Service section, select one or both of the Show Leave Balances or Show Projected Leave Balances checkboxes.

In the Properties section, if the entitlement is non-accruing, select the Non Accruing Entitlement checkbox.
If you select Non Accruing Entitlement, all employees can see their balances for this entitlement. For accruing entitlements, employees can only see their balances if they have a linked accrual pay item in their standard pay.- On the form toolbar, click the Save icon ().
Warning employees about negative leave
You can add a warning message to leave requests that would result in a negative leave balance, or even stop them from being made.
This is only available if you let employees see their leave balances.
- Go to the the Entitlements form (MPPP3300).
- In the Entitlement ID field, select the leave type you want to set up.
- In the Self Service section of the Rules tab, select one of the For negative leave options:
- Show no warning or error – Employees aren't warned when they submit leave requests when that would take them into a negative leave balance.
- Show warning and allow submit – Employees are warned that their request will take them into negative leave, but they can still submit the request.
- Show error and prevent submit – Prevents employees from submitting leave requests that would take them into a negative leave balance.
- If you chose to show a warning or error, select an option in the Validate on field:
- Available Balance – Warnings and errors appear if the employee's current leave balance will be negative.
Projected Available Balance – Warnings and errors appear if a projected leave balance on the date of the leave application will be negative.
If you set an entitlement to show a projected leave balance in Employee Self Service, MYOB Advanced Payroll will automatically recalculate projected balances for new leave requests.
On the form toolbar, click the Save icon (
).
Self-service preferences
Settings on the Self-Service Preferences screen (MPPP1010) affect the Employee Self Service module as a whole. For example, you can choose how leave requests are numbered, whether they need to be approved by a manager, and how they look in employee calendars and team calendars.
On the Onboarding Email Templates tab, you can associate an email template with a user type, so that employees can receive an onboarding email with information specific to their user type. You can assign a user type to an employee on the User tab of the Employees screen (EP203000).
- Go to the Self-Service Preferences screen (MPPP1010).
- Complete the fields in the summary area:
- Leave Request Numbering Sequence – Select how leave requests are numbered.
- Leave Request Approval Map – By default, no approval map is selected. You can set one up on the Assignment and Approval Maps screen.
Leave Request Notification Template – Select the notification template to use when sending notification emails.
A default template is provided. This is used to notify a manager that a leave request has been generated by a team member. You can review this template and make any necessary edits on the Notification Templates screen (SM2040PL). You can also set up automation notifications.- Default Request Colour – The default colour of leave requests on the Team Calendar form (MPES4003). You can choose specific colours for each leave request type on the Request Type Colour tab.
- Employee Team Display Source – Determines how employees will be selected for display on the Team Calendar (MPES4003) screen. Select a setting based on which ESS setup the company is using:
- If you're using the company tree-based setup, select Company Tree. This displays all employees who are below the user viewing the team calendar (below the user on the Company Tree screen (EP204061)).
If you're using the reports-to based setup, select Employee Supervision. This displays all employees who have the same user selected for their Reports to field on the Employees screen (EP203000).
The Reports to field is only used to determine which employees should appear on the Team Calendar—it isn't used anywhere else in the Payroll or Employee Self-Service modules.
- On the Request Type Colour tab:
- Click the Add Row icon ().
- In the new row, select a Leave Request Type that employees will request through ESS.
- Select a Color for that leave request type.
- Repeat steps a–b for each leave request type.
- Click the Add Row icon (
- Optionally, you can allow employees to change their own bank account details by selecting the Allow Employees to Update checkbox on the Settings tab.
- If you want to use onboarding email templates, click the Onboarding Email Templates tab:
- Click the Add Row icon ().
- In the new row, select a User Type that was created on the User Types form (EP202500).
- Select the Email Template you want users with the associated user type to receive.
- Click the Add Row icon (
- On the form toolbar, click the Save icon ().
Automatically notifying employees their leave is approved
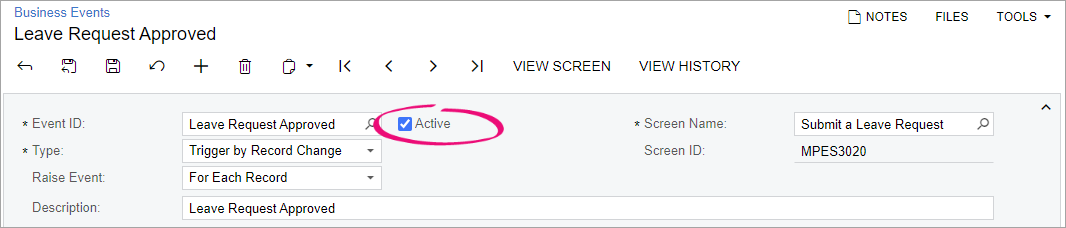
You can notify employees when their requests are approved or declined by using business events. Two notifications are provided on the Business Events screen (SM3020PL): Leave Request Approved and Leave Request Declined. To use these notifications, make sure you've enabled the business events feature, then set the notifications as active.
Go to the the Business Events screen (SM3020PL).
- Open the Leave Request Approved or Leave Request Declined notification.
- In the summary area, select the Active checkbox.
- On the form toolbar, click the Save the current record and close the screen icon (
 ).
). - Repeat steps 2–4 for the other notification.
What's next?
After setting up ESS, you can give users access to start making the most of its features.