Skip table of contents

Advanced Employee Onboarding - Initial Setup

Once you've got your new MYOB Advanced Workforce Management site, there are some setup tasks you'll need to complete before creating onboarding experiences, and ultimately getting the forms out to your new starters.

Even if you're going to use a simple, one-size-fits-all approach to onboarding, you'll still need at least one position, location, and hiring manager before continuing.

Default location Your head office location is automatically created with your new site. Skip this step if you only have a single location or are starting out with a single onboarding experience.

Add extra locations if needed

Locations are one of the criteria for creating tailored onboarding experiences, as your Melbourne-based starters might need quite different information than those in Perth. Your head office is automatically created with your new site, so if you only have a single location, or are starting out with a simpler onboarding experience, you can skip this step!

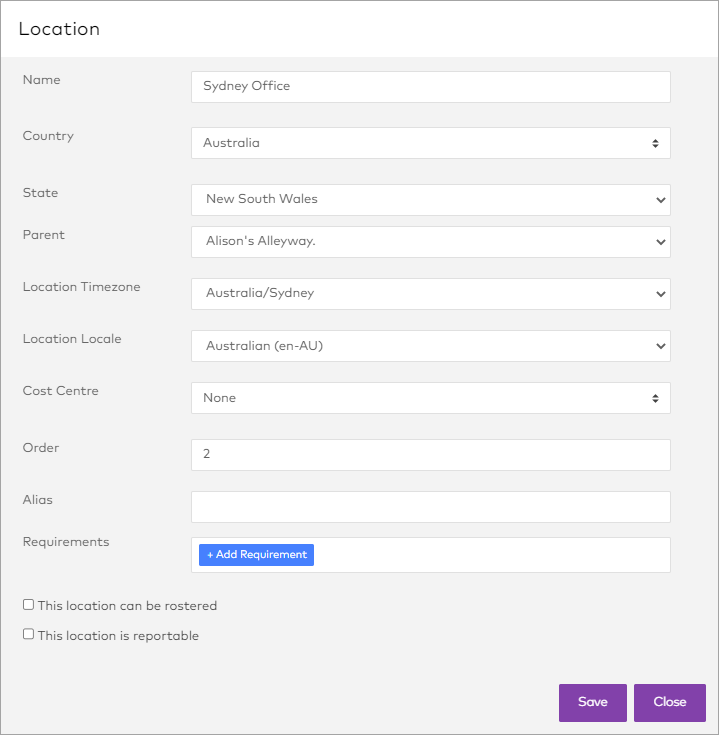
Most fields in this step are required, so you will need to fill them out, but only the Name is currently relevant to MYOB Advanced Employee Onboarding.

  1. Go to Management > Settings > Edit Location.
  2. Click Add ().
    The Location window opens.
  3. Complete all the required fields as appropriate.
    • For Parent, select your head office location.
    • Enter any number for Order. This controls where the locations are positioned on the list.

    You can ignore any fields which aren't required.
  4. Click Save.

All locations you add can be used, along with your head office, to create custom onboarding flows.

Create positions

When you send an invitation to a new hire you need to specify the position you're hiring them for. You can add all the positions you'll need at once, or just add each one as you need it – you need to create at least one to send your first invitation.

Only the Name and Description fields are needed for MYOB Advanced Employee Onboarding – you can skip the rest.

  1. Go to Management > Settings > Edit Positions.
  2. Click Add ().
    The Add Position window opens.
  3. Enter the position's Name and Description.

Once you've added some positions, you're ready to add your hiring managers as users.

Add your hiring managers

Each manager that sends onboarding invitations to new hires needs to be added as a user. Set up at least one position before creating your first hiring manager.

Because hiring managers get notified when an employee submits their onboarding information, you might like to set your payroll administrator as a hiring manager.

Lots of required fields Because only payrolled (standard) employees can send invitations in Advanced Workforce Management, you'll need to fill in a lot of fields that aren't used for MYOB Advanced Employee Onboarding.

We'll let you know which fields are important below.

  1. Go to Management > Employees.
  2. Click Add Employee ().
    The Add New Employee pane opens.
  3. Complete the fields that are used in MYOB Advanced Employee Onboarding.
    • Select Standard Employee for the employee type (not Non-Payrolled Employee)
    • Select Hiring Manager from the Permission Group menu.
    • Enter the manager's correct Personal details and Contact details.
  4. Complete the remaining required fields with placeholder data – They aren't used for MYOB Advanced Employee Onboarding.
    • For fields that require data in a specific format, such as Account number and IRD and TFN number, copy from your existing employee records or use dummy data.
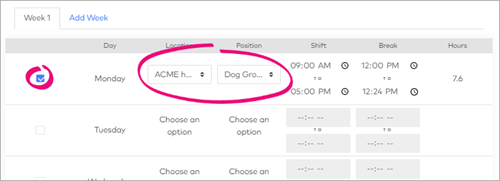
    • In the work week table at the bottom of the panel, select any one day, and choose any Location and Position for that day.
    • To check which fields still need to be completed, click Add Employee.
  5. When you've filled out the form, click Add Employee to create the hiring manager.

Next steps

Once you've completed these setup tasks and have an onboarding flow ready you can start sending invites to new employees.

For more information, see:


JavaScript errors detected

Please note, these errors can depend on your browser setup.

If this problem persists, please contact our support.