This page is about the improved onboarding experience, launched in June 2022.
For information on using the older features, see Legacy onboarding processes.
Flows are the steps a new hire goes through as they complete your company's onboarding process. You can create a single flow for your whole company, or separate flows customised to specific roles and locations. Once you've created flows, you can add and update the steps to make get all the information you need from the new hire, and keep them informed about the process.
Create a new onboarding flow
-
Click the plus sign icon. The New Onboarding Flow panel will open.
-
Enter details of the new flow:
-
Give it a Name and Description to help you identify it.
-
If the flow is only for certain groups of employees, enter the appropriate options in the Location, Position, and Employment Types fields.
-
Check the Assigning flows and Configuration requirements information at the bottom of the panel for technical details on how these options work.
-
-
Click Add to create the flow.
You're now ready to start add steps to your new flow.
Add or edit onboarding flow steps
Each flow starts with some default steps. Some of these are standard for all companies, such as bank details and address, while others (such as Right To Work) are determined by your initial setup. You can't delete the default steps, but you can add new ones to cover requirements specific to your industry, your company, the role, or the location.
-
Click the edit button next to the flow you're working on to open the Onboarding Flow Steps screen.
-
Click the plus icon to add a new step, or the pencil icon to edit an existing one.
-
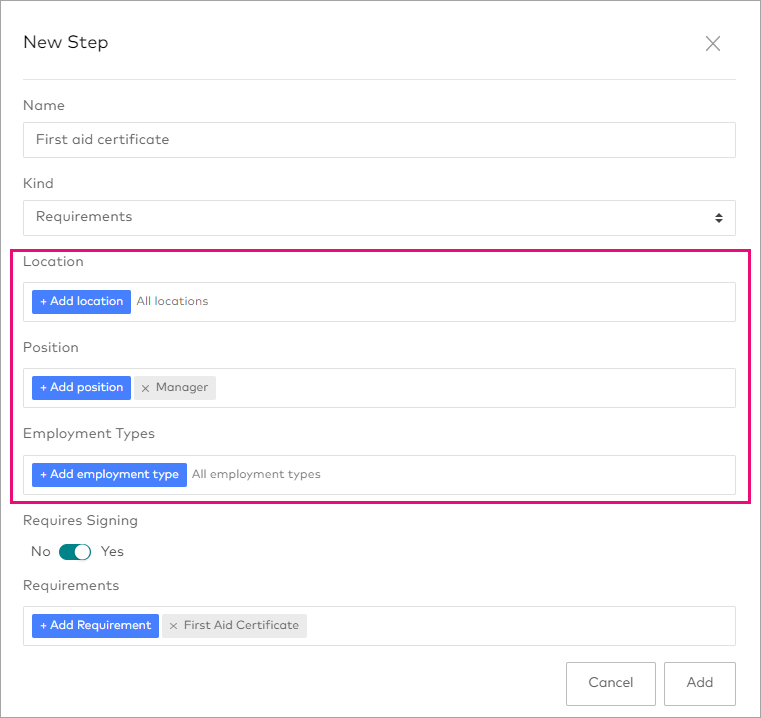
Enter a Name for the step, and select the Kind of step you want:
-
Custom Document: This step lets you upload a custom document to be signed each time you send an onboarding invite.
-
Custom Form: A customised form, for gathering special information for your business. To see how to set this up, see Designing user-defined forms.
-
Document: Provides your new hire with a document file to read, and sign if needed. This document will be the same for each hire.
-
Document Template: A signable document based on a template, with pre-filled fields derived from their emplloyee details.
-
Emergency: Asks your new hire for emergency contact details, with an optional signature.
-
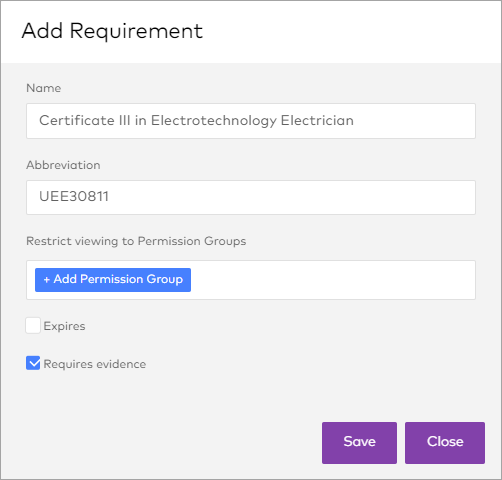
Requirements: Requests your new hire have the necessary qualifications for the role, and to provide evidence if needed.
-
Text: Includes some additional text in the onboarding flow, on top of the default text from your initial setup.
-
-
Enter the settings, files and messages for the kind of step you've chosen:
-
Before adding requirements to a step, create them from Settings > Management > Requirements.
-
Use Markdown syntax to format text and add links to your messages.
-
Employees will be able to view PDF documents in their browser. They'll need to download other file types.
-
-
Choose the Locations, Positions, and Employment Types the step applies to.
-
This step will only show for the selected employee groups, so you can create multiple steps to gather only the information required. For example, you may need a separate requirements steps for each position.
-
If you these fields empty, the step will apply to all employees.
-
-
Click Save Changes to complete the process.
You're now ready to use your new onboarding flow to Employee onboarding!