This document is a guide on how to use the MYOB Greentree Centre of Excellence (GT CoE) Support Portal. It is not mandatory that you log support through the portal, however, there are many benefits in doing so. These benefits include;
-
Access to our large pool of consultants with a wide array of experience;
-
Tracking of anything logged with a full history of comments;
-
No confusion on who should be next actioning the item logged;
-
Ability to look at prior items to self diagnose past issues.
The use of the support portals is convenient but can sometimes remove the personal touch of a call or virtual meeting. Also, many issues can be resolved faster through talking directly with each other. This is why you may be asked by a consultant if they can organise a time to work through your issue via a phone call or MS Teams meeting.
Creating a portal account
You can easily create an account through either the portal or email.
Creating an account through the portal
To create an account from the portal:
-
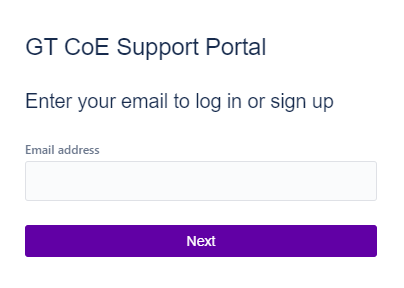
Go to https://myob-gtcoe.atlassian.net/servicedesk/customer/portal/9.
-
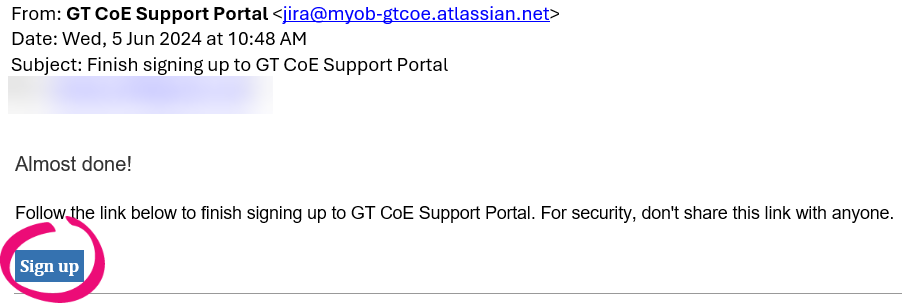
Enter your email address and click “Next”. You’ll receive an email with the subject “Finish signing up to CT CoE Support Portal”.
-
In the email, click “Sign Up”.
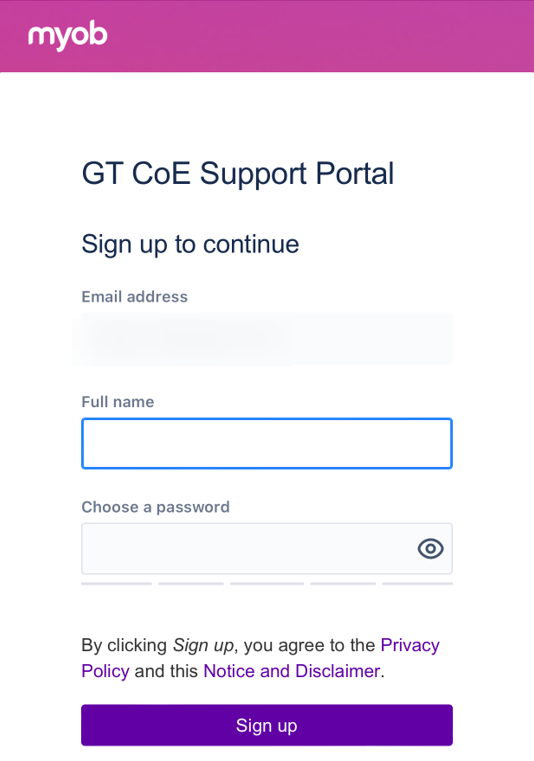
A support portal page opens in your browser.
-
Enter your full name and a password.
-
Click “Sign up” and your account will be activated.
Creating an account through email
The first time you email an item to the GT CoE Support Portal at gtree-support@myob.com you will automatically have an account created for you. You’ll receive an email with the subject “Finish signing up to CT CoE Support Portal”. In the email, click “Sign Up”.
A support portal page opens in your browser. Enter your full name and a password. Click “Sign up” and your account will be activated.
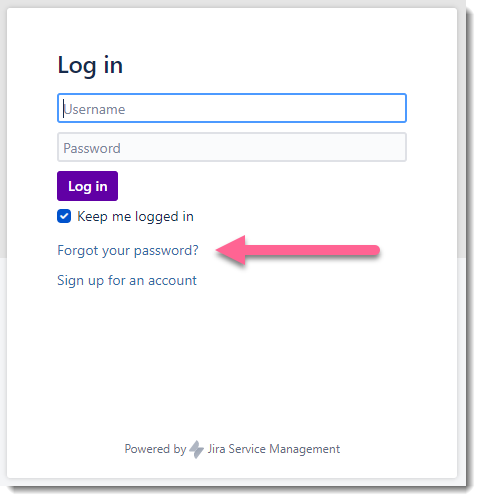
Logging in to the portal
The following web address takes you to the portal log in screen: https://myob-gtcoe.atlassian.net/servicedesk/customer/portal/9 .
Enter your username (this is your email address) and password. Once done, click “Log in” and you will be taken to the MYOB Greentree Customer Support Portal.
Resetting your portal password
If you have forgotten your password and would like to reset it, follow these steps.
-
On the support portal log in screen, click “Forgot your password?”
-
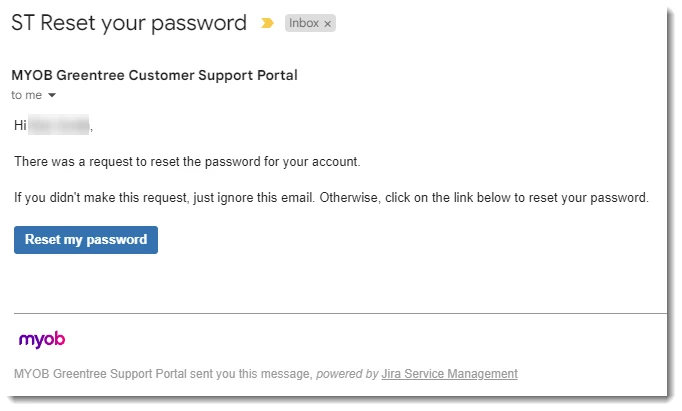
On the Forgot password screen enter your username (this will be your email address), and click “Email me”. Within a few minutes, you will receive an email like the one below.
-
Click “Reset my password” and you will be taken to a page where you can enter and confirm your new password.
Didn’t get the email? Reach out to your consultant. They'll contact the portal administrators to have this done for you.
Logging a ticket
Logging a ticket with the GT CoE can be done in one of two ways.
-
Portal
Logging a ticket via the portal is easy and allows you to choose the type of ticket you would like to create as well as add additional details such as business impact. -
Email
With over 75% of tickets created by email, it is by far the most popular method due to how convenient it is. However while convenient, the type of ticket is defaulted and you do not have the opportunity to set things like the business impact.
Get a resolution more quickly by following our tips when logging a ticket.
Logging a ticket via the portal
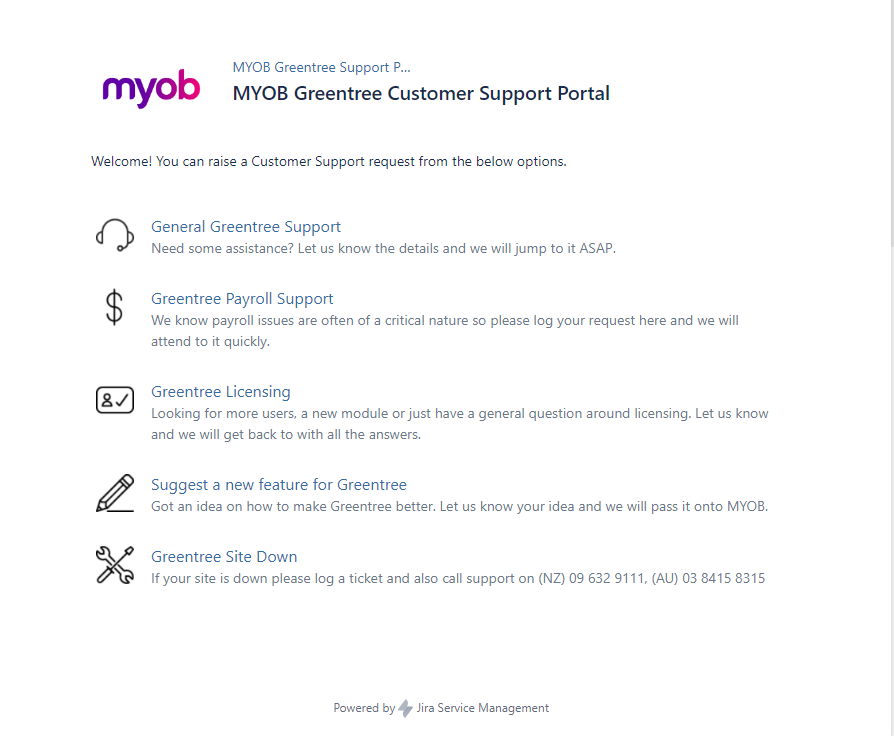
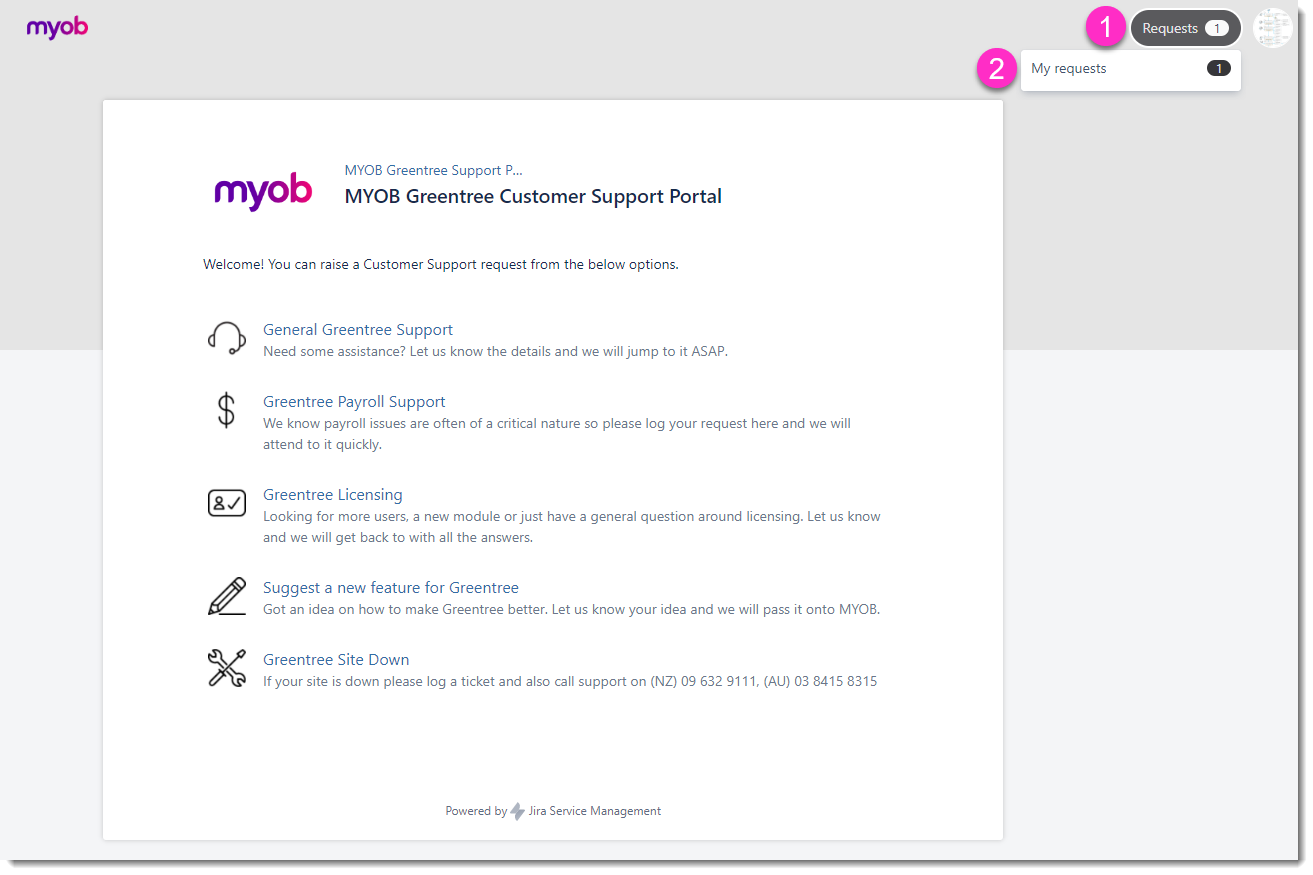
Once you are logged into the portal you can select one of the following ticket types;
-
General Greentree Support
This ticket type covers any support needed where any of the following types do not meet the specific reason you are logging a ticket. -
Greentree Payroll Support
As payroll requires specific knowledge, selecting this ticket type will ensure that your request goes to the right consultant. -
Greentree Licensing
If you need help with anything licence related, such as additional licences use this type. -
Suggest a new feature for Greentree
Have an idea for Greentree? Log this type of ticket and we will have it added to the Greentree Ideas Portal. -
Greentree Site Down
If your site is down you can use this ticket type to let us know. However we also ask that you call your consultant directly or the GT CoE on any of the numbers listed in the overview.
Once you have selected the type of ticket, you will be taken to a screen where you can fill in fields specific to this type.
General Greentree Support
When the ticket type of “General Greentree Support” is selected, the following fields are shown.

-
What can we help you with?
This is a short summary of the overall issue. -
Do you have any additional information?
Use this field to expand on the summary and supply additional information about the request being logged.
If you have any screenshots that may assist they can be added via the “Screenshots or Files” section or you can paste them into this field. -
Business Impact
Use this field to advise of the severity of the impact the request being logged has on your business.
Refer here for details on each impact. -
Business Impact Details
This field allows you to further expand on the impact the request being logged has on your business. -
Screenshots or Files
Add any screenshots or files that may aid us in assisting you with your request can be added here.
Once all fields have been filled out click “Create” and you will be taken to the ticket you have created. An email confirming the creation of the ticket will also be sent to you (Refer to Logging a ticket via Email for an example of this email).
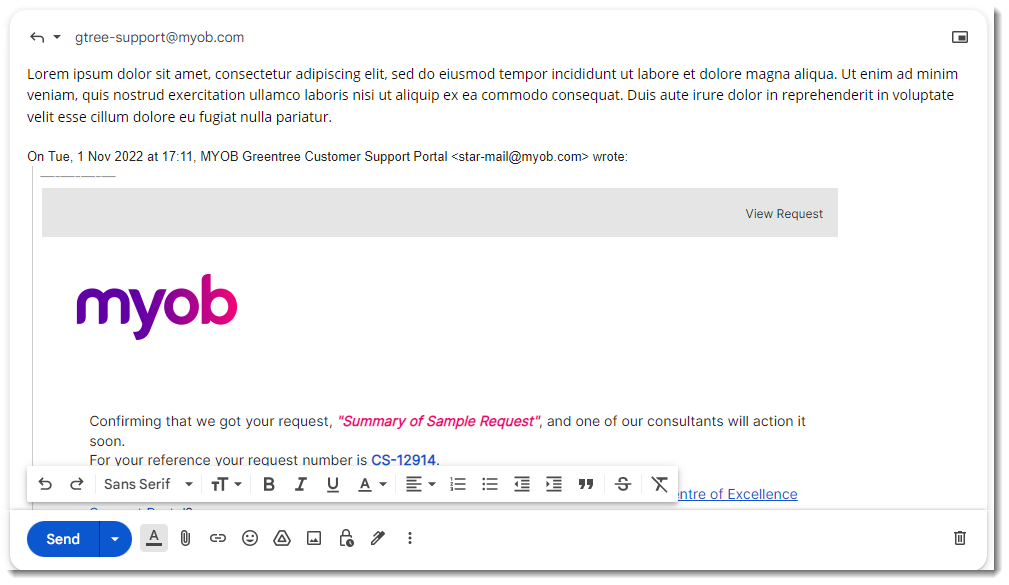
Logging a ticket via email
To log a ticket via email, simply send an email to the GT CoE support email address of gtree-support@myob.com, and the ticket will be automatically created with a type of General Greentree Support.
The Summary of the email will be the name of the ticket (this is the What can we help you with field detailed in the above section of Logging a ticket via the portal).
The body of the email will be the details added to the ticket (this is the Do you have any additional information, field detailed in the above section of Logging a ticket via the portal).
The Business Impact will be set to Normal and any attachments included in the email will be added to the ticket.
Soon after sending the email, you will receive an email confirming the creation of the ticket. Below is an example of this email.
The email will advise the following key details:
-
The summary of the ticket.
-
The reference number of the ticket. This number will always start with CS and clicking on the number will take you to the ticket within the portal.
-
A link to the GT CoE portal.
-
A link to the GT CoE Knowledge Base.

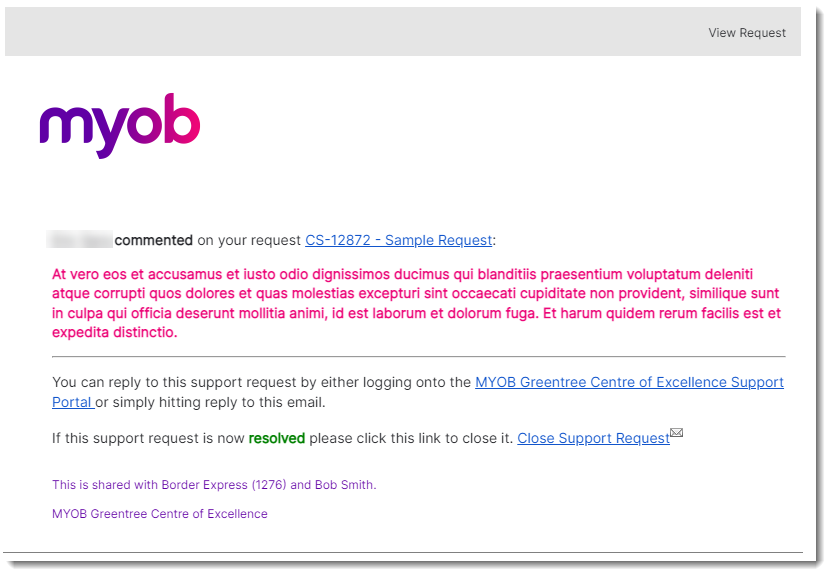
Include others on a ticket
You can include others on a ticket so that they are updated as progress is made or so they can add to the ticket. Adding additional people can be done when creating the ticket or at any time after creation.
Those who you add to the ticket do not need to be from your organisation. This allows you to include any third parties and they too can contribute.
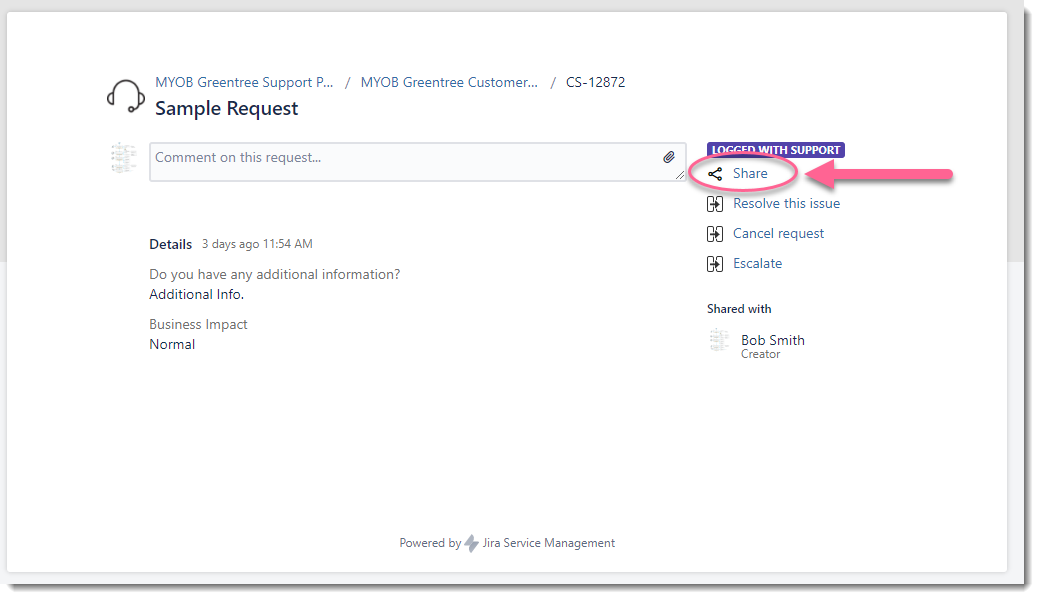
Adding others on a ticket via the portal
From within the portal, you can only add additional people to a ticket once it is created.
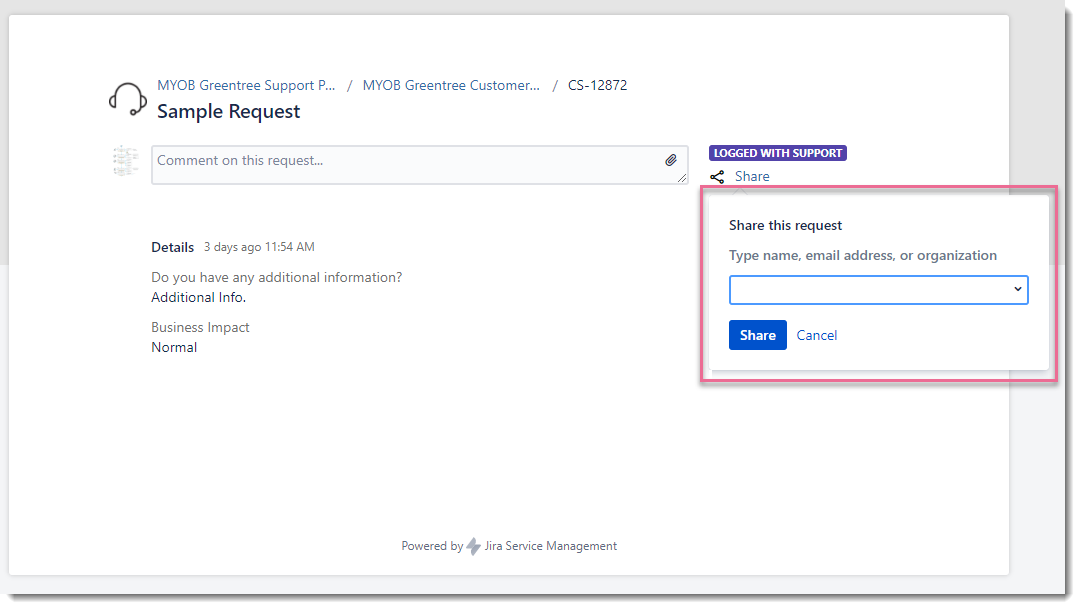
To add additional people, click Share.
Enter the email address of the person you would like to share the ticket with and then click Share.
Finding your ticket on the portal
To find a ticket that is either in progress or resolved:
-
Click on the Request button in the top right of the portal.
-
Click on My request
In the next screen, you can filter and search for tickets.
By default, it will show all open tickets.
Clicking on the Reference number of the ticket will open that ticket allowing you to see its details and action further.
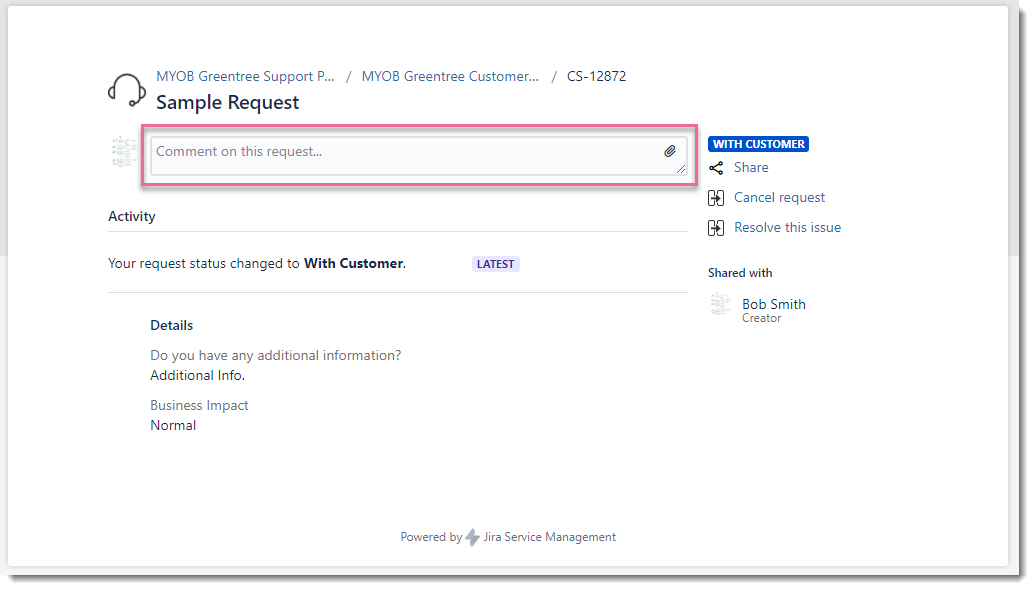
Commenting on a ticket
Commenting via the portal
Once the ticket is loaded to the screen, click in the “Comment on this request…” field.
You can use the tools in the ribbon to change the type of text, and add bullets, links, quotes and more.
Once done click Add.
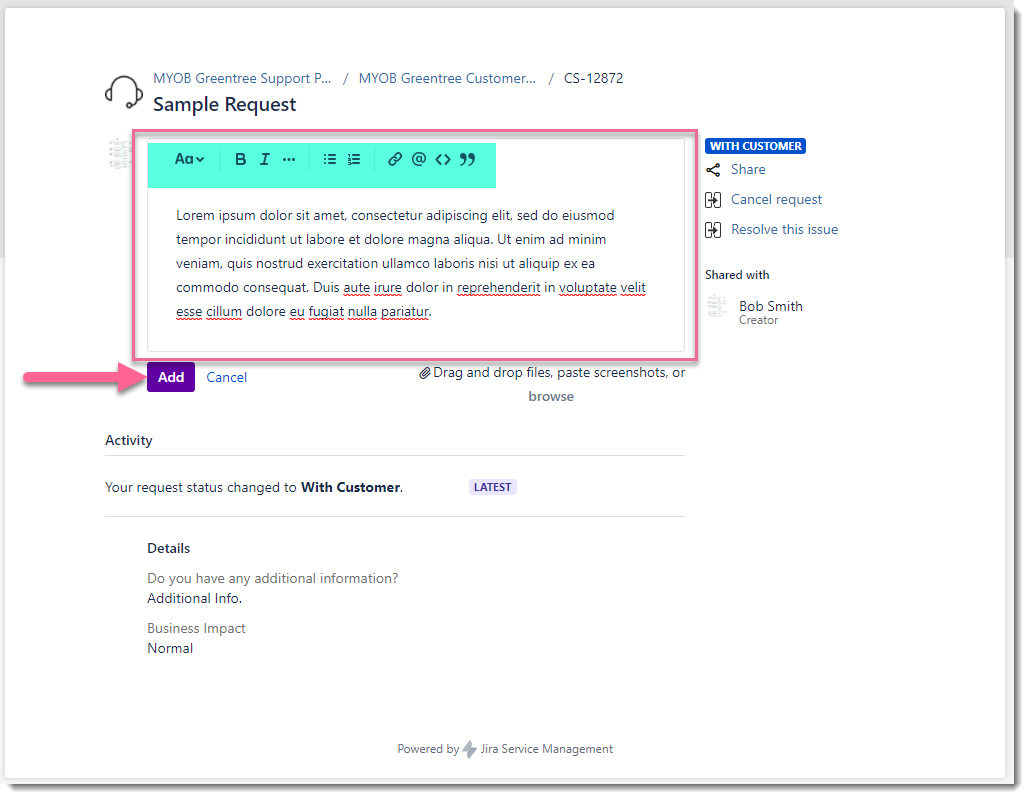
Once you have clicked Add, the ticket will be updated with your comment and an email will go to support advising them that an update has been made.
If the ticket was on a status (refer here for more details on statuses) was anything other than “With Support”, it will be updated to be “With Support”, further notifying support that you have made a comment and action may need to be taken.
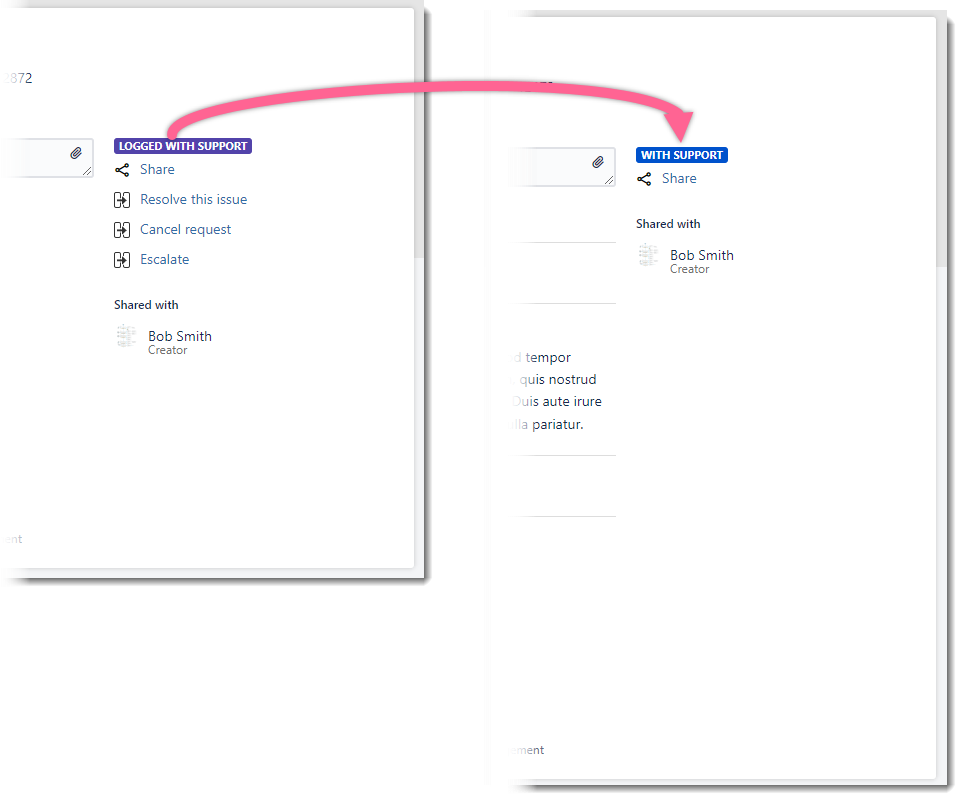
Commenting via email
To add a comment to a ticket via email, simply reply to an email you have received from the support portal about the ticket in question. The body of your email will be added as a comment. Support will be aware of your comment as they will receive an email advising them and the status of the ticket will be updated to be with support.
It can take up to five minutes for support to be notified your comment has been added.
If you do a new email and do not reply to an email from the portal related to the ticket in question, a new ticket will be created and your comment will not be added to the existing ticket.
Comments added by support
Any comments added by support will be added to the ticket. Additionally, you and anyone you are sharing the ticket with will receive an email with the comments.
Attachments
Working with attachments on tickets is easy, however, there are some key principles to understand.
Uploading Attachments to a ticket
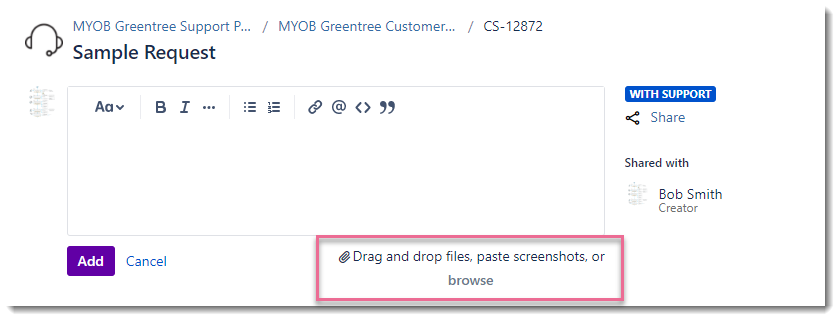
Attachments can be added to a ticket when creating the ticket or adding a comment.
If this is being done on the portal you can drag and drop your attachment to the screen or click on ‘browse’ to search for the attachment.
If you are using email to create or update a ticket, any attachments you add to the email will be automatically added to the ticket.
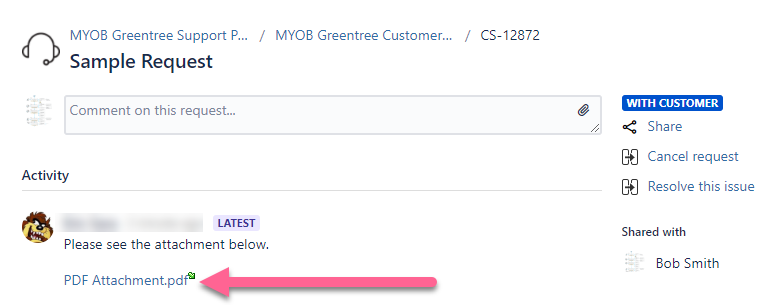
Downloading or receiving attachments
When support adds any attachments to a ticket they will not be attached to the email you receive notifying you of the update to the ticket. Instead, the email will have a hyperlink to the attachment. Clicking on the link will open the attachment.
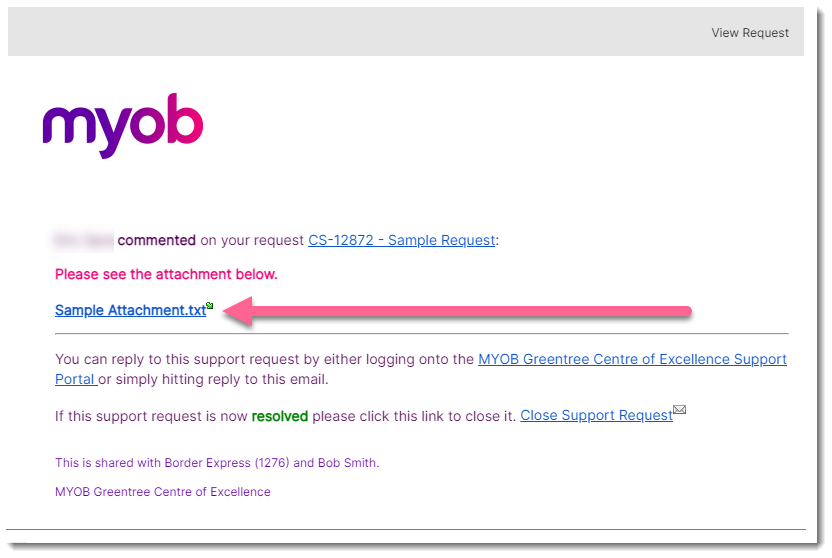
On the portal, the attachment will be in the comment where you can also click on it to open it.
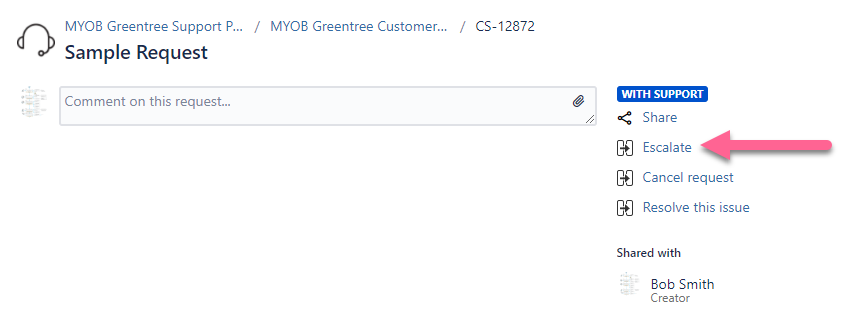
Escalating a ticket
There may be times when you need to escalate a ticket so that more immediate action is taken.
The escalating of a ticket can only be done through the portal.
To escalate a ticket click “Escalate”.
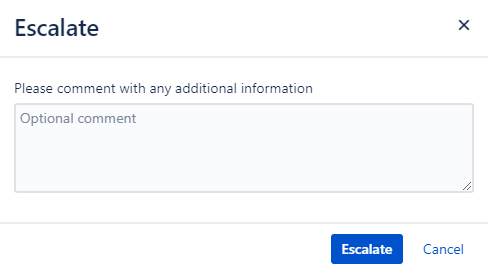
You will be given the opportunity to add details on why you are requesting the escalation. While not mandatory it is appreciated so that the urgency behind the escalation can be best understood.
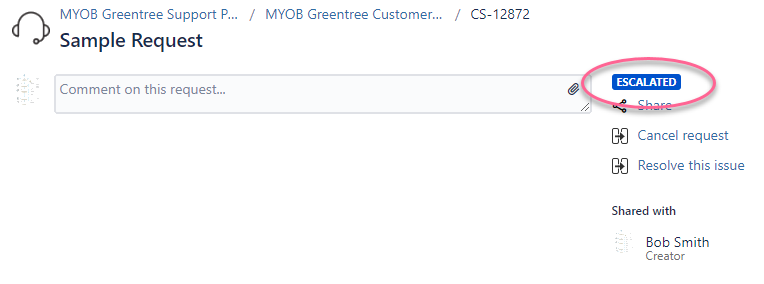
Once you have escalated the ticket the status will be changed to Escalated.
Closing a ticket
There are three ways a ticket can be closed.
Closing a ticket yourself
You can close a ticket yourself in two ways:
-
From within the portal you can close a ticket by clicking on “Resolve this issue”.

-
In any email received from the portal about the ticket, click “Close support request”. This opens a new email that you only need Send and the ticket will be closed.
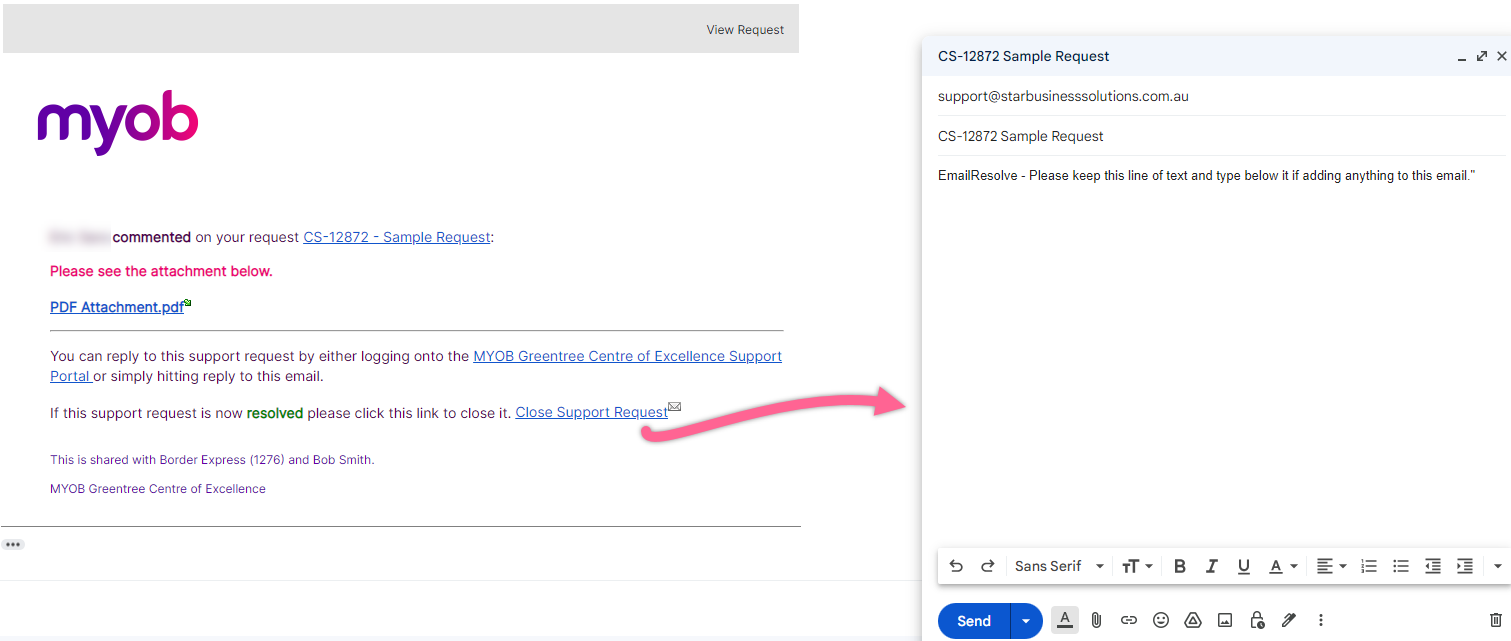
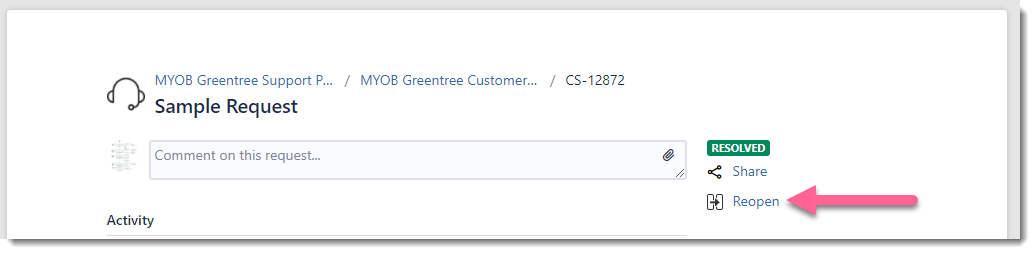
Reopening a ticket
If a ticket has been closed you can reopen it via the portal or email.
To reopen a ticket via the portal click on “Reopen”.
To reopen a ticket via email, simply reply to an email from the portal for the ticket in question and it will automatically be reopened.
Business impact descriptions
Ticket status flow
As a Ticket is processed it will move from one status to another. Typically this will involve three key statuses, With Support, With Customer and Resolved. However, there are others that can also be used. Below is a table of each of the statuses you may see on a ticket and what they mean.
|
Status |
Description |
|---|---|
|
With Support |
When a ticket is on the status of With Support it means that the next to take action on the ticket is a consultant. No matter what status a ticket is on if you make a comment on a ticket it will automatically transition to With Support so that a consultant can address the update made. |
|
Resolved |
The status of Resolved advises that the ticket is closed and the purpose of the ticket was delivered. |
|
Auto Closed |
The status of Auto Closed advises that the ticket had been inactive for a period of three weeks on the status of With Customer at the end of which the ticket was closed.
|
|
With Customer |
When a ticket is on the status of With Customer it means that the next to take action on the ticket is you. When you update the ticket with an action it will automatically transition to With Support. |
|
Duplicate |
The status of Duplicate advises that an already existing ticket was logged for the same item and as such this ticket has been closed. |
|
With Development |
The status of With Development advises that the ticket is currently with the GT CoE development team for further investigation. |
|
Cancelled |
The status of Cancelled advises that the ticket is no longer required to be looked into and has been closed. |
|
Logged with MYOB |
The status of Logged with MYOB advises that we have needed to log the ticket with MYOB Product for deeper investigation. |
|
Reopened |
The status of Reopened advises that the ticket was closed but has now been reopened for further processing. |
|
Logged with ISV |
The status of Logged with ISV (Independent Software Vendor) advises that the ticket is logged with a third party for further investigation. |
|
Escalated |
The status of Escalated advises that you have escalated the ticket and require more immediate action be taken. |
|
Waiting for live |
The status of Waiting for live advises that the resolution of the ticket requires something to be loaded to the live system and that we are waiting for this to happen. The reason for waiting for this to happen could include such things as needing to block out a system down period within your organisation or perhaps there are other tickets that also need to be applied to the live system and doing them all at the same time may be prudent. |
Tips when logging support
Take screenshots
A picture speaks a thousand words. If you have something on screen and take a screenshot of it we often find it helpful to get more than just the item you are referring to. By taking a screen grab of your whole screen, including the time in your taskbar, we are often able to get to a resolution sooner. We do this through things like, seeing what operations where happening in the background or using time to target logs in the system.
Include log Files
If you get an error it may also include the option to export a log file.
Doing this and adding it to the ticket can speed up the resolution process. Without it we either need to ask you to replicate the issue or spend time replicating it ourselves so that we can get a copy of the log.