Roster Setup

Rosters have been designed to minimise the amount of time it takes to set up your Exo Time and Attendance system and also to allow quick changes to employee rosters once your system is operational.
In many cases employees work similar shift patterns each day of the week or regularly work similarly structured weeks. This can also apply to groups of employees. Rather than going through each employee's masterfile and specifying their daily rules, you can set up standard Rosters and then allocate those to an employee.
Rosters can be created for various Time frames including:
- Fixed Period, e.g. Fixed Weekly Roster
- Rotating Cycle, e.g. Rotating Shifts/Daily Rules over a Fortnightly
- Date Range, e.g. Variable Shifts/Daily Rules over a Date Range
It should be noted that once a Roster has been created and allocated to an employee or group of employees it can still be overridden at the employee level on a temporary or permanent basis.
Creating a Roster
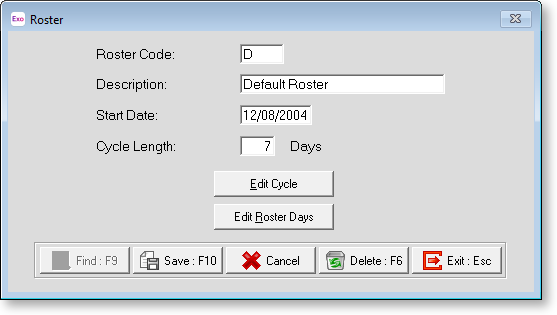
Select Roster Setup from the Roster Setup window to add or edit rosters.

Enter the code to be used for this Roster. You will be asked if you wish to copy another previously created Roster. If you have previously set up a Roster that is similar to the one you are adding, click Yes and choose from the list displayed. You can then edit the Roster to bring it in line with what you want. If this is your first Roster or is not like any others, select No to be presented with a blank screen.
Description Enter a description for this Roster.
Start Date This date is used to specify when this particular Roster will start.
Cycle Length Days The number entered here specifies the length of the Roster Cycle and will depend on what type of roster you want to create. All Rosters operate as a cycle, even if it is a cycle of one day (i.e. the same Daily Rules apply for every day). All Rosters, regardless of length, will carry on indefinitely with the various Daily Rules (set up in the next stage), rotating based on this setting.
If you want to set up a Roster with a different rule for each day of a weekly period, set the Cycle Length to 7.
If you want to create a Roster for a date range that has variable Daily Rules throughout the period, set the length to 1. The Daily Rule Code entered at the next stage will become your default daily rule, and this will then allow you to use the Edit Roster Days button to create a variable Roster for a specific date range.
Edit Cycle
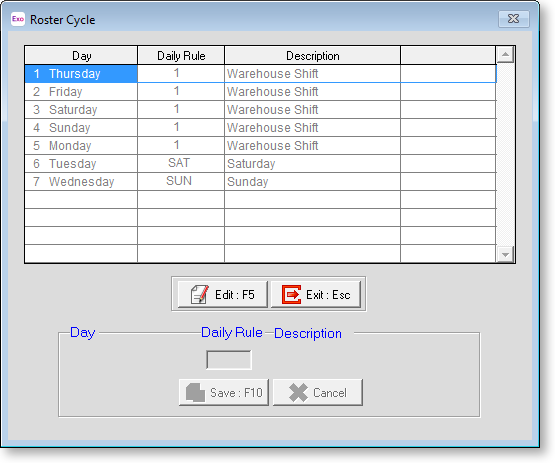
All Rosters operate as a cycle of Daily Rules; click Edit Cycle to set up this cycle.

Depending on the Cycle Length setting, you will be presented with a screen displaying a series of numbers and days down the side. Each of these represents a day in your Roster Cycle. To allocate the appropriate Daily Rule code to each day, select a day and click Edit. You can then edit the Daily Rule for that day. If you don't know the code you wish to use or you enter an invalid code a Popup list will appear and you can choose from the list.
Repeat this process for each day of your Roster cycle. and click Save to save your changes.
Edit Roster Days
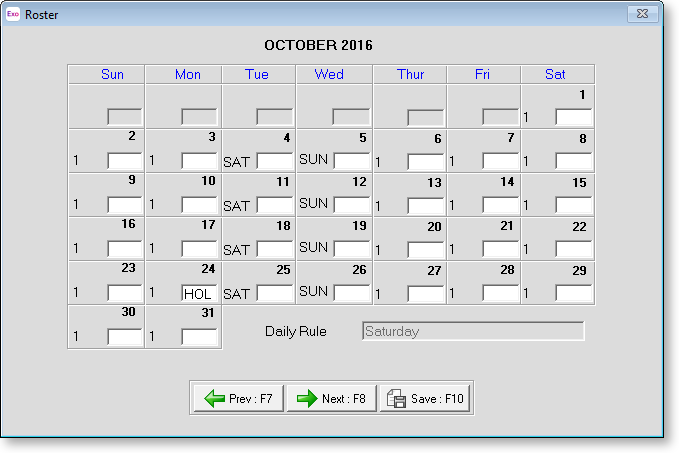
Having set up the Roster Cycle, you can now see how the Roster will look in a calendar format by clicking Edit Roster Days.
A Calendar screen is displayed with a Daily Rule Code allocated against each day and a blank field beneath each code.

If you wish to override the Daily Rule Code for a particular day or series of days, enter the appropriate code in the field for that day. This new Code will be used by Exo Time and Attendance as the default code for that day.
If you are using a Date Range Roster, override each day for the Date Range you wish to set up. If you are using this method you will need to either create a Roster for a long period or remember to regularly update this screen, as eventually the Roster will revert to the default.
Daily Rule This field is a read-only field showing the description for each Daily Rule Code entered in the days above.
Click Prev or Next to move to another month. Click Save when you are done.
