You can set up almost any device as a time clock, using a simple browser-based application.
To set up a time clock, you need to:
-
Create a special system account for the timeclock.
-
Sign in to the clock application on your device.
-
Assign the device to a location.
Once that's done, employees can use their PIN to clock in and out.
These instructions are about our new, more robust timeclock app, released in November 2023. For help with our older browser- and app-based clock, see the legacy information below.
Create a system account for the clock device
Users with Administrator permission can create system accounts.
-
Go to Management > Settings > Manage System Users.
-
Click Create new system user.
-
Select the Location the time clock will be used at.
-
For Permission Group, select Clock Device.
-
Enter a name for the time clock. The name fields are required.
-
Enter email addresses for the time clock.
-
You must use a unique email address for the Email field. Consider setting up a special email address just for the time clock if you don't have another option.
-
Enter a Notification Email if you'd like notifications meant for this user to go to a different address.
-
Select Enable notifications if you'd like email notifications related to this user.
-
-
Click Add User.
Sign in to the time clock and select a location
-
Using your clock device, open the time clock from Management > Settings > Clock Applications > New Clock Device for Browsers.
A sign-in window opens. -
Sign in to the time clock using its dedicated system account.
-
Select a company and a location for the time clock.
Setup is complete. Employees can now clock in by entering their PIN, available on their employee profile.
Update the time clock's settings
To access the settings, enter the PIN number of the signed-in clock user.
To find the pin, go to the Personal Information tab of the clock device user's employee profile to find their PIN.
-
Click Change Location to associate the time clock with a different location.
-
Click Refresh employees to update the timeclock with the latest employee list.
This happens automatically every 5 minutes, but you can speed up the process for new employees. -
Click Log out to close the time clock on this device. You can log back in with the same user on another device.
Updating your time clock settings
To change your settings for location device timeclocks, go to Management > Settings > Company Settings > Clocking.
The settings under the Shared settings and Location device settings headings are relevant to location devices:
-
If you have a single time clock device that applies to all of your locations, select Use employee's primary location in timesheet so that timesheets are generated using the employee's default location, rather than the timeclock location.
-
For information on clocking photos and facial verification, see Facial verification for clock-ins.
-
To set up clocking questions and shift enjoyment ratings, see Setting up and reporting on clock questions.
The Mobile clocking settings are only relevant if your employees clock in using the MYOB Advanced Team app on their phones.
Legacy timeclock
The MYOB Advanced Team Clock app is not available from the Play Store, only by direct download from the MYOB Advanced Team web app.
Installing the MYOB Advanced Team Clock app on Android
From the MYOB Acumatica — Workforce Management web application:
-
Log in to MYOB Acumatica — Workforce Management using the web browser on your mobile device.
-
Go to Management > Settings > Clock Applications.
-
Click Download Clock App for Android.
You are prompted to install the application, which may include security warnings. -
Follow the instructions to complete the installation.
Direct download:
-
Using your Android device, download the MYOB Advanced Team Clock apk install file.
You are prompted to install the application, which may include security warnings. -
Follow the instructions to complete the installation.
Once you have installed the app it will be available to open from your app drawer.
Registering a device as an MYOB Advanced Team Clock
To register a device, you need to open the MYOB Advanced Team Clock app, find its unique Device ID, then register it in MYOB Acumatica — Workforce Management settings.
Changing locations If you have registered your device to the incorrect location, contact your MYOB support person for help deregistering it.
-
Open MYOB Advanced Team Clock via the Android app or your web browser.
-
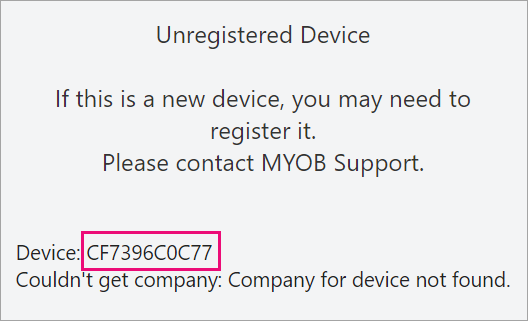
If prompted, click Connect.
An Unregistered Device warning screen displays. -
Make a note of the Device ID. You will use this to register the device.
-
Open MYOB Acumatica — Workforce Management in a web browser. It doesn't need to be on the same device as the MYOB Advanced Team Clock you are registering.
-
Go to Management > Settings > Location Devices.
-
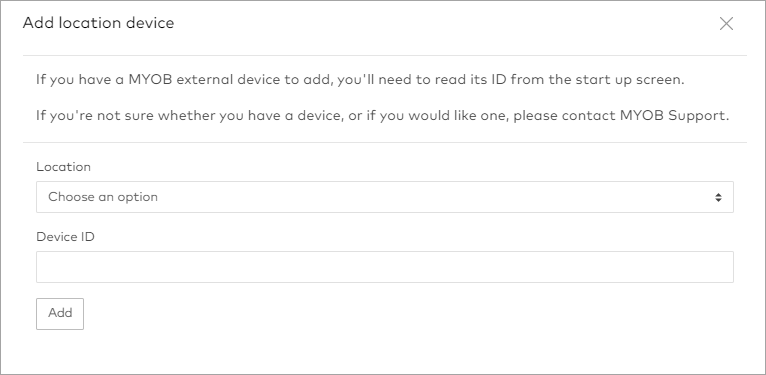
Click Add Device at the top-right.
The Add location device panel opens. -
Select a Location to register the timeclock to, and enter the Device ID from the MYOB Advanced Team Clock app.
-
Click Add to register the device.
Be careful Make sure you select the location the MYOB Advanced Team Clock will be used to clock in and out at.
Once the device is registered, you will be able to see it on the Location Devices screen.