Integrating with MYOB Acumatica — Workforce Management
MYOB Acumatica — Payroll supports integration with MYOB Acumatica — Workforce Management. Once this integration has been set up, data can be shared between payroll and workforce management:
When employees are created in workforce management, matching employee records are automatically created in payroll.
Timesheet data entered in workforce management can be imported into payroll and included in pay runs. For companies in New Zealand, where a record of employees’ work schedules can be kept and used for leave calculations, employees’ standard hours and scheduled hours can also be imported, so that their work schedules are updated automatically.
Integration is supported in MYOB Acumatica 2021.1.2 or later.
Integration is also possible in MYOB Acumatica 2020.8 and 2021.1.1 via a customisation. Contact MYOB Professional Services for setup advice.
Preparing to integrate
Setting up payroll
On the Enable/Disable Features screen (CS100000), enable the "Work Force Management" feature.
Also Enable the “Employee Profiles” feature if it is not already turned on.
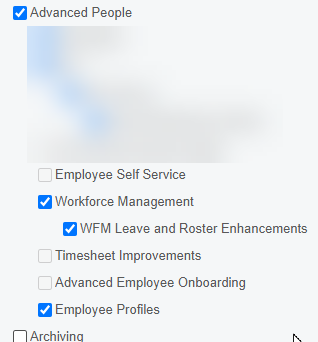
It is recommended to enable Workforce management, WFM Leave and Roster Enhancements and Employee Profiles
The “Work Force Management” feature can’t be enabled if any of the following features are enabled and vice versa.
Employee Self Service
Timesheet Improvements
Advanced Employee Onboarding
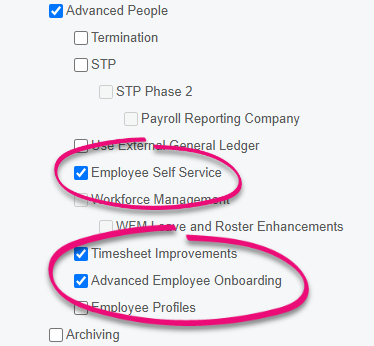
These 3 options MUST be unticked to be able to enable Workforce Management
The Work Force Management Setup screen (MYSM2050) lets an administrator set up the integration details between payroll companies and workforce management. This screen is available to the admin user only and is not available on menus.
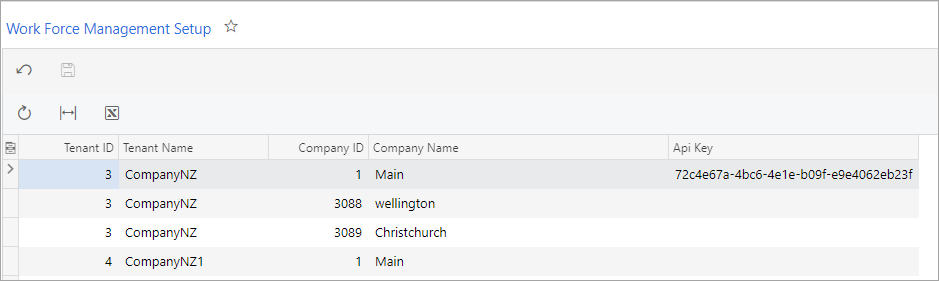
API keys are generated and managed by MYOB and will be set up by the MYOB implementation team.
Recommended options to enable workforce Management.
The Workforce Management Preference screen (MPAT1010) lets you set default values for employees’ details that aren’t brought across by the integration:
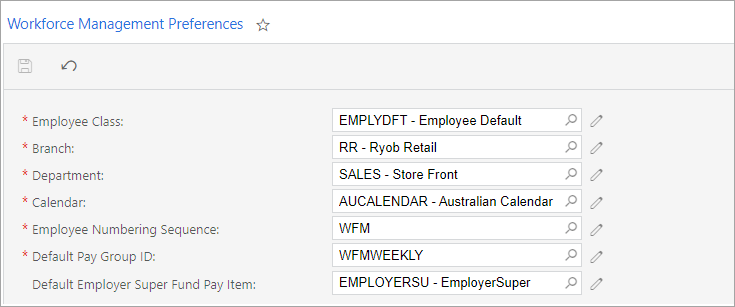
The screenshot above shows the Workforce Management Preferences screen for Australian companies—in New Zealand, some of the fields differ:
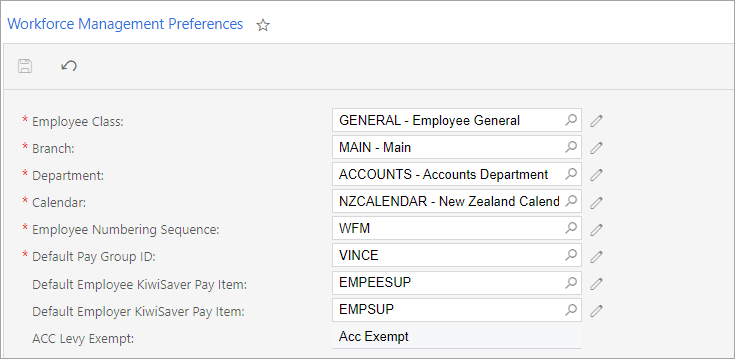
These settings must be configured before syncing employees from workforce management.
The ACC Levy Exempt field is read-only. For it to be populated, you must have set up a 0-rated ACC levy code on the ACC Rates screen (MPPP3011).
Importing employees
If you are integrating workforce management with an existing payroll site, you can export employees from the payroll site via an export scenario and import them into workforce management from the Settings > Importers > Import Employees screen. For information on the import file specification, see Importing employees via Excel/CSV.
Ensure that all employees have their pay details set up before exporting—employees without pay details will not be included in the export file.
In payroll, use the export scenario to generate the Excel file with employee information.
Download the file.
In workforce management, go to Management and choose Settings.
On the Settings screen, click IMPORTERS.
On the Importers screen, click EMPLOYEES. The Employee Importer screen opens.
At the bottom right of the screen, click Next.
Upload your Excel file.
Review the employee information.
Some fields only exist in MYOB Advanced WFM, which means information for those fields can’t be exported from MYOB Advanced Payroll. For details on mapping these fields, see the online Employee Importer mapping page, where the Comments column mentions if a field is only for MYOB Advanced WFM.
Save your changes.
The export file contains visible personal information for the exported employees. It’s important that you’re aware of your obligations for handling sensitive employee information in Australia and New Zealand, and that you have a process for the data transfer that ensures you meet these obligations.
The exporter includes an externalId field. When employees are exported from payroll and imported into workforce management, this field is used to stop the employee being synchronised back to payroll.
Pay items
A Workforce Management section is available on the Pay Items screen (MPPP2210):
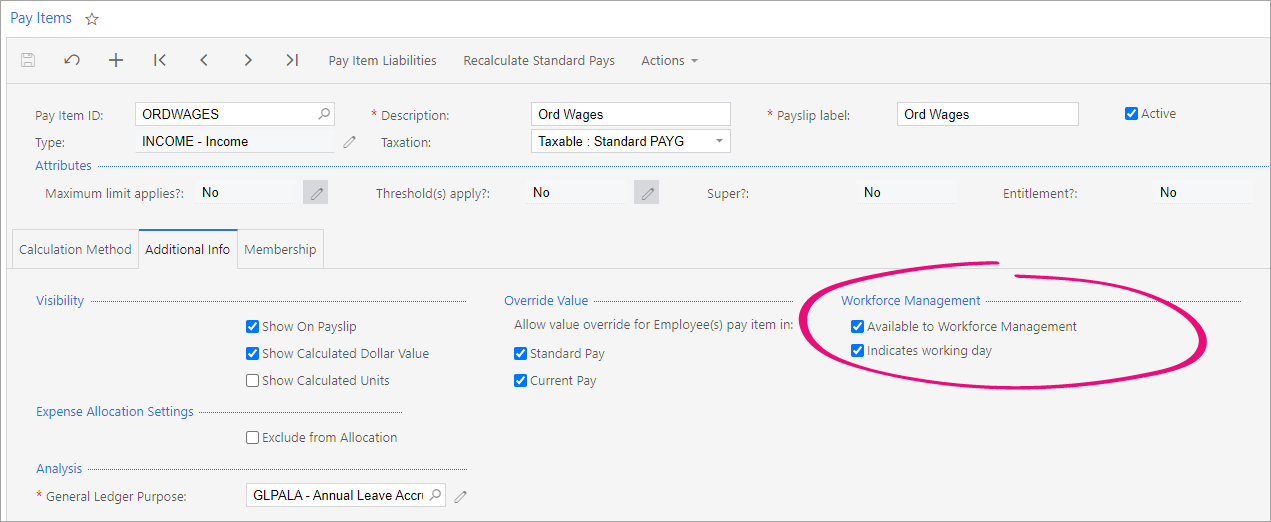
The options in this section affect how the pay item will be used by workforce management:
Available to Workforce Management – ticking this box indicates that the pay item will be available as a pay type in workforce management.
Indicates working day (New Zealand only) – this check box is available for pay items with the “Income” type. Ticking this box indicates that any time associated with this pay item should be treated as a working day.
If you want to use the rate supplied by workforce management for this pay item, select Current Pay under Override Value on the Additional Info tab, and select Use Custom Rate on the Calculation Method tab.
Entitlements
Entitlements in payroll can be made available to leave types in workforce management (see the setting up workforce management section). The existing options available under Self-Service on the Entitlements screen (MPPP3300) also apply to workforce management:
Show Leave Balances – when this check box is ticked, the entitlement will be available for selection in workforce management.
Show Projected Leave Balances – when this check box is ticked, employees will be able to see their projected balance for the entitlement when requesting leave in workforce management.
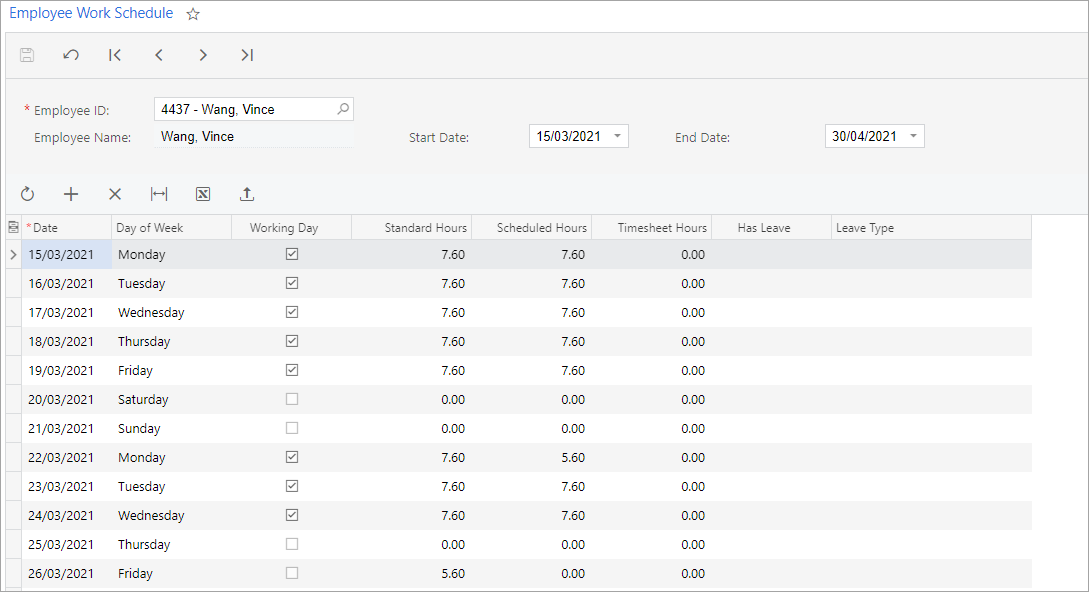
(NZ only) Employee definition of a week
An “Employee Schedule - Standard Hours” option is available in the Definition of a Week dropdown on the Pay Details screen (MPPP2310). When this option is selected for an employee, their definition of a week will be determined by their Standard Hours, which are set up in workforce management. A Standard Hours column is visible on the Employee Work Schedule screen (MPPP2260) to show the Standard Hours for each employee (if there are any):
Employees’ Standard Hours and Scheduled Hours values can be pulled into payroll from workforce management in one of two ways:
When importing timesheet data—see Importing Timesheet Batches.
By using the Employee Work Schedule Import screen (MPPP2261):
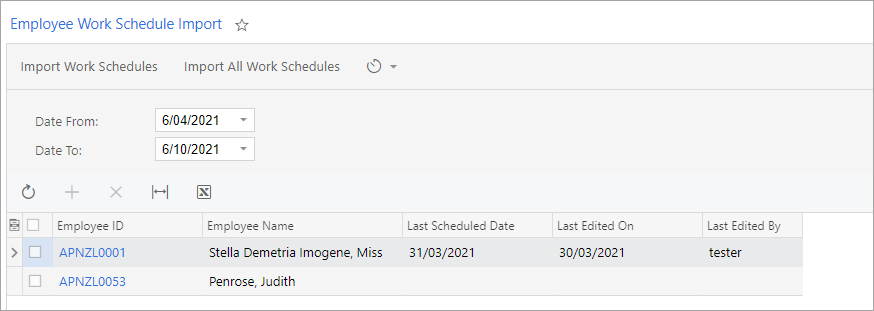
Select one or more employees and click Import Work Schedules (or click Import All Work Schedules) to import Standard Hours and Scheduled Hours from the specified date ranges for the selected employees.
You can use the Schedules button on this screen to set up a schedule so that employees’ work schedules are updated automatically.
Setting up workforce management
To enable data to be imported from workforce management to payroll, records in workforce management must be set up with data that maps them to records in payroll.
Pay types in workforce management are mapped to pay items in payroll. When setting up a pay type, enter the ID of the pay item that it maps to into the External Mapping field:
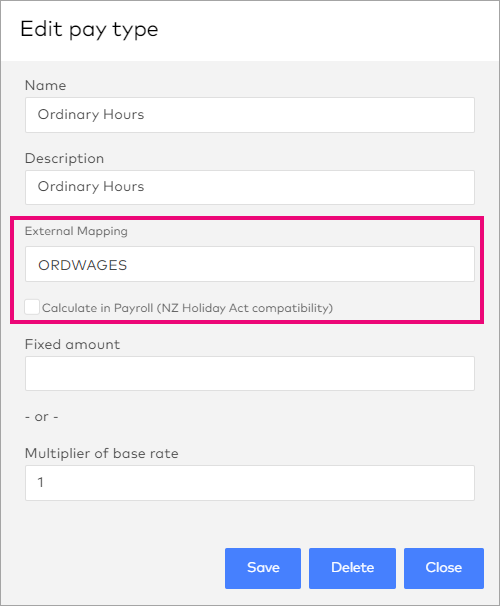
The Calculate in Payroll option determines what rate will be applied to hours with this pay type when they are imported into payroll:
If ticked, any workforce management rate is ignored. The rate associated with the pay item in payroll is always used.
If not ticked, the workforce management rate is used. If there is no workforce management rate, the rate associated with the pay item in payroll is always used.
For New Zealand companies, when mapping leave pay items, the Calculate in Payroll option behaves differently depending on the leave type:
FBAPS leave pay items always work as described above.
Annual leave pay items never use the workforce management rate. So, for annual leave pay items, we recommend ticking Calculate in Payroll.
Leave types in workforce management are mapped to entitlements in payroll. When setting up a leave type, all entitlements that have the Show Leave Balances option ticked will be available for selection in the Service Type field. Select the entitlement that the leave type maps to here:
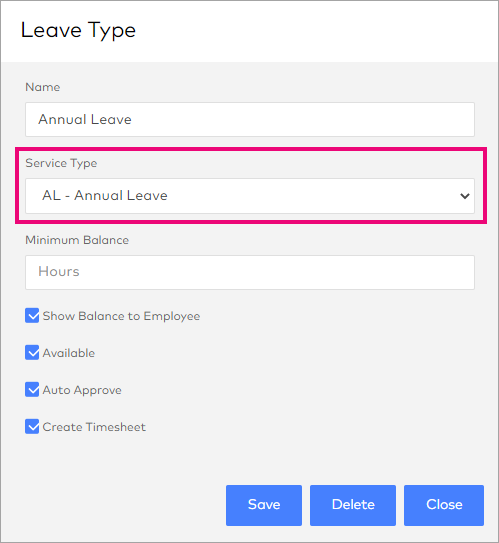
For Australian companies, only entitlements with units in Hours are supported for integration with workforce management at present.
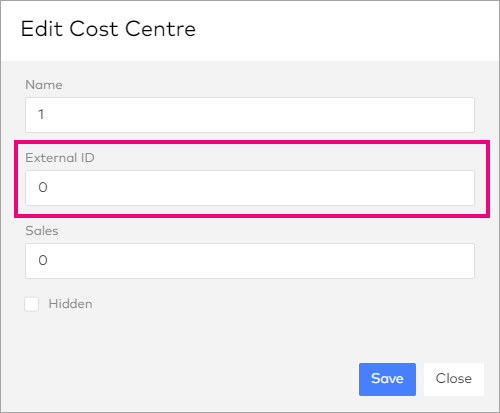
Cost centres in workforce management can be mapped to subaccounts in payroll by setting up a data map on the Data Maps screen (MPPP7020). To make this process easier, you can use the Export CSV button on the Cost Centres screen in workforce management to export a list of cost centres. This list can then be edited to add columns for subaccount mappings and imported into the Data Maps screen.
For more information on data mapping, see importing timesheets.
When setting up a cost centre, you can enter the ID of the subaccount that it maps to into the External ID field:
Integrating with workforce management
Importing timesheet batches
In payroll, use the Timesheet Batches screen (MPPP7060) pull timesheet data from workforce management:
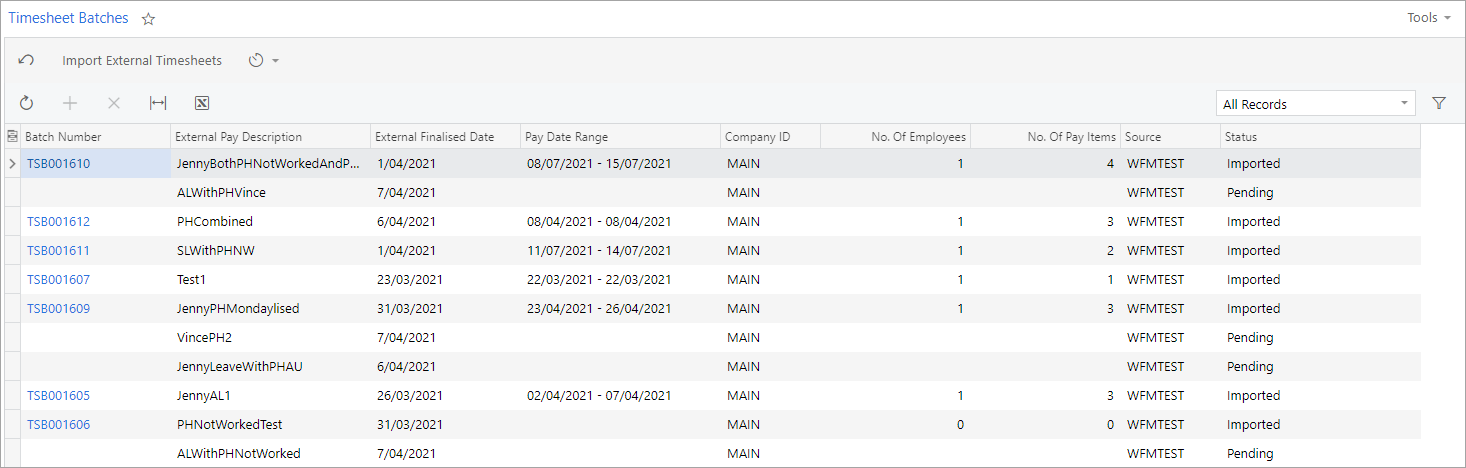
Click Import External Timesheets to pull in timesheets from workforce management. Timesheets are imported from any pay runs in workforce management that are in the “Finalised” status and have not already been imported.
Importing timesheets from workforce management has the following effects:
Timesheet data records appear on this screen, and can be imported into the payroll system in the same way as other timesheet/time card data.
For NZ companies, employee’s schedules are updated on the Employee Work Schedule screen (MPPP2260) based on the imported data:
Data on employees’ shifts is imported into the Scheduled Hours field on their schedules.
The Working Day checkboxes on employees’ schedules are ticked or cleared as appropriate, according to the days they worked.
You can use the Schedules button on this screen to set up a schedule so that timesheets are imported automatically.
Synchronising employee records
Once the integration has been set up, any time an employee is created in workforce management, a matching employee record will be created in payroll. Employees can be created in two ways:
By an employee following the workforce management onboarding process. When the employee clicks Submit at the end of the process, the information they entered is used to create the employee record in payroll.
By a manager clicking the + button on the Management > Employees screen in workforce management. After the manager completes the Add New Employee form and clicks Add Employee, the information they entered is used to create the employee record in payroll.
In payroll, the employee record is created with the following details:
Employees screen (EP203000)
The Personal Info, Contact Info and Address Info sections are populated with information entered by the employee during the onboarding process.
The Employee Settings section is populated with the defaults from the Workforce Management Preferences screen (see page 4).
Pay Details screen (MPPP2310)
Pay items are added to the employee’s Standard Pay
Superannuation/KiwiSaver pay items are added to the employee’s Standard Pay where possible—see Synchronising superannuation.
The Pay Distribution tab is populated with the bank account details entered by the employee during the onboarding process.
In Australia, the Taxation tab is populated with the TFN declaration details entered by the employee during the onboarding process.
In NZ, the Definition of Week tab is populated with the employee’s Standard Hours (if they exist).
The employee is initially set to Inactive—the record can be made Active once a payroll administrator has checked the record to make sure that it has all of the necessary information (see Validating the synchronisation).
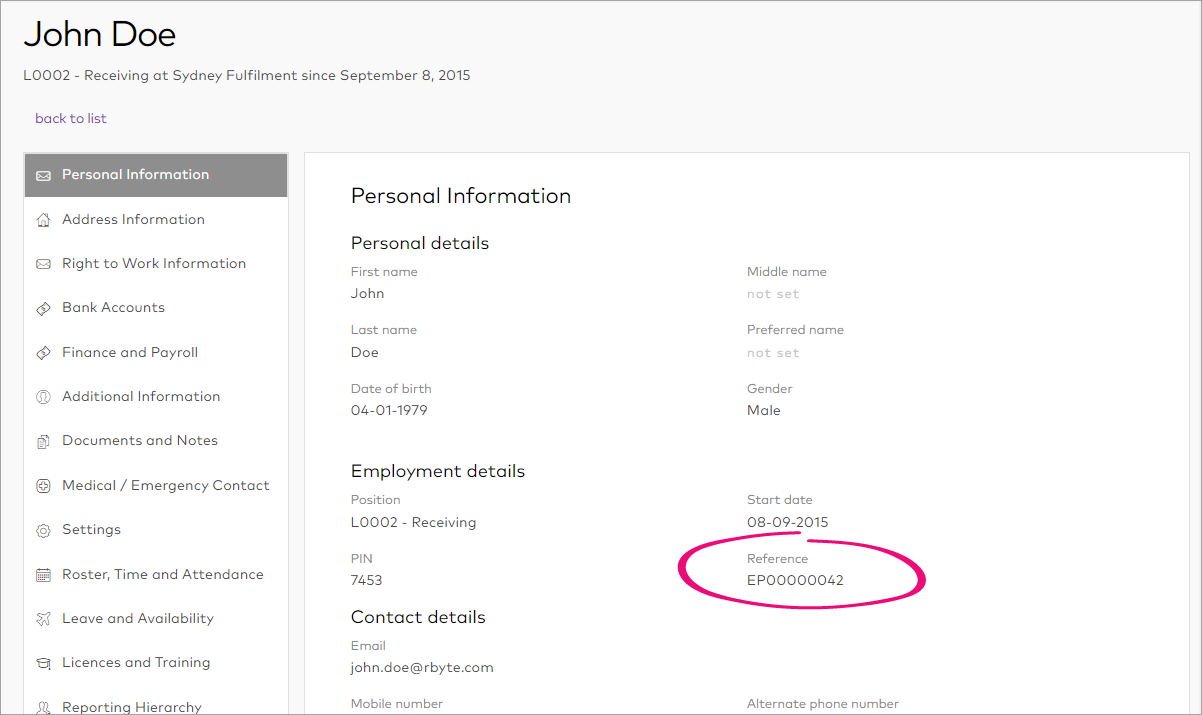
The employee record is assigned an Employee ID by payroll —this ID is displayed in workforce management in the Reference field on the employee’s Personal Information tab:
Synchronising superannuation
When an employee is added from workforce management, superannuation pay items are added to their Standard Pay, as long as pay items that correspond to the employee’s superannuation details exist in payroll. (If corresponding pay items don’t exist, they should be created before syncing employees.)
In Australia, if a pay item exists in payroll for the Super fund that the employee chose during the onboarding process, that super pay item will be added to their Standard Pay.
In New Zealand, if a pay item exists in payroll for the KiwiSaver rate that the employee chose during the onboarding process, that KiwiSaver pay item will be added to their Standard Pay.
In both cases, if there is no pay item in payroll that matches the employee’s superannuation information, an action will be displayed for this on the employee’s Onboarding Actions tab (see Onboarding actions).
Validating the synchronisation
When an employee was added automatically from workforce management, a WFM Status field is available on the Pay Details screen (MPPP2310):
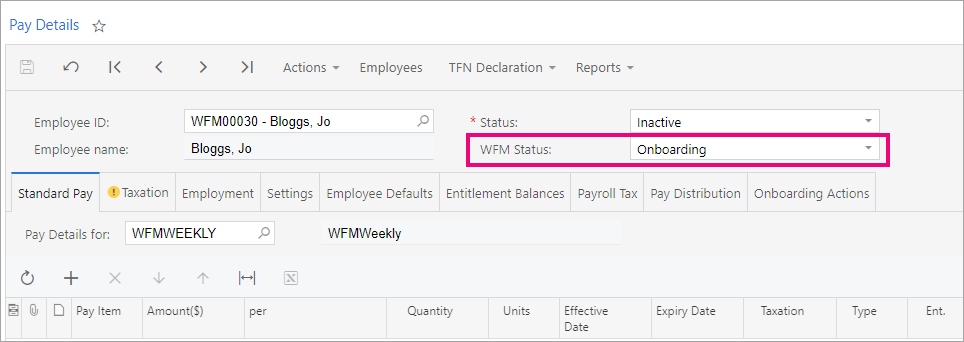
When the employee is first created, this field is set to “Onboarding”. Once a payroll administrator has reviewed the new employee record and taken any actions necessary (see below), they can change the status to “Onboarded”. The employee’s Status cannot be set to “Active” until their WFM Status is “Onboarded”.
Once the employee is Active, you can include them in pays in payroll and import timesheet data for the employee from workforce management into payroll.
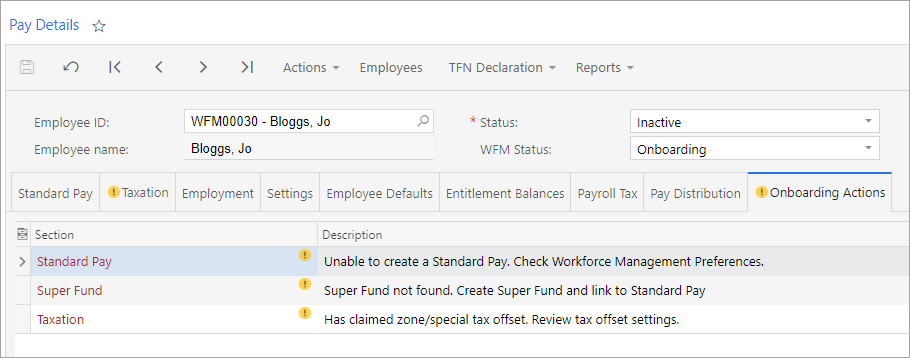
Onboarding actions
An Onboarding Actions tab is available on the Pay Details screen for employees who were added from workforce management. This tab displays any actions that a payroll administrator may need to take before activating the employee record, e.g. reviewing settings or adding missing information.
Employee sync issues report
An Employee Sync Issues report is available in workforce management at Management > Reporting > Employee. This report displays any issues that occurred when workforce management attempted to send employee information to payroll.
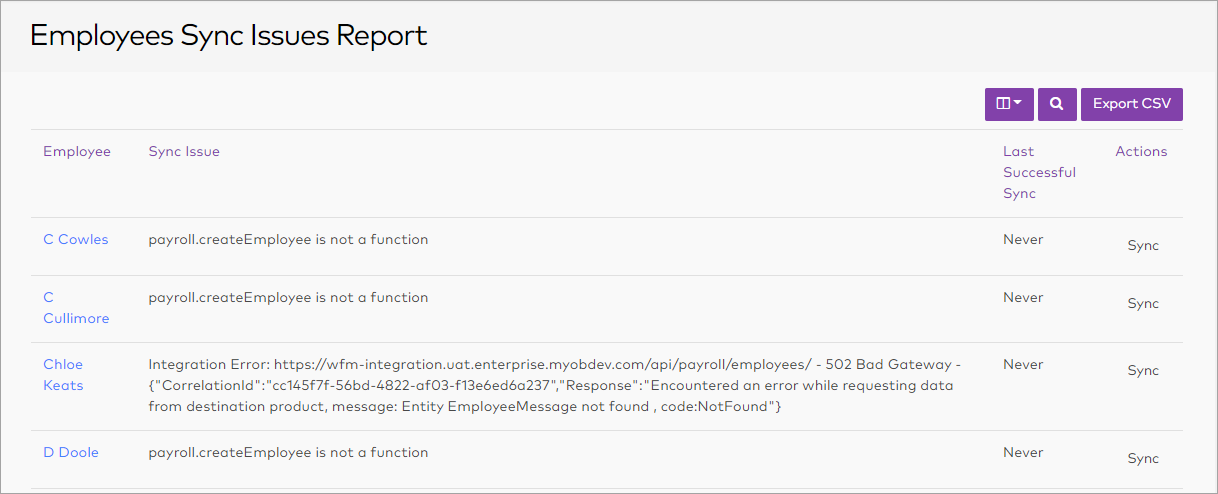
If the sync failed because of a connection or setup issue, click the Sync link in the Actions column to resend the employee information to payroll.
If the sync failed due to errors in the employee’s data, e.g. the employee has the wrong postcode for their country, a manager should update the employee’s record on the Employees screen in workforce management; when they click Update Employee, the system will resync the employee‘s information with payroll.