For each payroll migration, configuring pay history is a one-time setup task. Pay history is a type of dynamic data, and you need to configure it before you can extract dynamic data from your customer's source product.
This page explains how to configure pay history and then upload pay history to your customer's MYOB Acumatica site.
To apply the uploaded pay history to your customer's employees, you also need to do a pay run in your customer's MYOB Acumatica site. Because every migration is different, we can't tell you exactly how to do this pay run, but you can find general pay run instructions on Doing a pay run.
New Zealand pay history
1. Before extracting dynamic data, configure pay history
Before configuring pay history, there are prerequisites you need to set up in MYOB Acumatica. You can find instructions on what to do on Importing pay history - NZ only.
-
Log in to MYOB Adapt Desktop.
-
In the progress table, click the Config progress item.
-
In the Item Data tab, for the Pay History Start Date row, enter a date in the Value column. Make sure the date is at least 52 weeks ago.

-
For the Re-upload Action Entitlement Adjustments row, set the Value column to:
-
R to replace entitlements on re-upload.
-
D to create more batches of entitlement adjustments.
-
-
On the toolbar, go to the Actions menu and click Apply Pay History Settings.
-
On the toolbar, click the Save icon (

).
-
When the customer's site is ready to go live, use Adapt Uploader to extract their dynamic data.
Australia pay history
For Australian companies, uploading pay history is optional. If you're not going to import pay history, you must still configure it.
1. Before extracting dynamic data, configure pay history
If you won't import pay history
-
Log in to Adapt Desktop.
-
In the progress table, click the Config progress item.
-
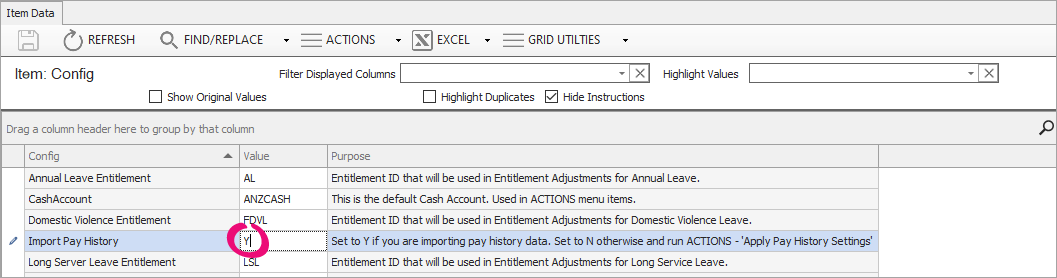
If you won't import pay history, in the Import Pay History row, enter N in the Value column.
-
On the toolbar, go to the Actions menu and click Apply Pay History Settings.
-
When the customer's site is ready to go live, use Adapt Uploader to extract their dynamic data.
If you will import pay history
-
Log in to Adapt Desktop.
-
In the progress table, click the Config progress item.
-
In the Import Pay History row, enter Y in the Value column.
-
In the Pay History Start Date row, enter a date in the Value column.
-
For the Re-upload Action Entitlement Adjustments row, set the Value column to:
-
R to replace entitlements on re-upload.
-
D to create more batches of entitlement adjustments.
-
-
On the toolbar, go to the Actions menu and click Apply Pay History Settings.
-
In the Employees, Employee Banking and Pay Details-Distribution Balance progress items, upload information for both terminated and active employees.
-
When the customer's site is ready to go live, use Adapt Uploader to extract their dynamic data.
Setting terminated employees as inactive
After uploading pay history and doing a pay run to apply it to employees, you can deactivate employees that were terminated during the pay history period.
In Adapt Desktop, go to the Deactivate Terminated Employees progress item and upload the status changes for terminated employees. The Deactivate Terminated Employees progress item also lets you set deactivated employees as active again.