End of year payroll processes 2024 - AU
This page explains the compliance changes related to MYOB Greentree Payroll for the 2024–25 financial year.
For supervisors or payroll administrators who run end of financial year procedures, you'll also find how to prepare for the new financial year in MYOB Greentree Payroll. There are some procedures you should do ahead of time and some you need to do at the end of the payroll year.
Although you need to finalise Single Touch Payroll (STP) before 14 July 2024, you can process pay runs for the new year before submitting your finalisation.
What to do now
You must complete these procedures before finalising your first pay of the new tax year.
Tasks to do once per system
1. Verify your software maintenance is up to date
You need a valid software maintenance to import tax scales for the new year. Go to Menu Help > About to check the current maintenance expiry date. If it is expired or expiring soon, please check with your accounting team if the annual maintenance invoice (from MYOB) is paid. Contact your Greentree consultant if needed.
2. Increase superannuation rate and contribution base
From 1 July 2024,
The SGC rate increases from 11% to 11.5%.
The 2024–25 maximum superannuation contribution base increases to $65,070.
This can be manually maintained in HR Module Control:
Go to menu HR > System > Module Control.
Select the Payroll tab, then click the Super sub-tab.
Add or update the following line.
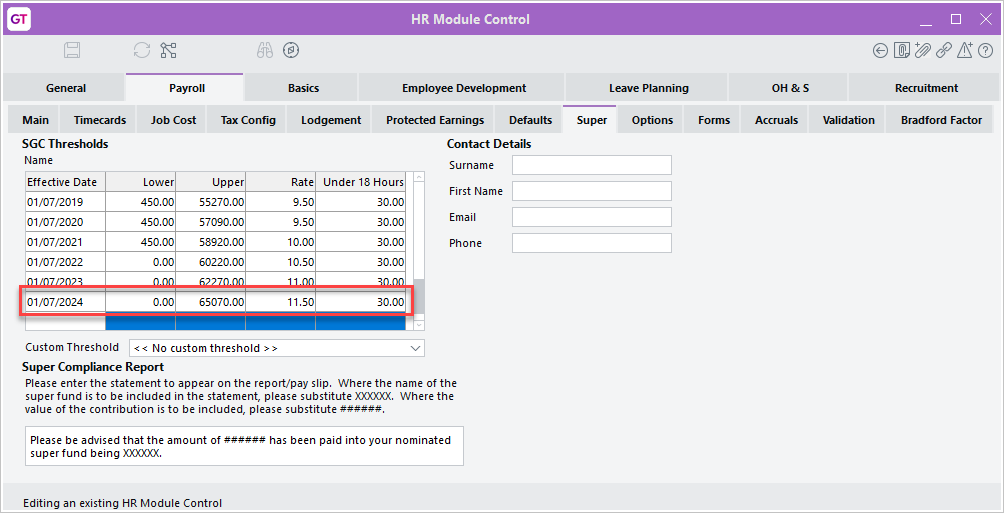
The SGC rate will increase by 0.5% each year until it reaches 12% by 1 July 2025.
Refer to this ATO Link for the latest rates and maximum super contribution base.
Tasks to do once per company
3. Check and update pay group maintenance
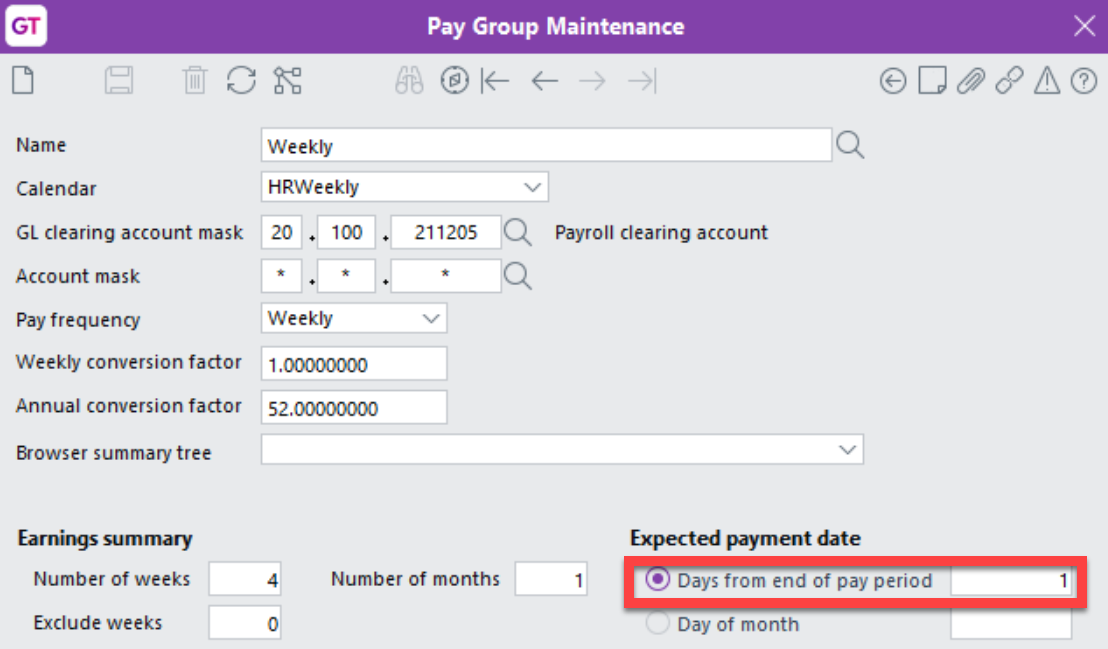
According to ATO, if salary and wages are accrued in the current financial year (prior to 30 June) but paid in the following financial year (on or after 1 July), the full amount of the payment will be taxed at the following financial year's tax rates and included in the following financial year's STP reporting. Please refer to ATO for more information on end of financial year payments to employees. This also applies to superannuation.
Greentree uses the "Days from end of pay period" set in Pay Group Maintenance to calculate the expected payment date for each pay batch and apply the appropriate tax rate and super rate. Go to menu HR > System > Payroll > Pay Group Maintenance, check and update this in each active pay group.
4. Update the default rate in employer super transaction types
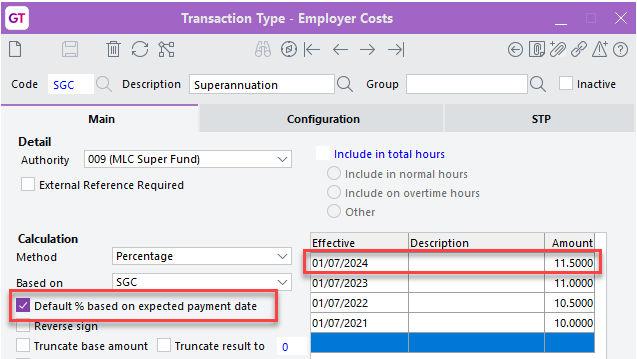
With SGC rate increase, the default rate set on Employer Super transaction type needs to be updated. To do this:
Go to menu HR > System > Payroll > Transaction Type > Employer Costs.
Pick up the super guarantee transaction type.
Select the Default % based on expected payment date option.
Add a new effective date of 1/7/2024 with the rate set to 11.5.
Save the changes.
5. Optionally, update payroll tax rates
Payroll tax transaction types are not mandatory in each system. But if there are payroll tax transaction types already set up in your system and your payroll tax rate is changed from 1/7/2024, you can update the rates by:
Go to menu HR > System > Payroll > Transaction Type > Employer Costs
Select the payroll tax transaction type.
Select the Default % based on expected payment date checkbox.
Add a new effective date of 1/7/2024 with the new rate and annual threshold.
Save the changes.
6. Optionally, update WorkCover rates
WorkCover transaction types are not mandatory in each system. But if there are WorkCover transaction types already set up in your system and your WorkCover rate is changed from 1/7/2024, you can update the rates by:
Go to menu HR > System > Payroll > Transaction Type > Employer Costs
Select the WorkCover transaction type.
Select the Default % based on expected payment date checkbox.
Add a new effective date of 1/7/2024 with the new rate.
Save the changes.
7. Import new tax scales
You can load the updated tax tables at any time before the year-end. The new rates will only be applied to the whole pay with payment date on or after 1/7/2024.
Save the TaxScaleAustralia_2024_07_01.csv file to your workstation.
Go to menu HR > System > Payroll > Transaction Type > Tax, pick up tax code C01, or any existing tax transaction type. Move the screen aside. You will refer to this screen in the next step.
Go to menu HR > System > Payroll > Import/Export > Tax Scales Import. The screen displays as:
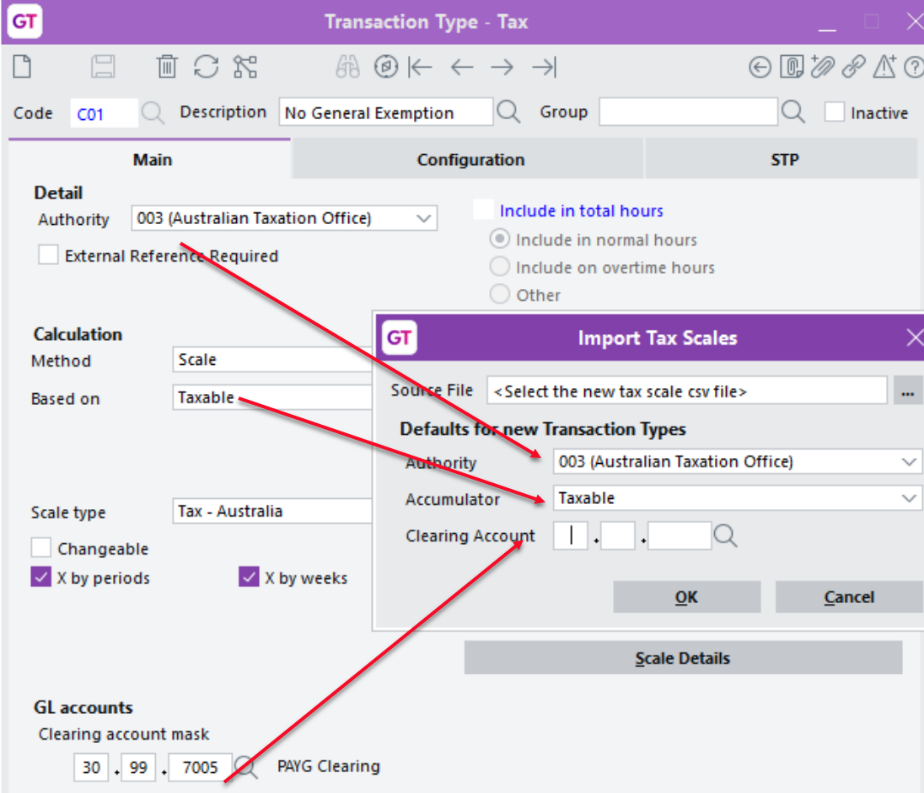
Source File: Select the CSV tax tables file you saved to your workstation.
Authority: Set it to the same code as shown on the existing tax code.
Accumulator: Set it to the same accumulator as shown on the existing tax code.
Clearing Account: Set it to the same clearing account as shown on the existing tax code.
Click OK. This message displays:

Click Yes to update the description on the Transaction Type with the description contained in the file.
After clicking either Yes or No, the message Import of Tax Scales completed successfully displays.
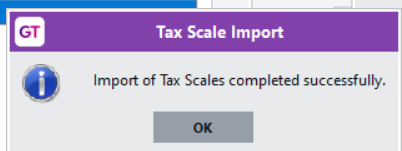
All transaction types are imported. They display with an effective date of 01/07/2024.
8. Add new tax codes to STP configuration
There are new tax codes for senior Medicare levy exemptions. You need to set the STP components for them and add them to the tax accumulator.
Go to HR > System > Payroll > STP Configuration.
On the Tax Types tab, set the component for the new tax codes:
C50 – Senior Single Full Medicare
C51 – Senior Illness Sep Half Medi
C52 – Senior Couple Full Medicare
C53 – Senior Single Half Medicare
C54 – Senior Illness Sep Half Medi
C55 – Senior Couple Half Medicare.
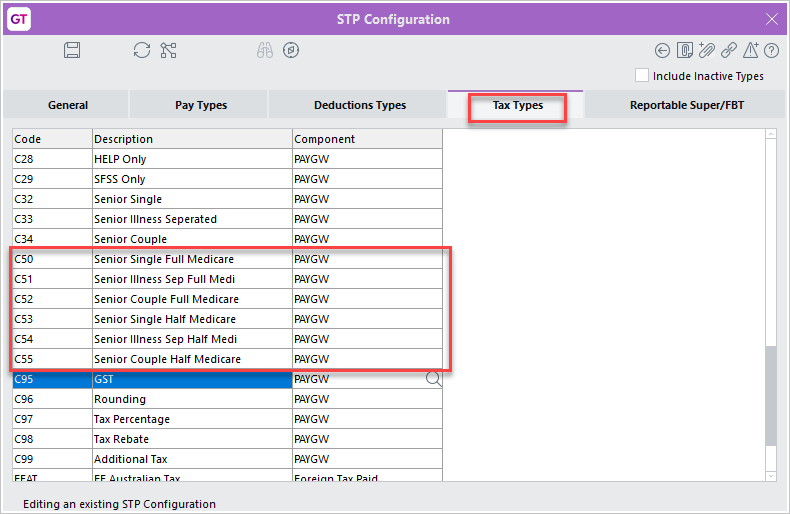
Save your changes.
Go to HR > System > Payroll > Accumulator Maintenance.
Open your tax accumulator.
Select the Include checkbox for the new tax codes.
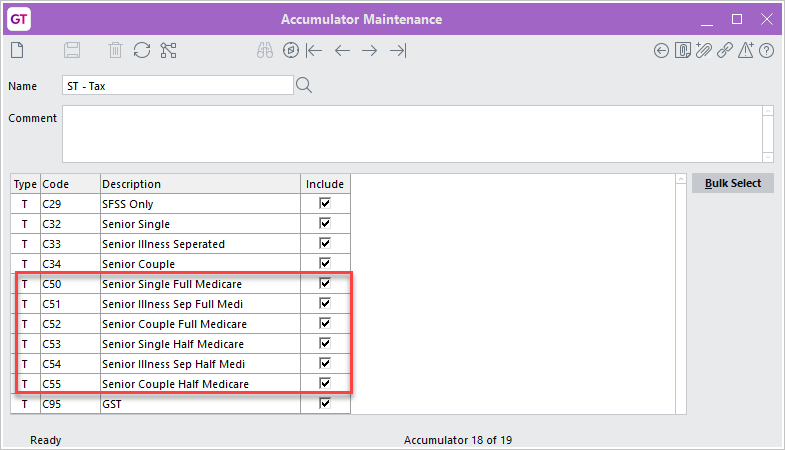
Save your changes.
9. Reviewing other STP configuration settings
STP Configuration sets STP contact info as well as STP categories for each transaction type. Setting can be reviewed before final submission, via menu HR > System > Payroll > STP configuration.
If a category was not configured properly before, correct it now. The next STP lodgments, including the STP finalisation, use the latest settings to report the YTD amounts to the ATO.
If your system has STP with quad accounting enabled, the contact info for STP per entity is set in branch maintenance via menu System > System Setup > Branch Maintenance, STP Contact Info or Payment Summary Contact Info tab. Check and make sure the contact info is up to date.
10. Enter reportable FBT
Some employees may have Reportable Fringe Benefits that must be reported to the ATO. You need to have an employer cost transaction type for reportable FBT and use it to enter an HR journal for each applicable employee via menu HR > Payroll > Other Functions > Enter Journals.
To create/update the reportable FBT transaction type:
Go to menu HR > System > Payroll > Transaction Type > Employer Costs
Pick up the existing code or nominate a new code if needed.
Set Calculation Method to Amount.
Enable Changeable option.
Disable Create GL Journal option.
Set effective date and a default amount of 0.
On the configuration tab, no accumulators are ticked. Disable Print on Pay Slip.
On STP tab, select either Fringe Benefits or Fringe Benefit Exempt category based on your needs.
Save.
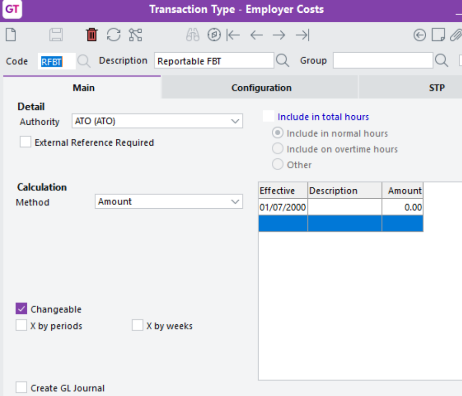
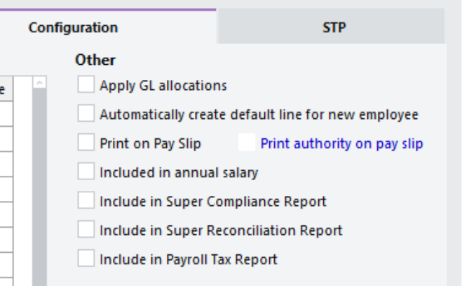
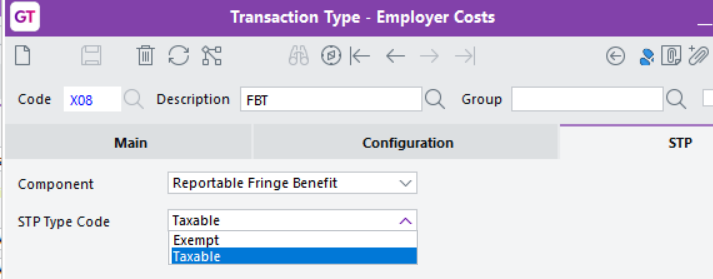
To enter HR journal for reportable FBT amounts:
Go to menu HR > Payroll > Other functions > Enter Journals.
Pick up the employee.
Leave the Pay Number blank, for the system to assign it.
Set the Pay date to the last pay period end date.
Set the payment date to 31/3/2024.
Add the Reportable Fringe Benefit transaction type, enter the amount.
Save.
HR Journals can be entered for inactive employees.
The amount entered will be picked up by the next STP lodgement in the year.
HR journal doesn't post to GL, but it does require an open HR posting period, based on the pay date of the journal.
11. Review employee STP setup
Go to menu HR > System > Utilities > HR System Scripts > STP employees setup, check income type/country code for all employees paid since 01/07/2023.
If any new updates to income type/country code are made, update these to pay history for affected employees via HR > System > Utilities > HR System Scripts > Populate Income Type/Country Code.
For employees terminated in this year, valid termination reasons must be assigned. Please refer to the STP Phase 2 transition documents for more details.
What to do at the end of the payroll year
12. Submit STP finalisation
By July 14 each year, you must send a finalisation declaration for each employee. This updates STP data for all employees you've paid since the 1 July of the previous year, and indicates that you have provided all of their information for the year through STP reporting. From this data, the ATO will pre-fill each employee's taxation information in their myGov accounts.
STP amounts must be reconciled before final submission.
You can follow the procedure below to get a preview of the STP report for each employee before the final submission.
You can compare the preview against the following reports:
the HR transaction type report via menu HR > Payroll > Reports > Transaction Type. OR
the customised HR Analysis Report via menu HR > Payroll > Reports > Analysis Reports.
If you need assistance with this reconciliation, please consult your consultant.
Go to HR > Payroll > Other functions > STP Update Lodgement.
Select the year the final update relates to from the dropdown.
Tick Final for year.
Select All paid employees.
.jpg?inst-v=4a433e9c-ab02-414e-a9bf-539e7bdeb737)
Click Create Lodgement.
To continue, click Yes. If No is clicked, the process will be cancelled. You will be brought back to the previous screen.
Press Preview to get an XML report in Excel with every employee's final figure.
Click Cancel to abort the submission.
Once reconciled the numbers, back to step 1 to follow the above steps again. Skip step 8 and 9.
Tick the box to sign the declaration.
Press submit.
Monitor the submission status until you receive a successful confirmation email.
If for any reason, amendment after finalisation is required, correct the error and submit another Final update for the affected employees. You can select the employees by Pay Group, Branch or Employee. The screenshot below shows various controls you can use to filter the employees.
.jpg?inst-v=4a433e9c-ab02-414e-a9bf-539e7bdeb737)
13. Create new HR and GL calendars
Ensure a calendar year has been set up for the new tax year for the HR calendar and GL calendar. All periods in the new calendar year are closed by default.
Go to System > System Setup > Calendar Maintenance.
Select the calendar used for payroll – for example, HR Monthly.
Click the Edit Calendar Years button, this will bring you to the "Calendar Year" tab.
Click Add new year:
Select After the last year.
Select Other from the Type of year list.
Enter the end date of the last pay period for the new financial year.
Once a calendar year has been used you can not change the year-end date. Please ensure you enter the correct year-end date.
Change the First-period description to be the first period of the new year – for example, July or Week 1.
Click OK.
Save.
14. Maintain the posting period
Before the first pay run of the new year, you need to open the posting periods in HR, GL and JC (if linked with payroll) for the new year.
After the STP reconciliation, you should close the posting periods for the prior year to prevent any changes.
The following steps explain how to maintain HR posting periods. Follow them for each payroll calendar.
Go to HR > System > Payroll > Posting Period Maintenance.
Double-click on the new year (for example, 2024/2025).
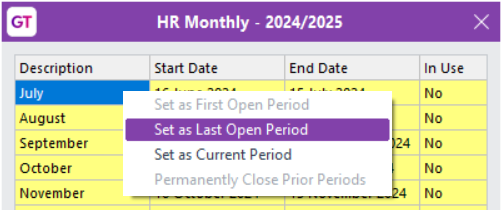
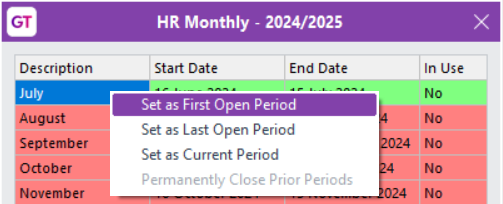
To open the first period of the new year, left-click to select the first period. Right-click on this period to display options and click on Set as Last Open Period. All periods except the first will be shaded red.
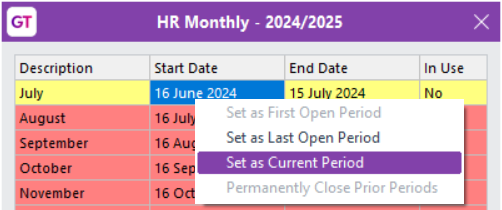
To set the first period as the current period, left-click to select the first period again. Right-click on this period to display options and click on Set as Current Period. This period will be shaded green.
To close prior periods, left-click to select the first period again. Right-click on this period to display options and click on Set as First Open Period.
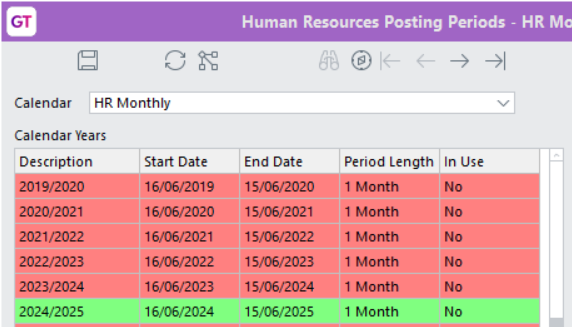
Close the screen to go back to the list of years. All prior years are now shaded in red and the current year is in green.
Save your changes.
If you need to delete the last calendar year where it has been set up incorrectly and no transactions exist in that year, you should run the HR Script Validate HR Periods.
This script removes any 0 value Period Summaries, which will allow you to delete the incorrect calendar year backward.
