Skip table of contents

2024.1 release notes

The MYOB Greentree 2024.1 release improves emailing, the query designer, job purchase orders and account group maintenance, as well as making some options more inclusive and gender-neutral.

To improve security, Greentree now uses more modern Microsoft Excel file formats. The eModules password settings are also more strict.

We've also addressed a range of issues identified in previous versions.

New features

Ensuring email addresses are correct

To make emailing a smoother experience with fewer errors, we’ve improved how Greentree validates that email addresses are correct. This applies to all fields where users enter an email, including invoice recipients, email pay slips, etc., as well as on the Add to Email Queue form.

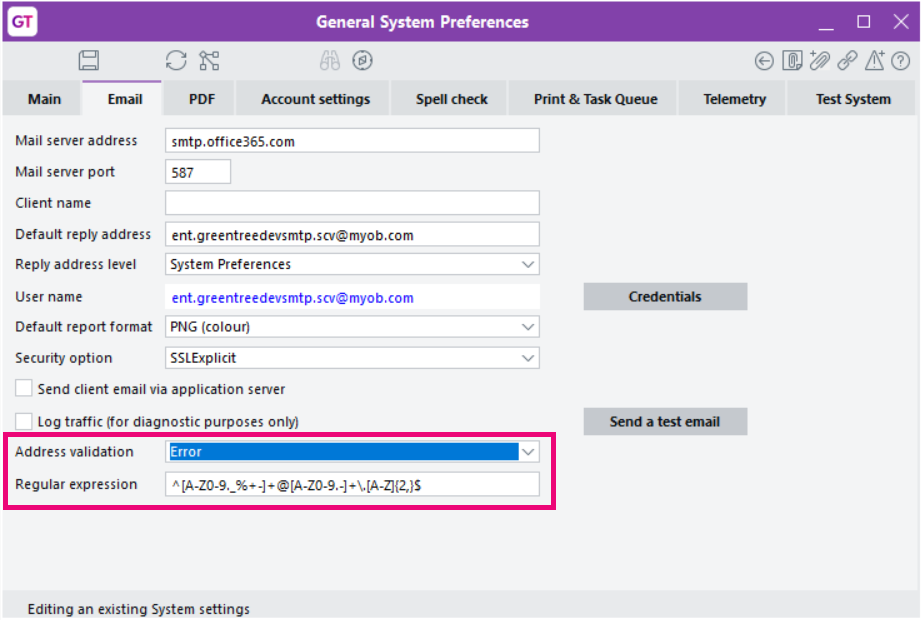
You can enable this improved validation on the Email tab of the General System Preferences form. The new Address validation field has three options:

  • None – Greentree won’t validate email addresses. This option means users can enter anything into email address fields, just like in versions before 2024.1.

  • Warning – If users enter an email address with the incorrect format, they get a warning but can still save the record.

  • Error – If users enter an email address with the incorrect format, they can’t save the record.

If you choose Warning or Error, you can define the correct format by using the new Regular expression field.

Ensuring email addresses are correct.png

Query Designer improvements

These improvements make the query designer better for everything from monthly reporting to data analysis.

Custom elements for data views

Custom elements give you more insight into your data, saving you the time and effort you’d previously spend working on data in other software like Microsoft Excel.

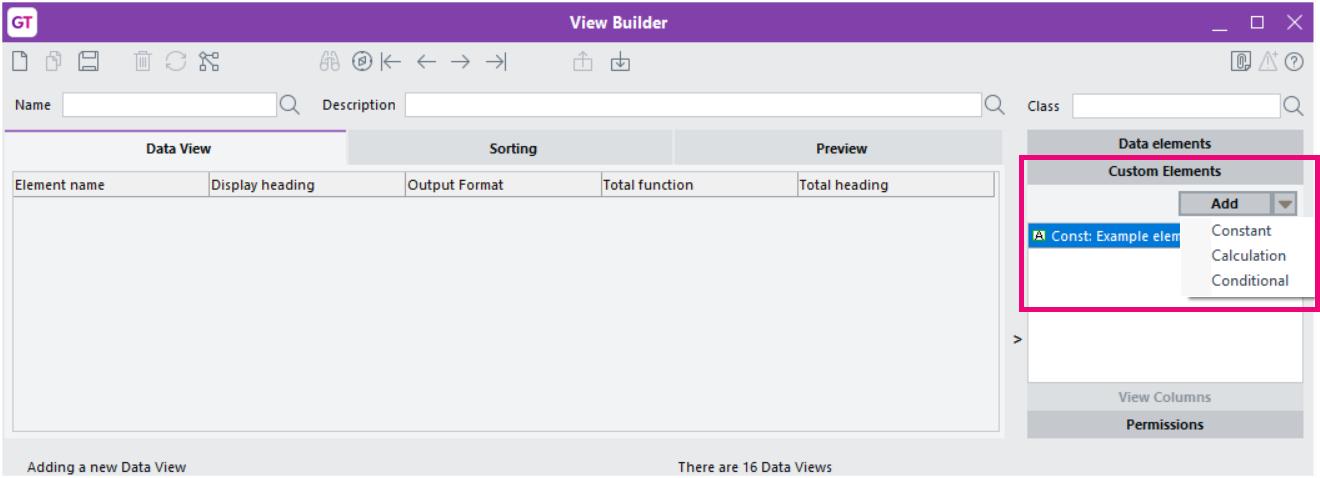
On the View Builder form, we’ve added a new Custom Elements section to the panel on the right. Click Add and choose which type of custom element you want to create: Constant, Calculation or Conditional.

After creating a custom element, you can drag and drop it into position in the Data View tab. The custom element will be included as an extra column when you run a query using that data view.

To remove a custom element, drag it back out of the Data View tab.

Custom elements panel on the View Builder form.png
Creating a constant

A constant is a piece of text that doesn’t change regardless of what data is in the query.

  1. Go to the View Builder form.

  2. In the Custom Elements section, click Add and choose Constant.

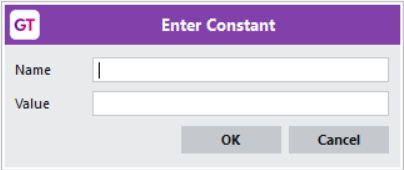
  3. Enter a Name. This is used for the column heading when the constant is added to a query.

  4. Enter a Value. This is what appears in each row of the column.

Enter constant window.png

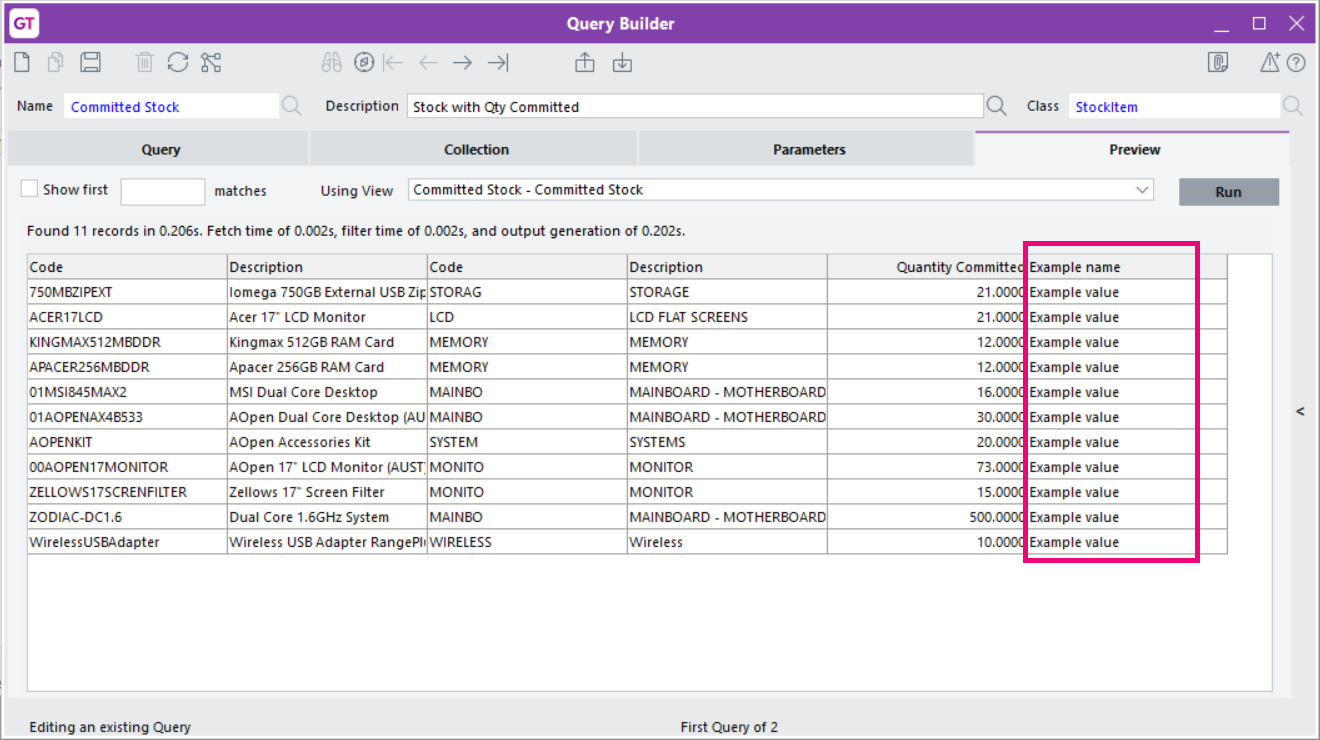
For example, in the following query preview, the Example name column was adding using a constant.

Example constant custom element.png
Creating a calculation

You create calculations using default data elements.

You can do simple calculations like, for example, subtracting a number from an element.

Or you can do more complex calculations using multiple elements. For example, if you want to analyse sales data, you could calculate the profit for each sale by subtracting the cost from the revenue.

The following steps give an example of a calculation that subtracts a percentage from a unit price.

  1. Go to the View Builder form (System > Utilities > Query Designer > View Builder).

  2. In the Custom Elements section, click Add and choose Calculation.

  3. In the Calculation window, enter a Name. This is used for the column heading when the calculation is added to a query.

  4. Drag an element from the Data Elements panel and drop it on the R1 row.

  5. Click the plus icon to add another row.

    Creating calculation step 5.png
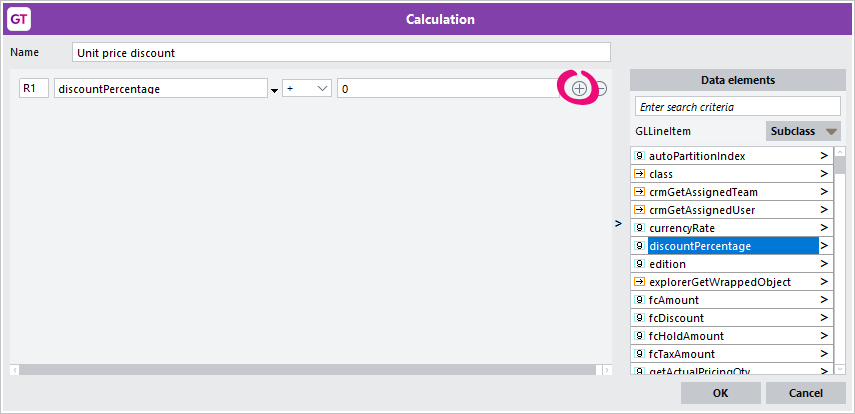
  6. In the R2 row, drag and drop a second element.

  7. To subtract the first row from the second row, drag R1 to the number field in the second row.

    Calculation.gif

Creating a conditional

A conditional displays different values based on certain conditions. For example, if you wanted to analyse sales data, you could create a conditional that labels data as “Q1 Sales” if it falls between certain dates.

Sales period conditional example.png

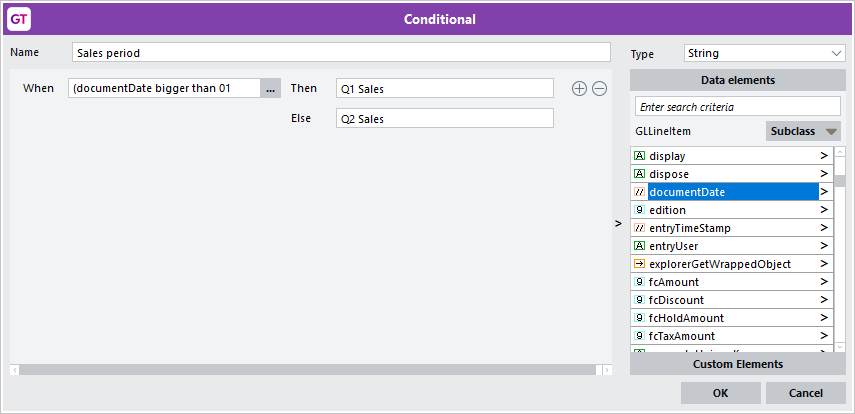
In the Conditional window, enter a Name. This is used for the column heading when the conditional is added to a query.

The Type field lets you choose what sort of information you want to appear in the conditional column of a query:

  • String is a piece of text. E.g., Q1 Sales.

  • Decimal is a number. E.g., 100.

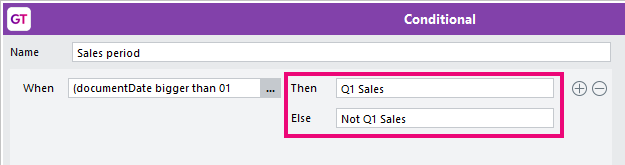
In the Then field, enter what appears when the condition is met. In the Else field, enter what appears when the condition isn’t met.

Then and else fields.png

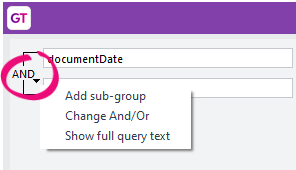
Clicking the When field opens the Filter window. This is where you define the condition. Drag elements from the Data elements panel and drop them in the empty field, then start defining the condition.

Conditional filter example.png

For more options when defining a condition, click the AND dropdown.

And for more options.png

Running and scheduling multiple queries

An extract is a new way to run multiple queries and data views at the same time.

On the new Extract Configuration form, you can define and run extracts. You can even schedule an extract to run later – for example, at the end of the month when you’d normally do your reporting. If you have multiple companies, you can run an extract for each of them simultaneously.

Importing and exporting extracts lets you use them on different Greentree systems without having to define them again for each system. Importing an extract automatically imports all the views and queries related to the original extract configuration.

Defining an extract
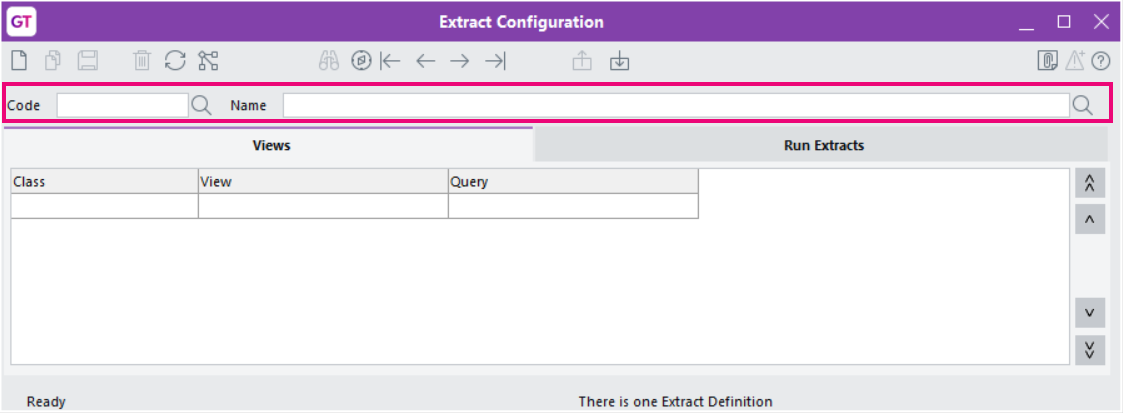
  1. Go to the Extract Configuration form (System > Utilities > Query Designer > Extract Management).

  2. Give the extract a Code and a Name.

    Extract configuration blank.png
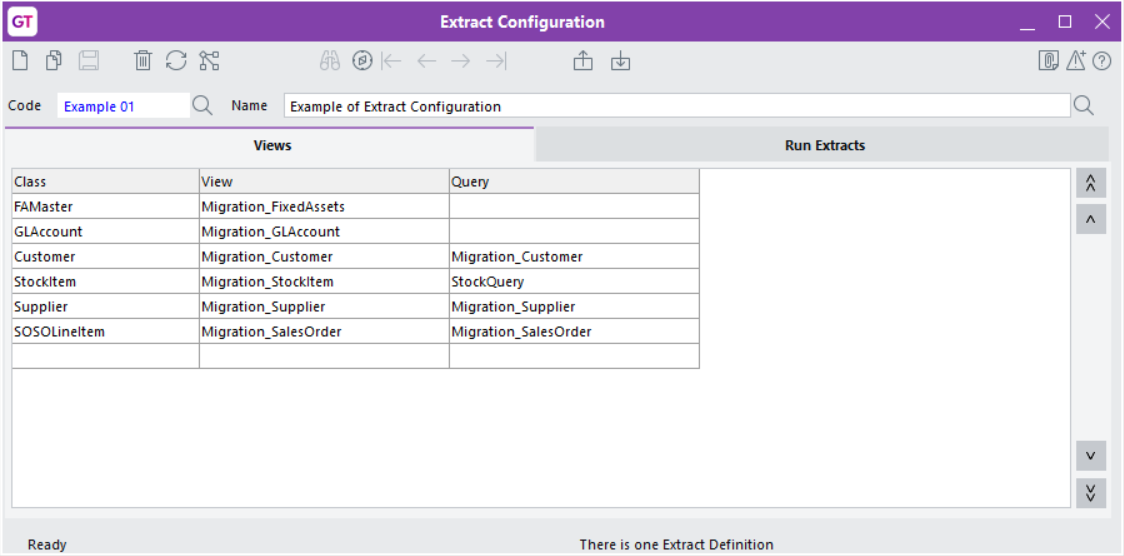
  3. On the Views tab, enter the views and queries you want to include when you run the extract.

    Extract Configuration Views tab.png
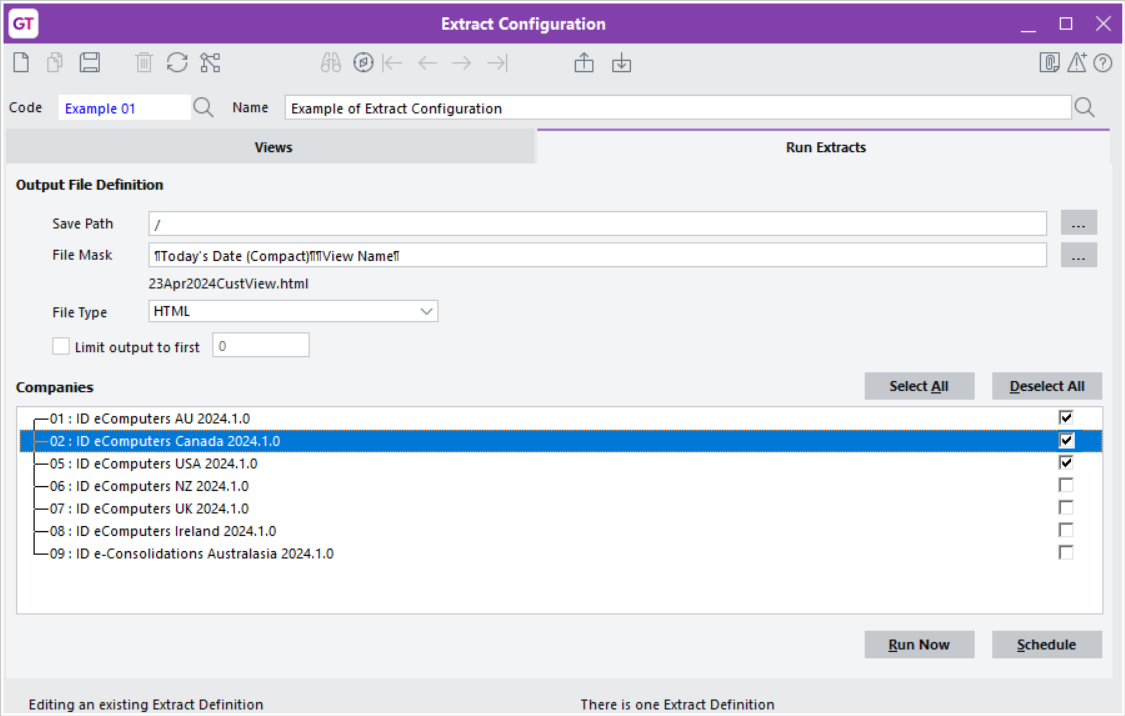
  4. Go to the Run Extracts tab.

  5. Complete the Output File Definition section:

    • Save Path – Enter the location on your computer where you want the extract files to be saved.

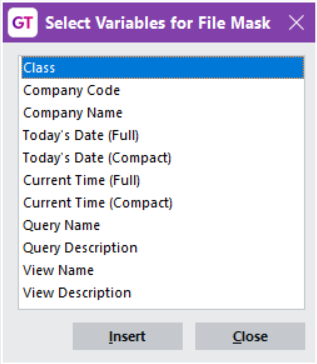
    • File Mask – This field lets you select variables that will be used to name extract files. Click the three dots icon to open a window with a list of variables.

      Select Variables for File Mask.png
    • File Type Select a file type to use for the extract file.

    • Limit output to first – If you want to run a test of your extract, select the checkbox and enter a number in the field. That way, your extract will only output a small number of results, which is faster than outputting all of the data.

  6. In the Companies section, select at least one company to run the extract for. If you select multiple companies, an extract file will be created for each one.

  7. Save your changes.

Extract Configuration Run Extracts tab.png

Running or scheduling an extract

After you’ve defined an extract, you can either run it straight away or schedule it to run automatically later.

  1. Go to the Run Extracts tab of the Extract Configuration form (System > Utilities > Query Designer > Extract Management).

  2. In the Name or Code field, select the extract you want to run.

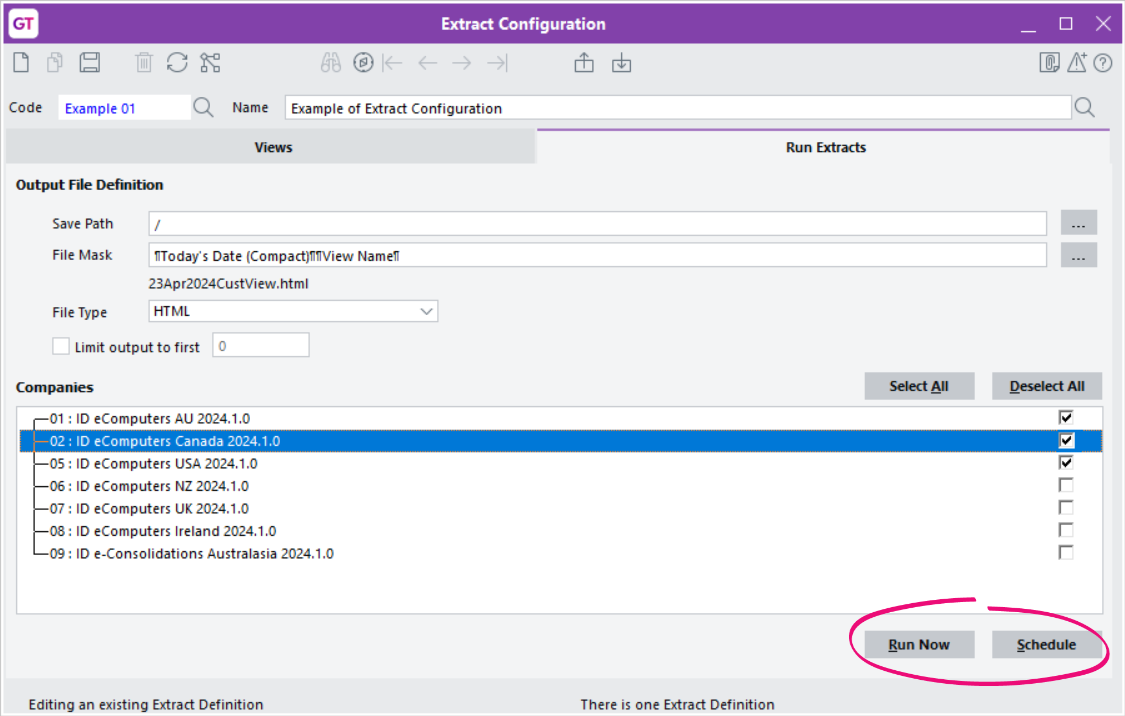
  3. If you want to run the extract:

    • straight away, click Run Now.

    • later, click Schedule. The Add to Task/Print Queue window opens, where you can choose when to run the extract.

Run Now or Schedule extract.png

While the extract task is running, the ‘Limit query designer to current company only’ option on the General System Preferences form is automatically enabled. When the task completes, it will be restored to its original setting. Users who run a manual query during the time that the task is running will only get results for their current company.

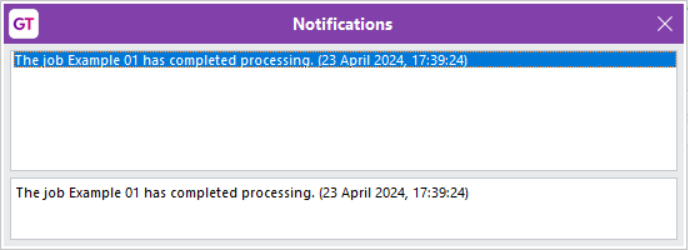
When the extract finishes running, you’ll get a notification.

Extract notification.png
Exporting and importing extracts

You can export extracts from one Greentree system and then import them into another system.

We do not recommend exporting or importing extracts if the data views include UDFs or trees. Unless the UDFs in the target system are identical to the UDFs from the source system, you will get a 1090 error when importing.

You shouldn’t include trees in an extract that you want to export or import, as this isn’t supported in 2024.1.

To avoid the error, you can import the extract, then add the necessary trees and UDFs from the target system into the data views – before running or previewing the output data.

  1. In the Greentree system that has the extract you want, go to the Extract Configuration form (System > Utilities > Query Designer > Extract Management).

  2. In the Code or Name field, select the extract you need.

  3. On the form toolbar, click the export icon to save the extract to your computer.

    Export icon Extract Configuration.png
  4. In the Greentree system you’re importing to, go to the Extract Configuration form.

  5. On the form toolbar, click the import icon and select the extract you copied.

    Import icon Extract Configuration.png

Repairing job purchase orders

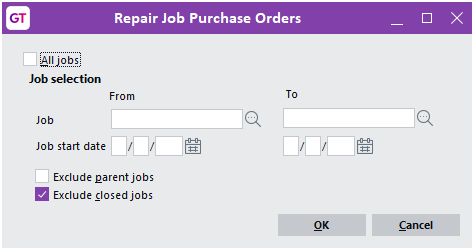
In version 2023.3, we resolved an issue with job purchase orders. If you changed a purchase order job line to a different job, the purchase order wouldn't appear on the Transactions Purchase Orders subtab of the Job Maintenance form. This prevented the issue for new transactions.

In version 2024.1, we've added a system script that lets you repair jobs previously affected by the problem: Repair collections of Purchase Orders on a Job. You can find this script on the System Scripts form, in the Purchase Orders section of the Standard Scripts.

Repair job purchase orders system script.png

Account Group Maintenance improvements

We've updated the Account Group Maintenance form to make it easier to use and to resolve issues and errors that could occur. We've made two main changes.

Saving and deleting is more consistent

We've removed the Delete and Update buttons at the bottom of the form. Now:

  • To apply your changes, click the Save icon on the form toolbar.

  • To delete tree branches in the Existing panel, you can either select a branch and click the Delete icon on the toolbar, or right-click and choose Delete Item.

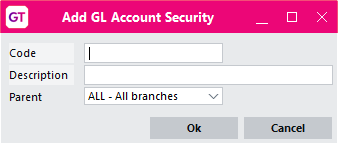
Adding new branches is simpler

When you add a new branch to the Existing panel, a new, simpler Add GL Account Security window opens. In this window, you can add basic details (code, description, parent). After clicking OK, you can add the remaining details in the main Account Group Maintenance form.

Add GL Account Security.png

Modern file formats for improved security

To protect the data in your company’s Microsoft Excel files, you can now use more modern, secure file formats to output reports and clever tables.

On the Main tab of the General System Preferences form, selecting the Use XLSX format for Excel output checkbox. This means the XLSX file format (instead of the older, less secure XML format) will be used for all reports, extracts from tables, Explorer, STP lodgement preview and review, and WebView online enquiries.

Update your FREE add-ins

As part of this change, we’ve also updated FREE add-ins to use the more modern XLAM format instead of the older XLA format. You or your MYOB Partner need to do some manual steps to finalise these changes.

eModules password security improvements

You can no longer request password and email changes from eModule login pages.

We've also removed the Allow auto emailing of forgotten passwords settings from the Main tab of the eModule Control and eHR Module Control forms.

On the eModule Control and eHR Module Control forms, the Administrator email address fields is now optional.

If an administrator email address has been entered, users can email the administrator by clicking a link on the eModule login pages.

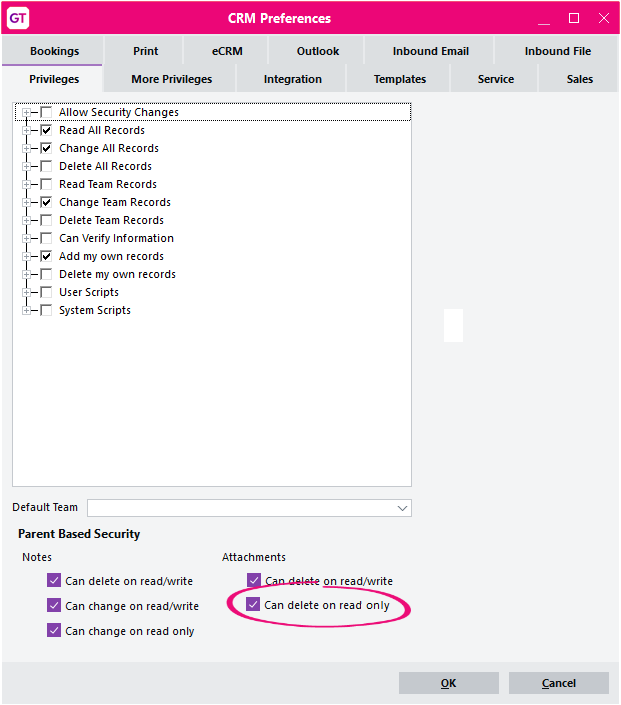
Deleting attachments on read-only records

You can now delete attachments on read-only records. To enable this, select the Can delete on read only field on the Privileges tab of the CRM Preferences or Workflow Preferences forms.

Can delete on read only .png

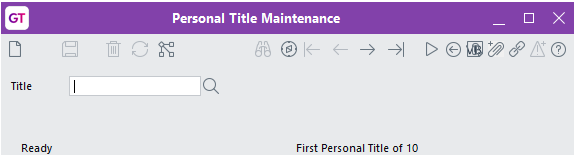
More inclusive language for personal titles

We’ve added a gender-neutral personal title: Mx. Previously, most personal titles for employees or contacts were gendered, for example, Mrs and Mr.

Also, you can now use any title for any gender.

If you need to add new personal titles, you can use the new Personal Title Maintenance form in the System > System Setup menu.

Personal Title Maintenance GT 2024.1.png

Other improvements

  • In workflow desktops, we’ve improved the performance of Finance Totals panels.

  • (Australia only) On the Protected Earnings tab of the HR Module Control form, we’ve added a new line with an effective date of 01/01/2024 and an amount of $514.50.

  • You can now enter an SMS of any length on the Send SMS form. Previously, there was a 160-character limit.

  • We’ve updated Greentree’s end user licence agreement.

  • Approvals and alerts (A&A) rules can now determine when a rule task has been added, changed, or removed. This allows changes to A&A rules to be controlled by an A&A rule, preventing unintentional changes, for example.

  • A new system script lets you check that sales order line item statuses are correct and consistent with sales order headers. The script is called Check and update order line and header status.

Resolved issues

Greentree Desktop

Issue IDs

Description

00008389

If you tried editing a suppler with an inactive GL account in their Exclude from Recently Used list, an error could occur: "Account [number] is inactive". To address this issue, we've improved error messaging, so users know what to do when there’s an inactive GL account in the Exclude from Recently Used or favourites list. For example, "GL account [number] is inactive. Please remove the account from Favourites list for eDocs."

00010016

On the View General Ledger form, sorting the order of the Balance column didn't sort correctly. This has been resolved.

N/A

The HR Leave planner desktop panel is available to anybody listed on the Availability tab of Desktop Designer. Previously, users could create view and update leave requests from this panel regardless of their other security settings. This has been resolved. Now, only users with access to the HR Leave Request menu item can create, view or update leave requests from the desktop panel.

00010850

On the JC Time Sheet Entry form, the Work Centre now defaults correctly from the Activity Code, regardless of whether there is one or more than one valid Activity Code.

00008686

If advanced invoicing was enabled, issues could occur with the Allocate Out of Balance Serial/Lots to Suspense system script. These have been resolved. Now, the script skips any advanced invoicing lines.

00007458

On the Requisition Types tab of the eDoc AP Invoice form, clicking in the Subcode, Location or Activity columns could cause an error: "An error has occurred (1309) Object already added to this set or dictionary." This has been resolved.

00012677

When creating a quote revision, costs are being copied from the original quote, rather than being recalculated. This occurred even if the Hold Cost option wasn't selected. This has been resolved. 

00005305

Saving attachments could leave empty, unused files in the temporary directory. This has been resolved.

N/A

When viewing error details, exception error 14037 could occur: "The form was previously unloaded." To address this, we've improved how exceptions are reported, to help avoid problems when showing the standard error form or writing details to a log file.

00012888

If you have user-defined fields and trees as parameters in the new report writer, the values for these parameters wouldn't appear in the printed report. This has been resolved.

00012886

The status for invoiced sales order lines could incorrectly be shown as Entered. This has been resolved.

As part of this fix, we’ve added a new system script. For more details, see the other improvements section.

00007996

An issue could prevent you from drilling down on the JC Sales GL Adjustment form from the GL Account Enquiry form. This has been resolved.

00012956

When updating STP for FBT in the current year only, validation could fail on the STP Submit Validation form: "Payee ETP Payment Date : ETP payment date must be in the same financial year as the Pay/Update Date". This happened if the employee was terminated with ETP in a previous year, but then had FBT in the current year. This has been resolved.

00013021

If Windows Designer was used to hide the Cost Summary tab on the JC Job Maintenance form, loading a record on that form could cause an error: "An error has occurred (14045) Invalid or invisible sheet requested ." This has been resolved.

00013028

After creating a purchase order the MRP Review form, advanced invoicing wasn't selected for that order, even if advanced invoicing was enabled for the supplier. This has been resolved.

N/A

When deleting a supplier, an exception could occur without a warning to let you know about the exception. This has been resolved.

00012849

We've resolved several issues on the Account Group Maintenance. For more information, see the new features section of these release notes.

00013099

If you entered a SubCode/Location/Activity in a GL line on the PO Purchase Order Entry form, the PO Enquiry form wouldn't display what you entered. This has been resolved.

00013101

If a user wasn't a super user, an error prevented them from bookmarking workflow desks: "This form cannot be added as a bookmark." This has been resolved.

00013107

The AP Taxable Payments report wouldn't display last period payments from after 30 June. This has been resolved.

00013113

When deleting a job costing job, an error could occur: "An error has occurred (1310) Key already used in this dictionary." This has been resolved. Now, the message explains that the user needs to review a timesheet mapping.

N/A

We've resolved issues with the user interface on multiple screens. For example, where a button obscured part of a field.

00013125

On the POS Transaction Entry form, users could access customers they shouldn't have been able to access. This has been resolved.

N/A

If you terminated an employee that had negative leave and you entered that negative leave as an opening balance, then the amount wasn't being deducted from their final pay. This has been resolved.

00013143

On the Quote Maintenance form for a CRM job quote, pressing the down key after entering a Quantity in one line caused an incorrect unit cost to appear in the following IN line. This has been resolved.

00013170

For Australian sites, you couldn't select the Use Calculated Leave option on the HR Leave Request Entry form. This has been resolved. You can now select the option for employees that have a working calendar set up correctly.

00013174

When running the Delete orphaned AHReportTask, AHFormDefn, PQWinPrintJob etc script, an error could occur: "An error has occurred (1309) Object already added to this set or dictionary." This has been resolved.

00013206

If you opened an inventory item from another transaction, changed the item description and clicked Save Details, an error could occur: "An error has occurred (1090) Attempted access via null object reference." This has been resolved.

00013234

Using the New Job Creation form after upgrading Greentree could cause an error: "Jade.exe Assertion failed: (m_pWindowCreate == NULL)". To resolve this issue, we've made changes to jobs. For more information, see the new features section.

00013254

In Query Designer, running a query that involves filtering by parameters in a workflow desktop panel could cause an error: "Compile failed: 6027 - Unknown identifier." This has been resolved.

00013264

When running WebView GL financial reports, an error could occur: "An error has occurred (4031) Index used in substring is out of bounds." This has been resolved.

00013267

After upgrade, entering AP Invoices for a company that does not use purchase orders could cause an error: "An error has occurred (1090) Attempted access via null object reference." This has been resolved.

00013352

The PO Summary Report wasn't including IN outstanding lines in the outstanding total. This has been resolved.

00013329

HR Mobile Leave Badge was defaulting to the wrong date and wrong leave balances. This has been resolved.

N/A

Payroll email templates weren’t using the From address entered on the HR Module Control form. This has been resolved. The correct From and "Reply To addresses are now used when sending HR reports.

N/A

The BPAY biller code not being set on AP Invoices generated from PO Purchase Order, PO Receipt, or PO Shipment. This has been resolved.

N/A

On the Security tab of the HR Employee Maintenance form, an error could occur when linking a salesperson if the combined length of the first name and surname exceeded 30 characters: “An error has occurred (1035) String too long.” This has been resolved. Now, the salesperson's first named is shortened to an initial if necessary.

00006065

On the Approvals and Alerts Rule Maintenance form, changes to items on the What to do tab (any sub tab) do not enable the save button. This meant you couldn’t prevent changes to certain rules. This has been resolved. For more information, see the other improvements section.

00013523

An issue affected GL Trial Balance and GL Movement reports. When certain trees were selected and the reports were emailed or saved to PDF, only the header of the report was displayed, not the data. . This has been resolved.

00013462

When saving the GL Trial Balance report to a Microsoft Excel file, data was being omitted. This has been resolved.

00013492

An issue prevented you from assigning the Print action to a shortcut key. This has been resolved.

00013199

When drilling into a scheduled A&A Rule from the results table in Query View or Explorer, an error could occur: “An error has occurred (14088) Invalid property value .” This has been resolved.

00013172

When opening a copied employee record, an error could occur: “Start date for person with code ‘XXXXX’ is not set.” This occurred if the original employee had a start date override on the Balance Tracking tab of the HR Employee Maintenance form. This has been resolved. Now, when an employee record is copied, the start date override is automatically removed.

00009889

On the Security tab of the HR Employee Maintenance form, the option to link JC employees was disabled for super users. This has been resolved.

N/A

While running the AR Customers query, clicking Search Now on the Explorer form could cause an error: “6027 - Unknown identifier.” This has been resolved.

eRequisitions

Issue IDs

Description

00013159

If a supplier doesn't have a default tax code, JC lines instead used the tax code on the Company Maintenance form rather than the one on the JC Activity Code Maintenance form. This has been resolved. If the supplier does not have a default tax code, the JC line will use the tax code from the JC Activity Code Maintenance form.

eDocs

Issue IDs

Description

00013238

When Show Text Search is selected on the eDocs tile, it overlapped another filter option on eDoc desk. This has been resolved.

00013287

Sites with eDoc SO only weren't able to enable Allow resending for scraping on the eDoc User Preference form. This has been resolved.

00013288

eDoc Sales Orders weren't allowing non-stocked kitset items to be selected or the quantity and price to be changed on the Recently Used tab. This has been resolved.

00013296

When selecting to merge one document with another, the document being merge into the other wouldn’t be removed from the workflow panel. This has been resolved.

00013302

The matched value of scraped eDoc line items was incorrectly including GST twice. This has been resolved.

N/A

When coding an eDocs expense claim, a 1090 error could occur. This has been resolved.

Greentree Browser

Issue IDs

Description

00009622

When submitting a timesheets, popup messages weren't displaying. This has been resolved.

N/A

After optimising Browser screens as part of applying a package, you could get a warning when logging in that the Browser client is not ready to run. This has been resolved.

JavaScript errors detected

Please note, these errors can depend on your browser setup.

If this problem persists, please contact our support.