This is where you set up a standard template of expected times for an employee. Copies of the templates are used on a week-to-week basis, with only minimal changes needing to be made, if there is a variance on the employee's normal times.
Select Step Three from the Setup Cycle. You will then see the Select Employee window. Select the employee you wish to set Standard Times for, then click on the Select button or press ENTER.
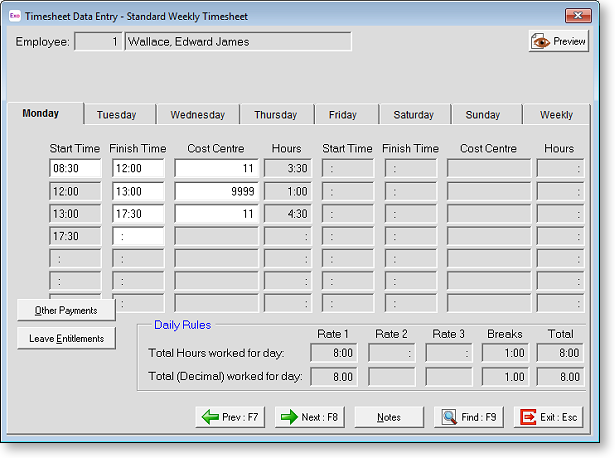
The Standard Timesheet appears. This is where you can maintain standard times for this employee – the equivalent of Exo Payroll's Standard Pay.
The layout of this window depends on the options chosen on the Timesheet Setup window.
If "One Page per Day" or "Time and Attendance (per Day)" is chosen for the Mode property, the window contains a separate tab for each day's times, plus an eighth tab that sums the hours on the other seven:
If "One Page per Week" is chosen for the Mode property, the window contains a single tab, with a line for each day's times:

Transaction Entry
Start Time Enter the time that the employee is expected to clock in on this day.
Finish Time Enter the time that the employee is expected to clock out on this day.
Cost Centre Enter the cost centre that the employee is expected to clock out on this day.
Hours Data entry differs depending on what you want to achieve.
Notes Here you can enter a standard note for this employee. The note will be incorporated into the Current Timesheet, and in turn, the Employee Notes screen in Payroll.
Example 1
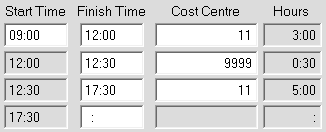
When Enter Start and Finish Times is selected, clocking meal breaks:
Example 2
When Enter Hours Only is selected:

If you're keying from source documents such as time cards you may already know the hours to pay. Note that the break line is not needed in this case because the hours to pay are a known quantity.
Example 3
No Costing:
Note that in both of the above cases the cost centre field is optional â in other words, only for costing fragments of time to specific jobs. If no cost centre is entered, the payroll will assume the appropriate cost centres, when the wages reach Head Office. Note that the break code is still needed.
Example 4
Time and Attendance mode, entering hours only:

This method requires you to know the start time and the finish time for the day, in order to process times for a day. Key in the start time, and the job cost centre if applicable, then key in the hours workedâ¦

Note that the Finish Time will be automatically calculated by the system.
Example 5
Entering decimal times:
In all of the above cases you are entering values for the day in terms of time (base 60). If you want to enter times in decimal form (base 10) use the Other Payments button (transaction type = W).
The daily rules (in Timesheet Setup) do not apply to the Other Payments screen. Therefore overtime has to be clearly stated on a separate line.
Daily Rules
A Daily Rules section appears on the Standard Timesheet window if "Daily Limits" was selected for the Rates calculated using property on the Timesheet Setup window.
The premise of a daily rule is that an employee must work at least X hours per day, before getting overtime. How much of that extra time is liable for time and a half or double time is also specified in the daily rule.
Total Hours Worked for Day
This will display the split of ordinary pay vs. overtime vs. breaks, as governed by the daily maximums in the Setup screen, in units of time (base 60).
Total (Decimal) Worked for Day
This will display the split of ordinary pay vs. overtime vs. breaks, as governed by the daily maximums in the Setup screen, in decimal units (base 10).
Weekly Rules
A Weekly Rules section appears on the Standard Timesheet window if "Weekly Limits" was selected for the Rates calculated using property on the Timesheet Setup window.
The premise of a weekly rule is that, regardless of how many hours an employee has worked on any given day(s), they must physically have worked at least X hours per week, before payment overtime is payable. How much of those hours are liable for time and a half or double time is also specified in the weekly rule.
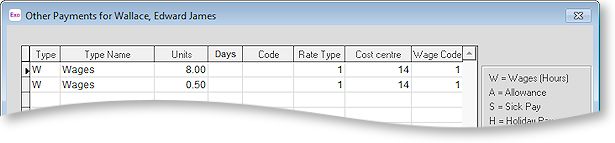
Other Payments
Click the Other Payments button to enter non-wage transactions that this employee would normally receive every pay period.
The Other Payments screen is not available for Time and Attendance employees. This is because the Time and Attendance system only accepts data in the form of a times file, and times files only consist of start and finish times.
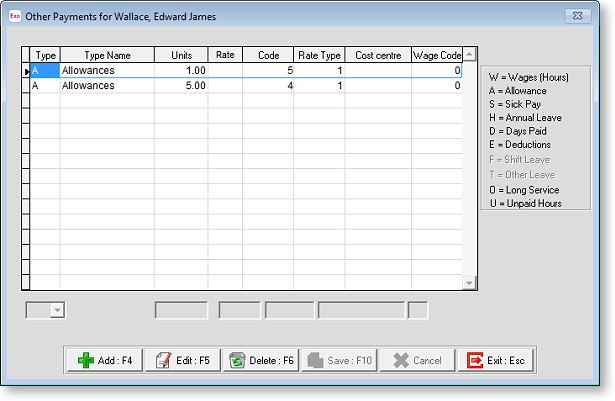
Click the Add button to add a transaction. In the transaction type field, click or press the spacebar on the list box to see your choices.
-
W - Wages (Hours )
-
A - Allowances
-
S - Sick Pay
-
H - Annual Leave
-
D - Days Paid
-
E - Deductions
-
F - Shift Leave
-
T - Other Leave
-
O - Long Service Leave
-
U - Unpaid Leave
Click the Edit button to edit a saved transaction.
Click the Delete button to remove the selected record from the system.
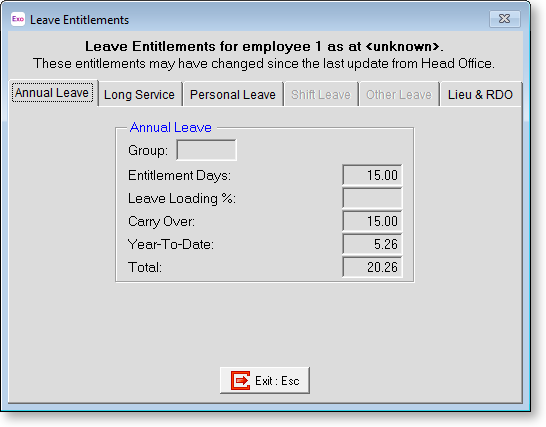
Leave Entitlements
Click the Leave Entitlements button to view the current balance for all leave types relating to the current employee. It is primarily used during the processing of the Current Times for checking that the employee has enough leave entitlement to cover their upcoming absence.