This is where you define how your ordinary pay and overtime is to be split.
Timesheet Tab
You can choose to enter the total times for the week, or you can enter times on a day by day basis, letting the Timesheet collate the hours and subtract the unpaid breaks automatically.
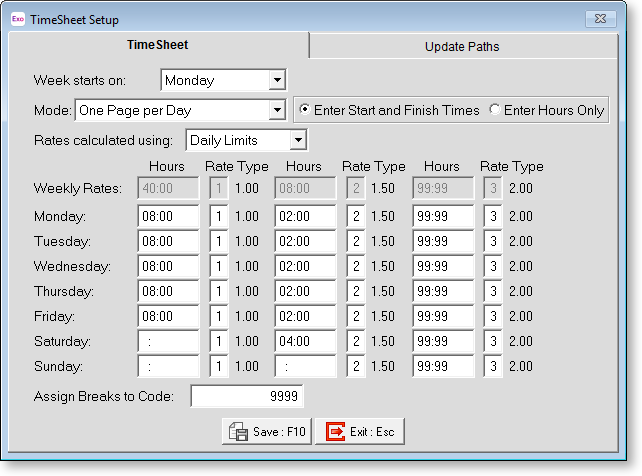
Week Starts On This indicates what day the roster starts on. In Exo Timesheet, the roster does not necessarily have to start on a Monday, it may start on any day of the week or weekend.
Mode The data entry Mode defines the number and layout of fields on the data entry screen. Select from the following modes of data entry:
-
One Page per Day - The Timesheet will create seven page tabs, one for each day, plus an eighth "weekly" tab which holds the sum of the hours on the daily page tabs.
-
One Page per Week - All data is handled on the one screen, with a horizontal line for each day of the week.
-
Time and Attendance (per Day) - This method is similar to the One Page per Day method, except that when entering Hours Only, you will need to know the start time and the number of hours worked for the day, before you begin data entry - the Timesheet will automatically calculate the finish time for you. The Timesheet will create seven page tabs, one for each day, plus an eighth "weekly" tab which holds the sum of the hours on the daily page tabs.
Enter Start and Finish Times Use the Start and Finish Times method when you want the Timesheet to calculate the hours to pay, taking into account the time in each day between the Start and Finish times less any breaks.
Enter Hours Only In general, use the Hours Only method when you are keying values from manual Timesheets where the hours to pay are already calculated.
Rates calculated using Select from the following choices:
-
Daily Limits - A method of calculation whereby a maximum number of units is set per Pay Rate Type, per day. If the maximum number is exceeded, the system will attempt to pay the hours at the next highest Pay Rate Type (multiplier), until all hours have been paid.
e.g. Rate 1 08:00 Rate 2 02:00 Rate 3 14:00
means that:
the first 8 worked hours in a day will be paid at ordinary time
the 9th and 10th worked hours in a day will be paid at time and a half
the 11th and subsequent worked hours in a day will be paid at double time
-
Weekly Limits - A method of calculation whereby a maximum number of units is set per Pay Rate Type, per week. If the maximum number is exceeded, the system will attempt to pay the hours at the next highest Pay Rate Type (multiplier), until all hours have been paid.
e.g. Rate 1 40:00 Rate 2 04:00 Rate 3 124:00
means that:
the first 40 worked hours in a week will be paid at ordinary time
the 41st to 44th worked hours in a week will be paid at time and a half
the 45th and subsequent worked hours in a week will be paid at double time
The advantage of this method is that the employee will not get overtime all at if they have not worked 40 hours.
Under a daily limit, the employee could in theory get 2 hours T1/2 for working one day, and still take the following day off.
Assign Breaks to Code
This is an optional field which gives you the ability to exclude times that belong to meal breaks from being paid in the payroll as a wage line, by attaching a "break code" to these times. Normally times are attached to cost centre codes.
e.g. from 12:00 to 13:00 you enter the break code as (999) in the cost centre field of the data entry screen, as opposed to entering a cost centre code, this would mean that you want to redirect 1 hour to the break code rather than to paid wages.
Note that the break code you specify should not be that of an existing cost centre that is used for wages. This is to safeguard against any employee inadvertently clocking against this code at any time in the future and therefore not being paid for those times, as they are classed as unpaid meal breaks.
Weekly Rates
Used in conjunction with the Weekly Limits method described above, enter the maximum possible number of wage hours you would pay a person in a week, for any given pay rate type. If there are no maximums set, i.e. 0:00, the system will assume that you do not want to pay on the rate type in question. Recommended settings are:
Rate 1 40:00 Rate 2 optional Rate 3 optional
Daily Rates
Used in conjunction with the Daily Limits method described above, enter the maximum possible number of wage hours you would pay a person in a day, for any given pay rate type. If there are no maximums set, i.e. 0:00, the system will assume that you do not want to pay on the rate type in question. Recommended settings are:
Monday -> Friday
Rate 1 08:00 Rate 2 optional Rate 3 optional
Saturday
Rate 1 optional Rate 2 optional Rate 3 optional
Sunday
Rate 1 0:00 Rate 2 0:00 Rate 3 0:00
Update Paths Tab
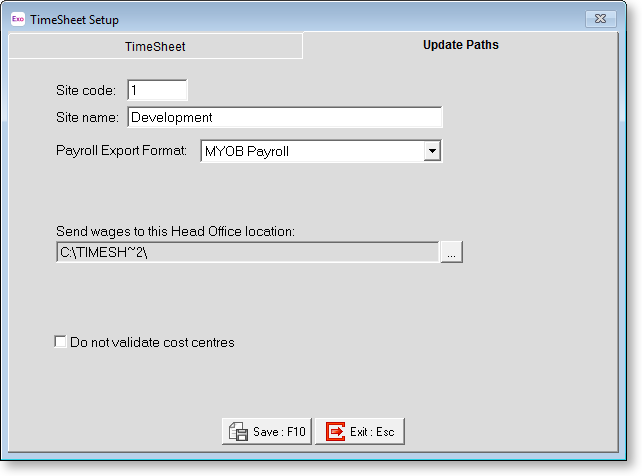
Site code The unique code used to identify a site - this needs to be the same as the one set from Head Office.
Payroll Export Format There are variety of payroll applications which can interpret the time transaction data that is posted by Timesheet, and import the entries into a live pay run. Select from the following list:
-
MYOB Exo Payroll - Exo Payroll originates from MYOB's Employer Services division (Auckland). This is the default choice and is appropriate for most customers. The Remote Head Office is an add-on application to PayrollEnterprise, and provides a way of selecting from all of the employees on payroll, those who will belong to this particular Timesheet. Support for all other formats will require the advice of the MYOB Support team.
-
Ace Payroll - Made by Ace Payroll Plus Ltd
-
IMS Payroll - Made by Information Management Services Ltd
-
MYOB Payroll - Made by MYOB, this is recommended for users of the NZ Payroll application.
Site name Enter the name for your new Timesheet, typically the branch name.
Location to get files sent from Head Office This is the path that the site files (masterfiles) created at head office will be retrieved from. Click the Choose […] button to select a folder.
Send wages to this Head Office location For Exo Payroll employees, Timesheet will post the sum of waged hours and the contents of the Other Payments screen to a wage transaction file, which is subsequently imported by Remote Head Office. This is the path that the wage file will be posted to. Click the Choose […] button to select a folder.
Send times to this Time and Attendance location For EXO Time and Attendance employees, Timesheet will post the start and finish times into a TR2 times file, which is subsequently polled by EXO Time and Attendance. This is the path that the times file will be posted to. Click the Choose […] button to select a folder.
Do not validate cost centres The default behaviour of the Timesheet is to display a picklist of cost centres if either no cost centre has been entered, or a non-existent cost centre has been entered. Enabling this option means that payments which have no assigned cost centre will automatically be costed to the employee's default cost centre, upon import into payroll. However, the downside to enabling this option is that any transactions which are attached to an inadvertently miskeyed (and invalid) cost centre will fail to be imported.
Enabling this option may be of special interest to EXO Time and Attendance users, who are using EXO Time and Attendance's special option to automatically create cost centres that do not already exist. In bypassing the cost centre validation, you may then enter any combination of cost centre analysis part codes, and in turn have Time and Attendance automatically create a new, full-length cost centre made up of this unique combination of part codes, when the times file is polled.