When running PC Clock Standalone, an application is also installed to the Payroll and Time and Attendance system, at what is referred to as the Payroll "Head Office". This appears under the Special menu, Special Applications. (See the Time & Attendance documentation if you are unsure where to find this).
It appears as Export to remote PC Clock.
This application is used to setup the names and numbers of each Clock, to assign which employees use the Clock, and to export this into a file that the Clocks can use to update their information. You should update the clocks whenever any of the following things happen:
-
New staff member.
-
Employee leaves.
-
Employee's name is changed in the system.
-
Cost Centres added, deleted or changed.
-
An employee's department is changed.
-
"Company card prefix" changes in Time and Attendance.
This consists of one main screen:
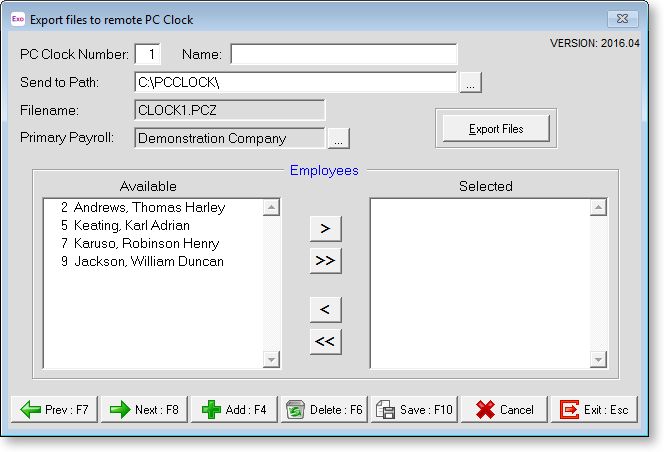
PC Clock Number The number assigned to the clock. This should be set the same as the one at the PC Clock end as it helps with identifying the Clock and also with identifying which export file belongs to that Clock.
Name The name of the clock (Optional). This is if you wish to label the clock or the export file, as it is used in the name of the file sent to the remote PC Clock.
Path This is where the Export file will be sent. If there is a connection to where the clock is, or a common share, then send it to that. Otherwise make it a location where you will be able to find the file so it can be sent.
Filename The name of the file created. This is automatically generated from the clock name and PC Clock number. (If there is no name entered, it will default to just saying "CLOCK" and then the number).
Primary Payroll This is the Payroll company that the Clock will source it's information from. This is important, as it effects which employees the Clock can use, as well as determining the setup of the Clock and where the recorded information will end up. It also determines the Company card prefix used by the current Clock.
Select a payroll by clicking on the ... button. After selecting a payroll, the window will refreshes to show the employees belonging to the selected company. Click on the Save button to confirm your selection, then you can get on with the process of assigning employees to the PC Clock.
Employees
This section of the screen determines which employees will be available for the current PC Clock. Ensure first that it has the correct Payroll selected, as described above.
Available - the employees who are in the payroll but are not currently selected for this clock. Whenever you hire a new employee, you will need to review this list.
Selected - employees that have been selected.
> >> << < - use these buttons to put one or all of the employees either to the left hand side, or the right hand side.
Export Files
The final step on this screen will create the export file. Click on this button to generate the file l containing the employees and job numbers to be used by the PC Clock..
Prev : F7
If there is more than one Clock set up here, it will move to the previous one.
Next : F8
Move to the next Clock.
Add: F4
Add a new clock. It will create it with blank information.
Delete : F6
Deletes the current Clock from this data (does not affect the actual installs of any Clocks, however they will not be sent any new information).
Save : F10
Saves any changes made.
Cancel
Cancels any changes made.
Exit : Esc
Quits from this screen.
These files will not automatically be imported to the clock - this must be done manually from the PC Clock enddone manually from the PC Clock end, or when the Clock is first installed.