As a manager, you can maintain a set of specific templates that they can use to pre-populate the roster so that you don’t need to build my schedules from scratch each time.
For example, if the company is running a bar they might know that on public holidays they generally need two chefs, six-bar staff, five waiters etc. When you're scheduling staff for that day, you would then be able to select the “Public holiday template, which would set up the unassigned shifts for each of the chefs, bar staff etc. in appropriate locations. You could then start assigning people to those shifts (or use Using Smart Roster), or optionally add/remove them.
Creating a roster template
-
On the dashboard, click Roster.
-
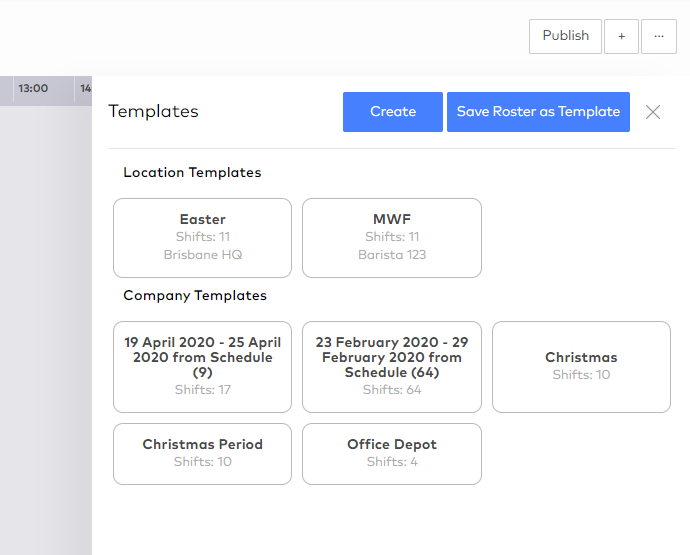
You are redirected to the Roster page. Click the ... button at the top right, then select Templates. The Templates control panel appears. On this panel, you can view existing templates, create a new template and save the current roster as a template.
-
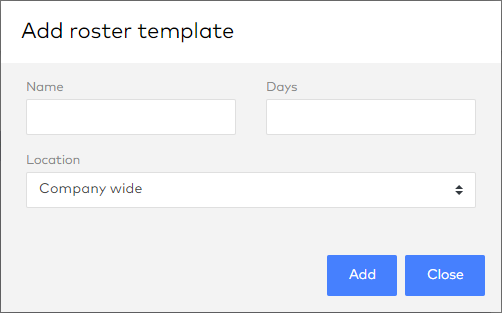
Click the Create button. The Add roster template window opens.
-
Enter the template's name, the location is applies to and the number of days it covers, then click Add.
-
An empty roster screen appears, showing the number of days you entered in step 4.

On this screen, you can re-open the Add roster template window by clicking on the template's name. This allows you to rename the template or change the number of days it covers.
-
Use the + button to add shifts to the roster template as necessary - see below.
Adding shifts to a template
To add shifts to a template
-
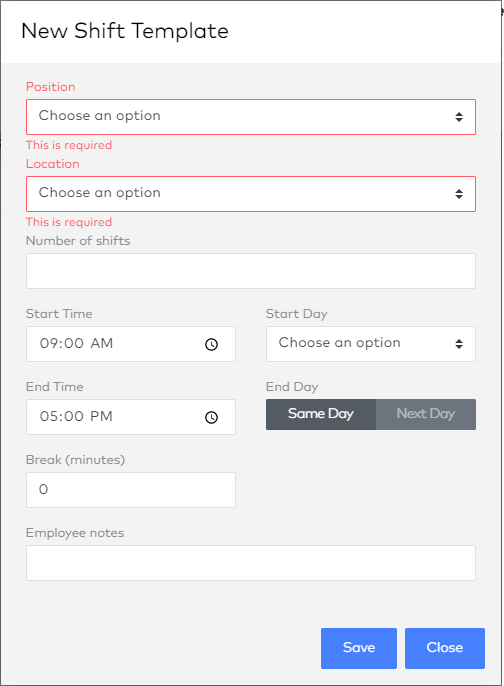
Click the + button at the top right. The New Shift Template window appears.
-
Enter the details of the shift(s) to add:
-
Position: Enter the position that applies to the shifts.
-
Location: Enter the location that the shifts will to be added under.
-
Number of shifts: Enter how many shifts you'd like to add in the template. All shifts will be created with the same details.
-
Start Time: Enter the time when the shifts start.
-
End Time: Enter the time when the shifts end.
-
Start Day: Enter the day in the roster template that the shifts will start on, e.g. if the roster covers seven days, enter a value between 1 and 7.
-
End Day: Select whether the shifts finish on the same day or the next day (i.e. overnight).
-
Break (minutes): Enter the break time for the shifts.
-
Employee notes: Optionally, enter any notes that apply to the shifts.
-
-
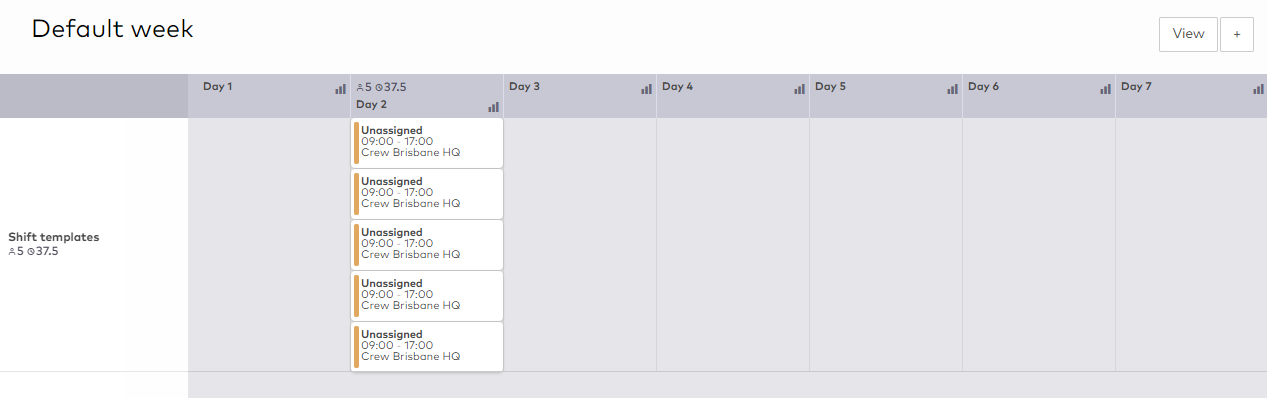
Click Save once you have filled out all required fields. Shifts will be added to the template according to the details you entered. In the example below, five shifts have been added on Day 2 of the roster template.
Editing shifts that have been added to the template
To edit existing shifts in the template, click on the shift to open the usual Shift Details window:
Make any changes, then click Save.
To delete existing shifts in the template, click on the shift you want to delete. On the Shift Details window, click the ... button, then click Delete. Click again to confirm.
Saving an existing roster as a template
You can create a new template based on the current contents of the Roster page.
-
On the Roster page, click the ... button at the top right, then select Templates to open the Templates control panel.
-
Click the Save Roster as Template button.
All days and shifts currently displayed on the roster will be saved as a template depending on your date range and roster view. The template will be named "(Date range) from Schedule (shift count)".
Once saved, you can open the new template to check that all shifts were added correctly, and make any changes as necessary.
Copying a template
You can create a new template based on an existing one.
-
On the Roster page, click the ... button at the top right, then select Templates to open the Templates control panel.
-
Click on the template you want to copy, then click the Copy button at the bottom right.
A new roster template is created with the same details as the first. The new template will have the same name as the original, with "(Copy)" added to the end.
You can then open the new template and make any changes as necessary.
Editing and deleting templates
To edit an existing roster template:
-
On the Roster page, click the ... button at the top right, then select Templates to open the Templates control panel.
-
Click on the template you want to copy, then click the Edit button at the bottom right.
The roster template appears on the Roster screen, where you can edit its details or any of its shifts, as shown in the sections above.
To delete a template:
-
On the Roster page, click the ... button at the top right, then select Templates to open the Templates control panel.
-
Click on the template you want to copy, then click the Delete button at the bottom right. Click again to confirm.
Applying a template to the roster
Once you have set up a roster template, you can apply it to the current roster
On the Roster page, click the ... button at the top right, then select Templates to open the Templates control panel. You can apply a template from the control panel in two ways:
-
Use the Apply button:
-
Click on the template you want to apply, then click the Apply button on the lower right.
-
A window appears, asking for the start day - the roster template will treat this day as Day 1. Enter the date and click Apply.
-
You may be asked to select a cost centre. Select one and click Apply.
-
-
Click and drag:
-
Drag the template you want to apply from the control panel onto a day on the roster. The day that you drag the roster template onto will be treated as Day 1 of the template.
-
You may be asked to select a cost centre. Select one and click Apply.
-
Shifts will be added to the roster according to the roster template. Once added, shifts can be edited, deleted and assigned to employees in the usual way.