Processing times for payment in MYOB Exo Time and Attendance software is normally done through Pay Period Times which is posted to the Current Pay in MYOB Exo Payroll. If an employee is to be paid outside of the normal Pay Period, such as when they are being terminated, this can be done using One Off Pay Times.
Using One Off Pay Times to process an employees days will mean that those days cannot be processed through Pay Period Times as they have already been paid.
The following can assist with processing a One Off Pay Times pay period.
To create a one-off pay times pay
-
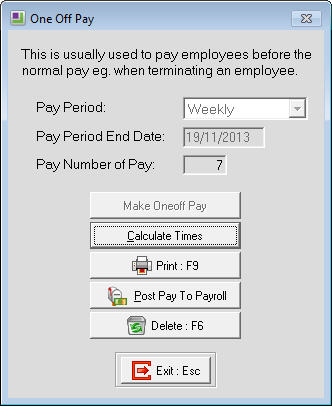
Go to the Transactions menu then select One Off Pay Times. The One Off Pay screen will appear.
-
Select the correct frequency in the Pay Period using the drop down list box
-
The Pay Period End Date field represents the end date of the pay period to be processed. This date will normally match the Pay Period End Date being used in the One-Off Pay in MYOB Exo Payroll. The date will default to today's date but it can be changes to reflect the period end date of the pay being processed.
-
Pay Number of Pay is automatically assigned to the One Off Pay Times by the system
-
Click on Make Oneoff Pay to create the pay. The other buttons now become available for use.
To process a one-off pay times pay
-
Click on the Calculate Times button and the Pay Period Times screen will appear.
-
Enter the code of the employee to be processed or click on the Find:F9 button (or press F9 on the keyboard) to get the employee list then select the employee.
-
When the employee has been selected, a screen will appear advising that the employee is not currently in this pay and asking if the employee is to be paid in this pay. If the correct employee has been selected then click Yes. Note: Once an employee has been added to the One Off Pay Times then this message will no longer appear for that employee.
-
Make any changes, as necessary, to the times and the days for the employee.
-
Repeat the above process for each employee that is to be added to the pay, making any changes to the times and days for each employee.
-
Once all employees who are to be processed in the One Off Pay Times pay have been added, with all changes made to the days and times, then click on the Print:F9 button to access the reports. Reports that contain the Pay Type option, such as the Payroll Posting report or the Costing report, will print for the One Off Pay Times pay only.
-
Print the Payroll Posting report to make sure that the figures are correct along with any other reports as required.
-
When the figures are correct and are ready to be transferred to Payroll, click on the Post Pay To Payroll button.
-
A confirmation message will appear. Click on the Yes button if the pay is correct and ready to be posted.
-
A screen will appear for doing a backup. Click on the Backup button for the backup to be created. Note: A backup must be done or the Posting process will not complete.
-
Once the backup has completed, a confirmation message will appear for posting the pay. Click on the Yes button for the information to be posted.
-
If the information is being posted to an integrated copy of MYOB Exo Payroll then a One Off Pay must have been created to receive the information from this Pay. The Posting process does not care what Pay Frequency the One Off Pay in MYOB Exo Payroll has been created with, just that there is an open One Off Pay to receive the information.
-
If the One Off Pay Times pay is to be cancelled for any reason, click on the Delete:F6 button then click on the Yes button in the confirmation message.
Need more help? You can open the online help by pressing F1 on your keyboard while in your software.
You can also find more help resources on the MYOB Exo Employer Services Education Centre for Australia or New Zealand.