
Having maintained all your Employees times for the Pay Period it is now time for us to look at preparing the data for sending to the Payroll or producing a Report of the Employees times for the period, for manual Payroll preparation.
This process will perform a number of functions, including calculating the Hours for the Period, including Ordinary and Overtime, calculating Allowances, Holiday and Sick Pay. For integrated systems where you are accruing Holiday Pay in Days, it will also determine the number of Days Paid.
Select Step Four from the Time Cycle. The following window appears:
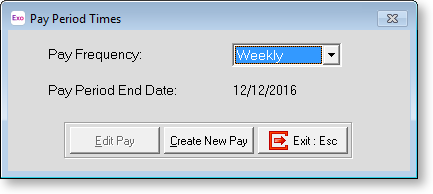
If this is the first time you have entered this screen for the Pay Period the window will display two fields:
Pay Frequency Select a pay frequency: Weekly, Fortnightly or Bimonthly. The default is "Weekly".
Pay Period End Date This will display the date for which the times and information will be calculated up to and including.
Click Create New Pay to create the Time and Attendance Pay Period
If you have previously been into this screen and created a Pay, the Edit Pay button will be enabled, as the pay period is now started.
Once you have created the Pay Period Times you will be presented with a blank Pay Period Times screen. At this stage you can do one of two things. You can either Print out the Payroll Posting Report or you can cycle through each Employees screen and check the information on screen. We recommend you print the Report as this is your Hard copy and it should be kept.
Once you have created the Pay Period Times all editing of Employee Times for the current week will be done in this area. The only data that will be in the Maintain Times screen will be days for the coming period.
Verifying Times from the Payroll Posting Report
To print the Payroll Posting Report escape from the Pay Period Times screen and move to Reports on the Exo Time and Attendance menu. Having accessed the Report screen you have a number of options to select. Firstly you must decide if you want to print in Employee or Department order. Having done this move the cursor the "Current Pay" switch and press enter, followed by a selection for which pay frequency you are working on.
Having selected the appropriate options you can now print the report by press <F9> (for more details see Reports). Once the report is printed you should go through it thoroughly to ensure there are no errors or omissions. This report will show you the hours the Employee has worked each day and for the week. This will include Ordinary and Overtime, plus any Allowances, Holiday, Sick Pay etc.
If during this checking you find anything that needs to be corrected you should return to the Pay Period Times screen and make you corrections in the same way you would have Maintained the Employees times during the week.
Verifying Pay Period Times on Screen
After clicking the Create New Pay or Edit Pay, you will be presented with the Pay Period Times screen, with the cursor in the Employee Code field. Enter the code of the Employee you wish to view or edit.
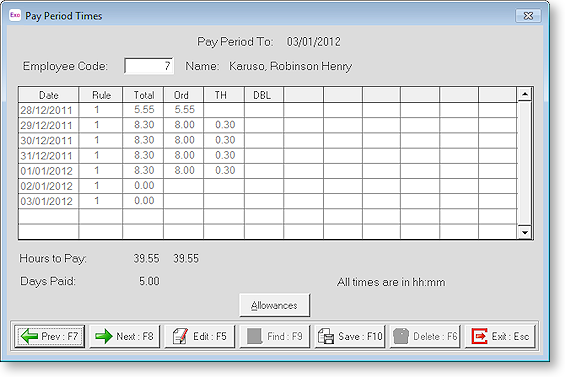
This screen contains a summary of the Pay week for each Employee including - Each day they worked, the number of hours per day (including ordinary and overtime) and the number of hours worked for the week.
The total number of hours for the week may not always reflect the sum of the hours per day, as your Daily and Weekly rules may have an effect on the overall Hours. The total Hours to Pay are in fact the Worked Hours to Pay, and therefore excludes holiday and sick pay. The reason behind this is that some companies choose to value sick pay and/or holiday pay in terms of days rather than hours. Therefore the system would not know how many hours to pay for 1 day of holiday, because not all employees can be assumed to be working 8 hours a day.
There is also an Allowances button at the bottom of this window. This is where any Allowances that the Employee has accrued for the week will be displayed. These Allowances will be generated by the system automatically but if required you have the ability to Manually add Allowances.
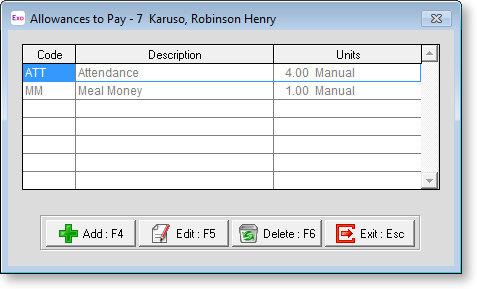
To do this select this button and then enter on Add in the next screen. You will be presented with a list of the Exo Time and Attendance Allowances from which you can choose the required Allowance. Allowances can only be added one at a time in this way.
Editing Days in Pay Period Times
If during your checking of the Payroll Posting Report you found there was a need to correct an Employees times or you may have omitted to enter some Holiday Pay etc., you can still make these change in the same way as you did under Maintain Times. Simply scroll to the day concerned, press <enter> and you will be presented with the Edit Times screen.
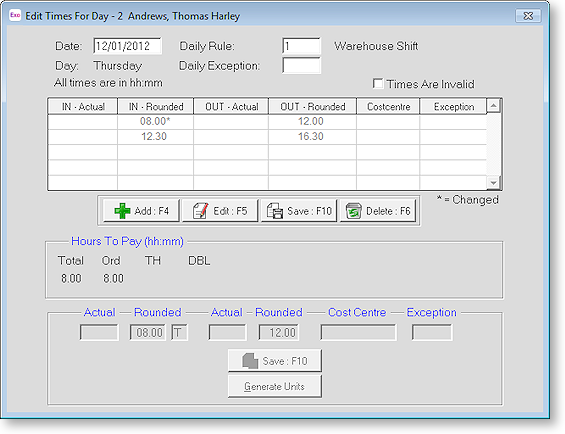
Edit or add data on this window in the same way as in the Maintain Times step - the system automatically recalculates whenever you make a change to an employee's day.
Once you have made the required changes to this employee you can return to the Time Cycle by clicking Save or pressing F10, then pressing esc to close the pay period times screen. Alternatively, you can move on to the next or previous employee by pressing F7 or F8.
After exiting from the Pay Period Times window, a message asking whether or not you want to print the Payroll Posting Report appears. Click Yes to reprint this report. Doing so ensures that you have an accurate hard copy of what will be posted to the payroll (if you have an integrated system) or for preparing your payroll by another method.