This is where setup information is entered - such as the posting and data paths, supervisor password, clock number, etc.
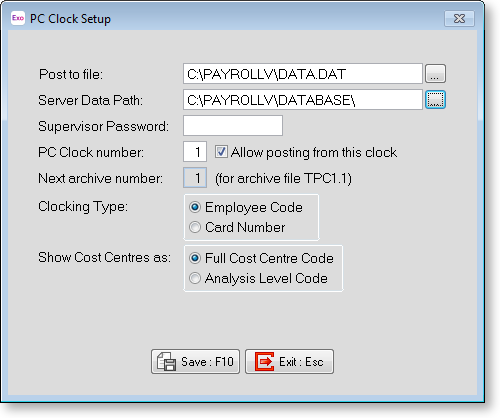
Post to file This is the path and filename where the times will be sent when posted from the Clock. This is the file that stores the times which Time and Attendance will pick up and process.
Ensure that the Time File Name in the Exo Time and Attendance Timeclock Setup for this clock is set to the same file or else it will be unable to find your clocking information. Refer to the Exo Time and Attendance documentation for instructions on how to set or check this.
Server Data Path (Server-based version only) This is the location of your Exo Payroll and Exo Time and Attendance company information. This only appears in the Server-based version of Exo PC Clock, as the Standalone version manually updates the files (see the Import/Update Data files topic for the Standalone version).
The company this points to determines such things as which Company card prefix, employees and cost centres are used.
Supervisor Password This is the password used for the Supervisor menu and exiting Exo PC Clock. This should only be given to those who are involved in processing the Time and Attendance and Payroll information, or are responsible for posting and/or maintaining times at the clock.
If you forget or lose the password, please contact Support.
PC Clock number This is mainly used to identify the different clocks and their posting archive files. Try and always use a different number for each copy of PC Clock that you run and if possible match them with the ones in Exo Time and Attendance, as this saves confusion.
Next Archive Number This is not an editable field, but it is to inform what the next times archive file will be. The times archive files are a backup of the posting, used only if there is a problem polling the times into Exo Time and Attendance, or if a times file is lost or accidentally overwritten. There are 9 archives, storing the last 9 postings made from the clock, and each ending in a dot then the PC clock number. It also displays the name of the next archive file. If you have any questions regarding retrieving these files, please contact Support.
Allow posting from this clock This option sets whether or not this clock is able to post times to Exo Time and Attendance. Some companies prefer to only allow posting from one clock, which makes sense when in a networked (Server-based) environment as it only needs to be done once for all the clocks. If you are running Standalone clocks, then this is not available as they will always need to be able to post.
Show Cost Centres as Select from:
-
Cost Centre Code - This displays and accepts the costing as a single number corresponding to the whole cost centre used in Exo Payroll and Exo Time and Attendance.
-
Structure Level - This breaks the cost centre down into pieces, or levels, each of which reflects a certain part of the whole cost centre. For example, you might have 3 levels of costing with lengths of 1, 2 and 4 respectively. So cost centre levels of 1, 02, 354 would make a whole cost centre of 102354.
Validate Cost Centres This option sets whether it will check the combined result to see if it exists as a cost centre in Exo Payroll , or if it checks each of the levels individually and not the total (Exo Time and Attendance has the ability to automatically create any cost centres that don't exist).
Save : F10
Saves the current setup details then exits.
Exit : Esc
Returns to the Supervisor Menu without saving.