End of financial year process 2024 – Exo Employer Services Australia
This document explains what you need to do to finalise the 2023–2024 financial year, and how
to prepare for the 2024–2025 financial year.
To make the end of financial year as straightforward as possible, it’s important that you follow
the instructions in this document in order.
Finalising the 2023-24 financial year
1. Reportable Fringe Benefits
Some of your employees may have Reportable Fringe Benefits that are to be shown on their Single Touch Payroll (STP) reporting for taxation purposes. If you had employees terminated during the financial year that require updating for Reportable Fringe Benefits, reinstate them. You must use the employee’s original start date.
Before finalising your STP reporting, these Reportable Fringe Benefits must be loaded into the system. These Reportable Fringe Benefits are loaded into the system as a Non-Cash Benefit pay item. If you already have a pay item set up for this purpose from a previous financial year, you can re-use it.
Set up a non-cash benefits
From the Maintenance menu, select Non-Cash Benefits. The Non-Cash Benefits Maintenance screen opens.
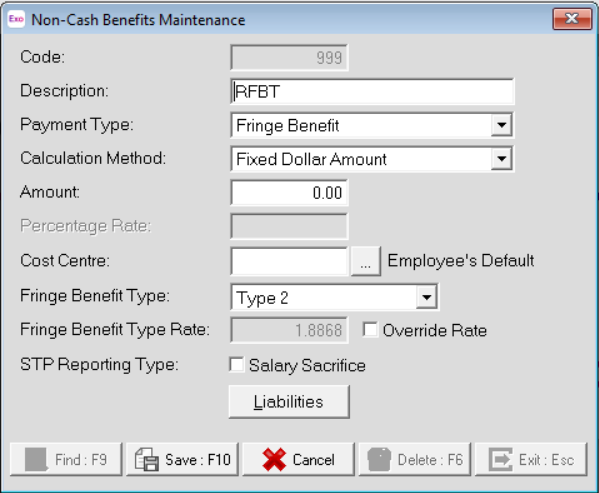
In the Code field, enter a unique number. It is recommended that you use a number starting with 9 to ensure it will always appear at the bottom of your list of Non-Cash Benefits.
Enter a Description. For example, RFB.
Set the Payment Type to Fringe Benefit.
Set the Calculation Method to Fixed Dollar Amount.
In the Amount field, enter 0.00. This will enable you to enter a number specific to each employee.
Select an appropriate Cost Centre. By leaving the Cost Centre as 0 (Employee Default), you will be able to change the cost centre specifically to each employee.
Select one of the following two Fringe Benefit Type:
Type 1 – This type is used when the employer can claim a GST credit.
Type 2 – This type is used when the employer cannot claim a GST credit. For example, supplies made that were either GST-free or input taxed.
Enter the reportable fringe benefits as either un-grossed up or grossed-up.
Un-grossed up – When the un-grossed up amount is entered, the system will calculate the grossed-up value depending on the Fringe Benefit Type.
Grossed-up – Enter the already grossed-up amount. You must select the Override Rate checkbox and enter 1.00 as the override rate.
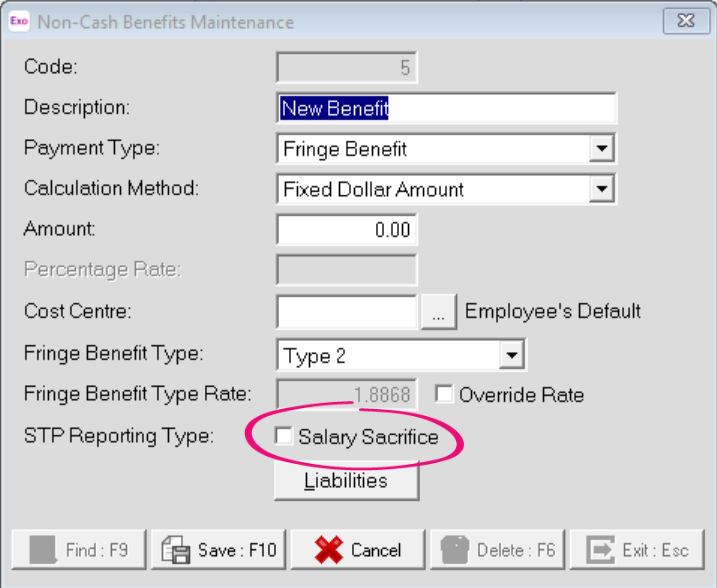
FBT-exempt items (e.g. a portable electronic device) need to be reported as salary sacrifice. If this non-cash benefit is part of a salary sacrifice agreement, select the Salary Sacrifice checkbox. This reports the benefit in STP with a reporting type of Salary Sacrifice – Other Employee Benefits. For more information, see STP Phase 2 employer reporting guidelines on the ATO website.
Click Save or press F10 to save the non-cash benefit.
Load reportable fringe benefit amounts
Reportable fringe benefits are loaded into the system by means of a one-off pay.
From the Pay menu, choose One-Off Pay.
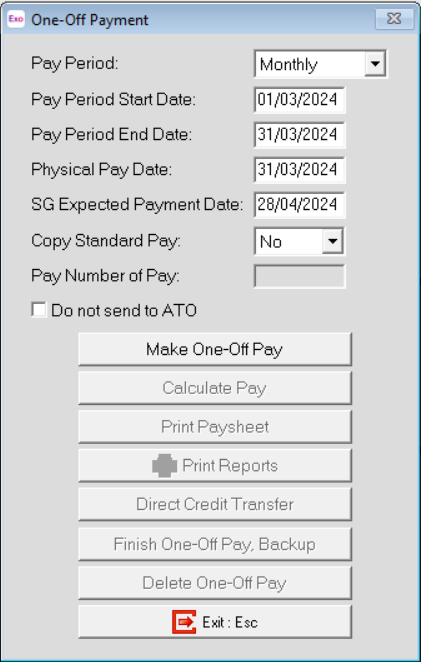
The Fringe Benefit Tax Year is from April 1 the previous year to March 31 the current year. So, the Pay Period End Date and Physical Pay Date should be no later than March 31 of the current year. If either of these dates are after March 31, the Reportable Fringe Benefit will not appear in the correct Fringe Benefit Year.
As this pay will only contain the Reportable Fringe Benefit Amounts, choose No from the Copy Standard Pay dropdown.
Select the Do not send to ATO checkbox.
To create the pay, click Make One-Off Pay. A message appears, asking if you want to pay all the employees in this pay frequency.
If you aren’t entering Reportable Fringe Benefits for all your employees, click No in the message window.
Click Calculate Pay.
To select the employee requiring Reportable Fringe Benefits update, click Find. A message appears, stating that the employee is not currently in this pay. This only appears if you chose not to include all the employees in the One-Off Pay.
In the message window, click Yes to include the employee in the One-Off Pay.
Select Non-Cash Benefits.
Click Add or press F4.
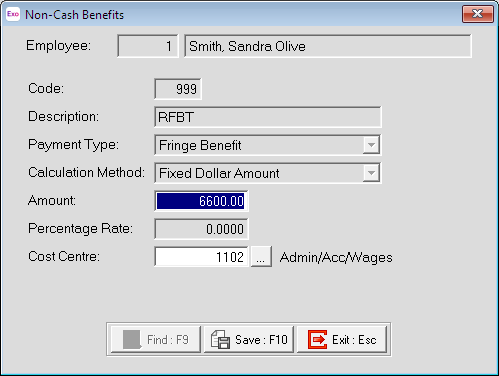
In the Code field, enter the Code assigned to the Reportable Fringe Benefit pay item.
Enter the Amount.
If you did not assign a Cost Centre when you set up the Non-Cash Benefit, assign a Cost Centre now.
Click Save or press F10.
Click Save or press F10 again to return to the employee’s One-Off Pay. The One-Off Pay for the employee should not show any values, because Non-Cash Benefits aren’t physically paid to the employee.
Repeat steps 5–15 to update other employee records for Reportable Fringe Benefits.
Click Print Reports. The Select Report screen opens.
On the Maintenance tab, print a Non-Cash Benefit History report.
Use the report to check that you have entered the correct values for the appropriate employees.
You can also print the Pay Summary report.
On the Select Report screen, go to the Pay tab.
Click Pay Summary from the list of reports and click Select.
On the Print Report – Pay Summary screen, click Report Options.
Select the Use Grossed up Value for Fringe Benefits checkbox.
Click Save.
On the Print Report – Pay Summary screen, click Print.
On the One-Off Payment screen, click Finish One-Off Pay, Backup to complete and update the One-Off Pay. A message appears, asking you to confirm that the pay is correct and that all reports are printed.
In the message window, click Yes. You’ll be prompted to do a backup.
Once the backup is completed, a message will appear, confirming that the pay has successfully been updated. Click Ok.
To update this information to the ATO, go to Pay > Single Touch Payroll > Update.
Update status of terminated employees
If you reinstated terminated employees for Reportable Fringe Benefits, you need to terminate them again after updating Reportable Fringe Benefits.
Enter the employees’ original termination date and their termination payment details, e.g., reason for termination. Do not update any monetary values.
2. Print reconciliation reports
Report | Options |
|---|---|
Trial Balance Go to Reports > Print Reports > Financial > Trial Balance. |
|
Pay Summary Go to Reports > Print Reports > Pay > Pay Summary. |
|
Print Costing Analysis Go to Reports > Print Reports > Financial > Costing Analysis. |
|
Superannuation Summary Go to Reports > Print Reports > Financial > Superannuation Summary. |
|
3. Submit final pay period data
If the payroll setting for STP is not set to Auto submit STP pay event date to ATO after every pay update, submit your final pay period data to the ATO as has been the case after each pay update.
4. Send a finalisation declaration
With Single Touch Payroll, at the end of each financial year, you must send a finalisation declaration for each employee. You need to do this regardless of the method the pay data is being sent after each pay update.
So, even if the payroll is set to Auto submit STP pay event date to ATO after every pay update, the finalisation declaration must also be sent.
This declaration has the year-end totals of the STP data for each employee.
To send a finalisation declaration:
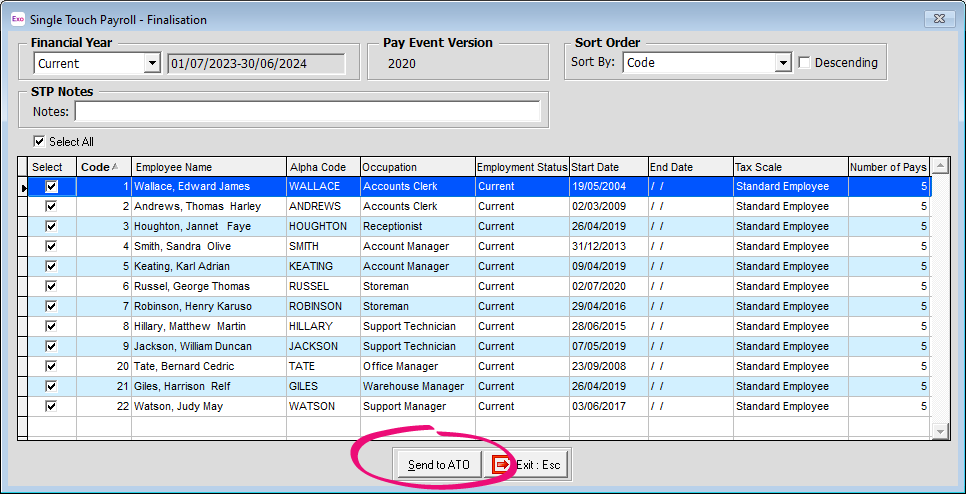
Go to Pay > Single Touch Payroll > Finalisation.
On the Single Touch payroll – Finalisation screen, either select the Select All checkbox, or select the individual employees to be included in this submission.
Selecting individual employees is useful if there was an error with a previous declaration, and you need to send an updated, correct declaration for an individual employee.
Click Send to ATO.
5. Lock down the financial year
Once the Year End Finalisation declaration has been submitted to the ATO final task is to lockdown the Financial year.
Prior to this step you should have a backup of the payroll company.
To lockdown the payroll company:
Go to Utilities > Setup Exo Payroll > Other > Other.
In the Financial year lockdown date field, enter 30/06/2024.
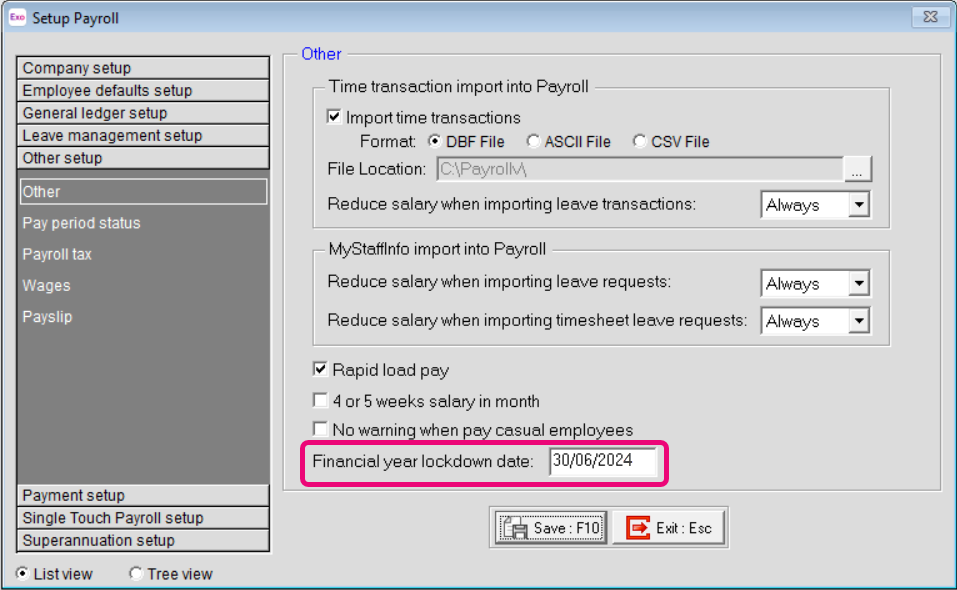
Click Save.
Preparing for the new financial year
Upgrade to version 2024.01
When you’re ready to begin the new financial year, you can upgrade to MYOB Exo Employer Services version 2024.01. The release notes describe all the tax and compliance updates for the 2024–2025 financial year, and the changes you need to make in your MYOB software.
For help manually upgrading to the new version, see the relevant support article.