Before you can enter any employee information and commence the preparation of your database it is necessary to setup the system to handle your company's unique requirements.
Although MYOB may handle some of this preparation in the course of their installation and training, it is necessary for you, the user, to have an overview so that you may be better equipped to successfully understand your system.
These procedures will be discussed in the order that they are usually performed.
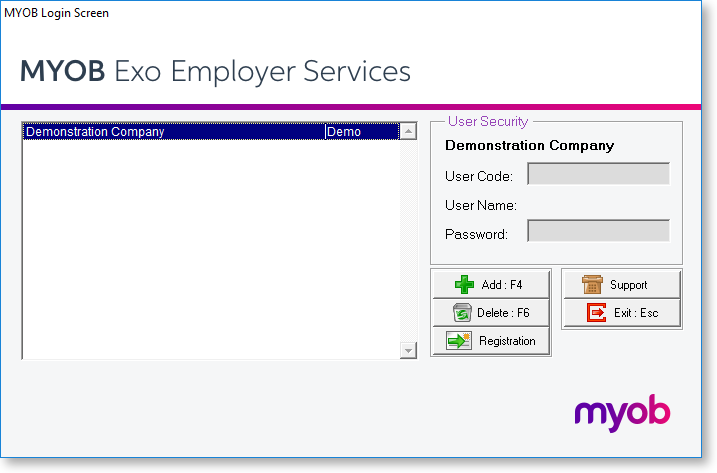
MYOB Exo Timesheet can have unlimited "live" companies in the same program, in addition to the Demonstration Company.
After the program has loaded the first screen that appears is the Login Screen.
Click on a line in the left-hand window to select a company. You will then the able to enter the appropriate login name and password for that company, in the user security section at right.
Add Company
This function creates a blank set of data, as a separate entity from the Demonstration Company. At this stage it is necessary to create your own Company with its unique information.
Press F4 to add, and the following window appears:
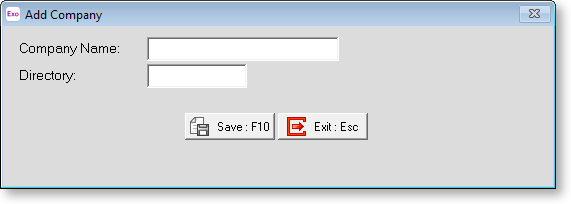
Company Name The directory name will be automatically generated for you, based on the first few characters of your company name.
Directory The directory name will be automatically generated for you, based on the first few characters of your company name.
Once the procedure is complete press F10 and you will be taken into your new company.
Once in the new Company, you will be presented with the Exo Timesheet Setup Cycle. This screen will step you through the process of setting the various Control screens.
The steps covered in this cycle can also be performed by selecting the appropriate option from the main menu. You can return to the TimeSheet Setup Cycle at any time from the Help menu.