On the Documents screen, you can create folders to help keep track of your uploaded document files, and control who has access to the files.
This page is only uploaded Document files, such as pdfs and Word documents. For informaton on managing documents created using the built-in HTML editor, see Creating document templates.
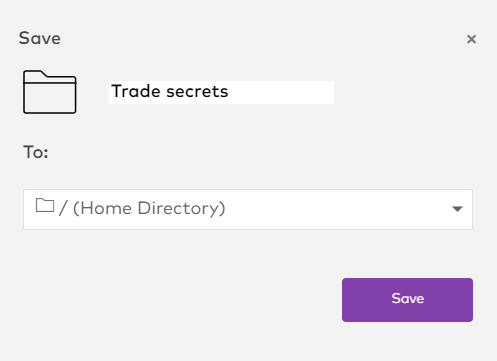
Create a folder
-
Click New Folder.
-
Enter a folder name, and select where the folder will be located in the To: field.
-
Folders in (Home Directory) will show in the Folders and ALL FILES groups.
-
Folders inside other folders will only show when you open that folder.
-
-
Click Save to finish creating the folder.
Move a file or document into a folder
Once a file is moved into a folder it will only show when you open the folder. Files that aren’t inside folders will be sorted into the groups on the panel according to their file type.
-
Select the file or folder and click More.
-
Select the new folder.
-
Click Move.
Delete a folder
Deleting a folder deletes all the documents and folders inside it. If you want to keep anything, move it out of the folder first.
-
Select the file or folder and click More.
-
Click Delete folder.
-
Click Yes, delete to confirm and delete the folder.
Control access to a document file
Access is controlled at an individual file level.
-
Select the file and click More.
-
Use the Accessible by field to select who has access to the file.
-
You can give access to individuals, or based on role and a location.
-
To give access to everyone at a specific location, select Everyone in the first field.
-
Click the + and - buttons to add access to more individuals or groups, or remove access.
-
-
Click Save to complete the access change.