Introduction
MYOB Advanced 2021.2 is a major release that adds a wide range of new features across the entire MYOB Advanced system.
This page provides an overview of the major new features in this release - for full information on all of the changes, see the 2021.1.1 Release Notes documentation:
New Features
Customisable Number of Staff Members on Calendar Boards
In MYOB Advanced 2021.2, a user can now specify the number of staff members to be shown on calendar board forms—that is, the Calendar Board (FS300300), Staff Calendar Board (FS300400), and Room Calendar Board (FS300700) form. This new functionality is convenient for managers who need to see the working calendars of all staff members on one calendar board form.
Specifying the Number of Staff Members
Now an administrative user can specify the number of staff members that the system will show on the calendar boards (independently of whether the vertical or horizontal view is used on the calendar). On the Service Management Preferences (FS100100) form, on the Calendars & Maps tab, the user specifies a number in the Number of Staff Members field (see the following screenshot) and saves the changes.
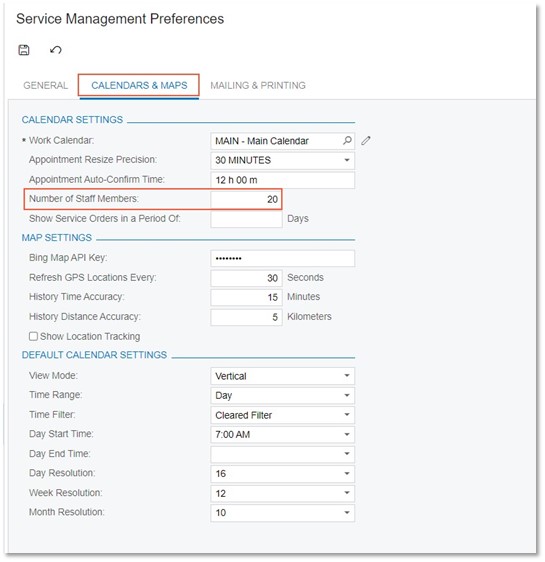
By default, the field contains 10. If a user clears the field and saves these changes, all of the field service staff members will be shown on the calendar boards
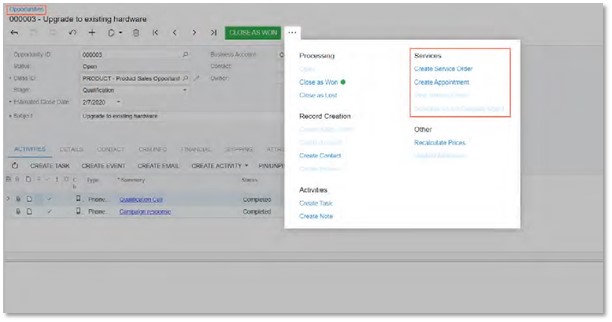
Quick Creation of a Service Document from an Opportunity and from a Project
MYOB Advanced 2021.2 introduces the ability to quickly create service documents (service orders and appointments) from the Opportunities (CR304000) and Projects (PM301000) forms. Now while remaining on either form, a user can quickly create a service order or schedule an appointment directly on the calendar board, without opening the Service Orders (FS300100) or Appointments (FS300200) form. This new functionality will help managers to reduce the time of creating service orders and scheduling appointments because they do not need to open a service document form and enter all the required information there.
Creating Service Documents from the Opportunities Form
In MYOB Advanced 2021.2, while working with an opportunity on the Opportunities (CR304000) form, a user can easily create a service order or appointment related to the opportunity. The user clicks one of the new menu commands, opens a dialog box, and quickly enters the general settings of the service order or appointment to be created. The system creates the opportunity-related service document immediately on the Service Orders (FS300100) or Appointments (FS300200) form.
To create a service document from the Opportunities form, on the More menu, under Services, the user can now use the Create Service Order and Create Appointment menu commands (see the following screenshot). The Services category also contains the View Service Order and Schedule on the Calendar Board service-related commands.
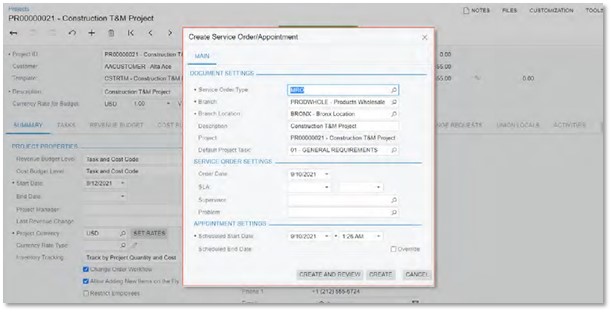
When a user clicks Create Service Order, the Create Service Order/Appointment dialog box is opened (see the following screenshot), in which the user specifies the basic settings the system will use to create the service order associated with the opportunity.
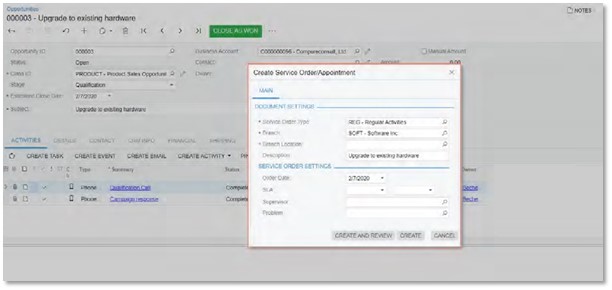
When a user clicks Create Appointment, the Create Service Order/Appointment dialog box is opened and includes the Appointment Settings section (see the following screenshot) The user specifies the basic settings the system will use to create an appointment associated with the opportunity. The system creates a service order in addition to an appointment automatically.

The user fills in all the required fields and specifies any other needed settings, and can click one of the following buttons:
-
Create: The system creates a service order or an appointment (or both documents) without opening the service document form—Service Orders or Appointments. In the upper right corner of the Opportunities form, the system shows a notification that the document has been created, but the user stays on the current form.
-
The user can later view the created service document on the Service Orders or Appointments form.
-
Create and Review: The system opens the Service Orders or Appointments form in a pop-up window with the created document. The user can review the document, add or change any settings, and save it.
The following commands are also included on the More menu under Services:
-
View Service Order: Opens the Service Orders form in a pop-up window, on which a user can view the service order associated with the selected opportunity.
-
Schedule on the Calendar Board: Opens the Calendar Board (FS300300) form, on which a user can schedule an appointment for the service order. The Calendar Board form can only be opened if a service order has been created for the selected opportunity and at least one service has been assigned to the associated service order.
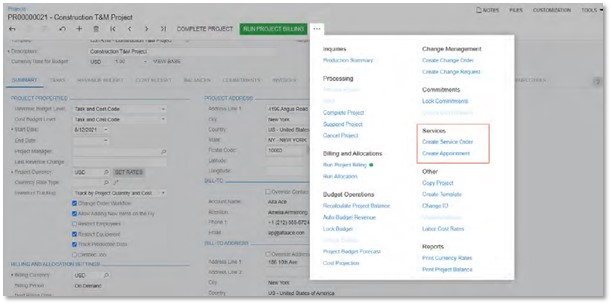
Creating a Service Order or an Appointment on the Projects Form
In MYOB Advanced 2021.2, while viewing a project on the Projects (PM301000) form, a user can easily create a service order or appointment related to the project. The user clicks one of the new menu commands, opens a dialog box, and quickly enters the general settings of the service order or appointment to be created. The system creates the project-related service document immediately on the Service Orders (FS300100) or Appointments (FS300200) form.
On the Projects form, on the More menu under Services, the following menu commands are now available (as shown in the following screenshot):
-
Create Service Order: Opens the Create Service Order/Appointment dialog box, in which the user specifies the basic settings the system will use to create a service order associated with the project.
-
Create Appointment: Opens the Create Service Order/Appointment dialog box with an additional section in which a user specifies the basic settings the system will use to create an appointment associated with the project.
The Create Service Order/Appointment dialog box with the Appointment Settings section is shown in the following screenshot.
The user fills in all the required fields and specifies any other needed settings, and can click one of the following buttons:
-
Create: The system creates a service order or an appointment (or both documents) without opening the service document form—Service Orders or Appointments. In the upper right corner of the Projects form, the system shows a notification that the document has been created, but the user stays on the current form.
The user can later view the created service document on the Service Orders or Appointments form.
-
Create and Review: The system opens the Service Orders or Appointments form in a pop-up window with the created document. The user can review the document, add or change any settings, and save it.
As a result, a user can save time and quickly create a service order or an appointment (or both documents) for a project.
Tracking Profitability of Items in Service Orders
Since MYOB Advanced 2021.2, a user can track the profitability and costs of items (stock items, non-stock items, services, and labour) at the service order level—that is, of the items included in a service order.
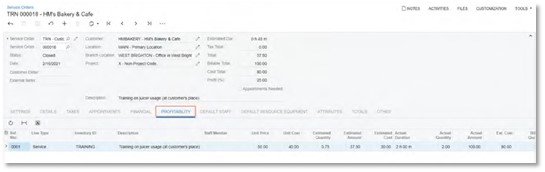
The New Profitability Tab on the Service Orders Form
The new Profitability tab, shown in the following screenshot, has been added to the Service Orders (FS300100) form to display details about the profitability and costs of the items in the service order. The lines on this tab are added by the system.
The table on this tab contains the following columns, which contain data about each listed item: Ref. Nbr., Line Type, Inventory ID, Description, Staff Member, Unit Price, Unit Cost, Estimated Quantity, Estimated Amount, Estimated Cost, Actual Duration, Actual Quantity, Actual Amount, Ext. Cost, Billable Quantity, Billable Amount, Profit, Profit (%), and Appointment Nbr. (hidden by default).
The system copies most of the values in these columns from the source of the line, as described further in this topic. The values related to profitability and costs are calculated by the system based on the type of the line item and the billing settings specified for the customer specified in the service order.
On this tab, the following types of detail lines can be displayed:
-
Non-Stock Item and Service types: The system copies all lines of these types, including the applicable column values, from the Details tab of the Service Orders form. For each line of this type, the system determines the values of the following columns as described:
-
Unit Cost: The system copies this value from the Details tab of this form. The value is the cost specified in the Current Cost field of the Non-Stock Items (IN202000) form.
-
Ext. Cost: This value is the extended cost of the item or service, which the system calculates as the unit cost multiplied by the actual quantity of the item.
-
Billable Quantity: This value is the same as the value in the Estimated Quantity column of this tab if on the Financial Settings tab, Service Orders is specified in the Billing By field. If Appointments is instead specified in the Billing By field, then on the Profitability tab, the value in the Billable Quantity column is the same as the value in the Billable Quantity column of the Details tab of the Appointments (FS300200) form for the appointment associated with this item.
-
Billable Amount: This value is the same as the value in the Estimated Amount column of this tab if on the Financial Settings tab, Service Orders is specified in the Billing By field. If Appointments is instead specified in the Billing By field, then on the Profitability tab, the value in the Billable Amount column is the same as the value in the Billable Amount column of the Details tab on the Appointments form for the appointment associated with this item.
-
Inventory Item type: The system copies all lines of this type, including the applicable column values, from the Details tab of the Service Orders form. For each line of this type, the system determines the values of the following columns as described:
-
Unit Cost: This value is the cost specified in the Average Cost field on the Stock Items (IN202500) form for the item. If this item is a serialised inventory item, this value may vary; thus, the value in this column is the average of the costs of all the serialised items with this inventory ID specified in this service order on the Details tab.
-
Ext. Cost: This value is the extended cost of the item or service, which is the unit cost multiplied by the actual quantity of the item. For a serialised item, this is the sum of the costs of all the serialised items with this inventory ID in this service order.
-
Billable Quantity: This value is the same as the value specified in the Quantity column of the Details tab if on the Financial Settings tab of this form, Service Orders is specified in the Billing By field. If Appointments is instead specified in the Billing By field, then on the Profitability tab, the value in the Billable Quantity column is the same as the value specified in the Appointment Quantity column of the Details tab.
-
Billable Amount: This value is the same as the value specified in the Amount column of the Details tab if on the Financial Settings tab of this form, Service Orders is specified in the Billing By field. If Appointments is specified in the Billing By field, then on the Profitability tab, the value in the Billable Amount column is the same as the value in the Appointment Amount column of the Details tab.
-
Labour type: When the system logs the time of a staff member assigned to an appointment associated with this service order, causing the log line to be added to the Log tab of the Appointments form, the system copies this line and its applicable column values to the Profitability tab of the Service Orders form. For each line of this type, the system determines the values of the following columns as described below:
-
Unit Cost: The system fills in this column with the cost specified in the Rate column on the Labour Rates (PM209900) form for the employee (that is, the applicable staff member) who performed the labour.
-
Ext. Cost: The extended cost of the labour item is the unit cost multiplied by the actual quantity of the item.
-
Billable Quantity: For the service order type of the service order on the Service Order Types form, if Project Transactions is selected in the Generated Billing Documents field and Cost as Cost is selected in the Billing Type field, then the value in the Billable Quantity column on the Profitability tab of the Service Orders form will be the same as the value of the Actual Quantity column of the Details tab on the Appointments form for the line representing this labour item. Otherwise, the system specifies 0 in this column.
-
Billable Amount: For the service order type of the service order on the Service Order Types form, if Project Transactions is selected in the Generated Billing Documents field and Cost as Cost is selected in the Billing Type field, then the value in the Billable Amount column on the Profitability tab of the Service Orders form will be the same as the value of the Actual Amount column of the Details tab on the Appointments form for the line representing this labour item. Otherwise, the system specifies 0 in this column.
For each line, regardless of its type, the Profit column contains the profit of the line item, which the system calculates by using the following formula.
Billable–Ext.Cost
For the Profit (%) column, which contains the profit of the line item expressed as a percent, the system uses the following formula.
((Billable Amount–Ext. Cost)/Ext. Cost) * 100
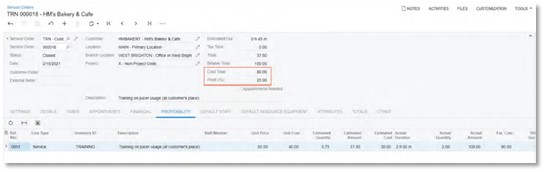
Changes in the Summary Area of the Service Orders Form
In the Summary area of the Service Orders (FS300100) form, the following fields (shown in the screenshot below) have been added:
-
Cost Total: The total of the Ext. Cost values of all line items on the Profitability tab.
-
Profit (%): The profitability of the service order's items, expressed as a percent. The system calculates this value as follows.
((Line Total (the Billable Total section of the Totals tab) – Cost Total) / Cost Total) * 100
Also, the Service Order Total field has been moved from the Summary area to the Totals tab (Service Order Total section), and renamed to Total.
Changes on the Appointments Tab of the Service Orders Form
On the Appointments tab of the Service Orders (FS300100) form, the following columns have been added (as the screenshot below shows):
-
Billable Total: The value in the Appointment Total field of the Summary area of the Appointments (FS300200) form for the corresponding appointment.
-
Cost Total: The value in the Cost Total field of the Summary area of the Appointments form for the corresponding appointment.
Changes on the Totals Tab of the Service Orders Form
On the Totals tab of the Service Orders (FS300100) form, the Service Order Totals section has been modified, and two new sections, Appointment Totals and Billable Total, have been added (see the following screenshot).
Specifically, the following changes have been made to this tab:
-
The Service Order Totals section has been modified as follows:
-
The Appointments Total field has been removed (the field that contains the equivalent value is now located in the new Appointment Total section).
-
The Service Order Total field has been renamed to Total.
-
The Billable Total field has been removed (the field that contains the equivalent value is now located in the new Billable Total section).
-
The new Appointment Totals section has been added and contains the following elements:
-
Line Total: This field holds the sum of totals without tax of appointments related to the service order; appointments are included only if they have the Completed or Closed status.
-
Tax Total: This field contains the sum of the tax amounts of appointments related to the service order appointments are included only if they have the Completed or Closed status.
-
Total: This field contains the sum of totals of appointments related to the service order with taxes included; appointments are included only if they have the Completed or Closed status.
-
The new Billable Total section has been added and contains the following elements:
-
Billing By: The value in this field is copied from the Billing By field of the Financial Settings tab of the current form.
-
Line Total: If the Billing By field contains Appointments, then the system populates the Line Total field with the value in the Line Total field of the Appointment Totals section. If the Billing By field contains Service Orders, then the system populates this field with the value in the Line Total field of the Service Order Totals section.
-
Tax Total: If the Billing By field contains Appointments, then the value in the Tax Total field is the same as the value in the Tax Total field of the Appointment Totals section. If the Billing By field contains Service Orders, then the value in the Tax Total field is the same as the value in the Tax Total field of the Service Order Totals section.
-
Billable Total: If the Billing By field contains Appointments, then the value in the Billable Total field is the same as the value in the Total field of the Appointment Totals section. If the Billing By field contains Service Orders, then the value in the Billable Total field is the same as the value in the Total field of the Service Order Totals section.
Thus, on this tab, the total amounts related to the selected service order and the associated appointments, as well as the billable totals, which are calculated by the system based on the billing settings are shown.
New Service Contract Billing Types
Starting in MYOB Advanced 2021.2, two new service contract billing types are available in the system. With either of those new billing types, a billing document is generated for a service contract at the beginning of each contract period and contains the fixed price that has been agreed upon. If any additional services or inventory items have been used on the appointment during the contract period, then depending on the specified billing type, they will not be billed or will be billed separately. The new billing types are described in detail in the next section of this topic.
The old service contract billing types (those that were available in the system before MYOB Advanced 2021.2) have been renamed.
New Service Contract Billing Types
On the Summary tab of the Service Contracts (FS305700) form, in the Billing Type field, the following new options are now available:
-
Beginning-Period Fixed: The type that is used for contracts for which the billing occurs at the beginning of the contract period. Any additional services or inventory items that have been used in appointments during this period are not billed.
At the beginning of the contract period, the system generates a billing document that contains the items specified in the contract with the agreed price. If any additional services or items have been used during an appointment, the system generates another billing document that contains these additional services or items with the 0 price.
-
Beginning-Period Plus. The type that is used for contracts for which the billing occurs at the beginning of the contract period. Any additional services or inventory items that have been used in appointments during this period are billed separately.
At the beginning of the contract period, the system generates a billing document that contains the items specified in the contract with the agreed price. If any additional services or items have been used during an appointment, the system generates another billing document that contains these additional items with their actual prices.
The following screenshot shows the current service contract billing types; the last two are the new options.
Renamed Service Contract Billing Types
The names of the billing types that previously existed in the system have been changed in MYOB Advanced 2021.2 as follows:
-
As Performed Billings has been renamed to At Time of Service.
-
Standardised Plus Usage/Overage has been renamed to End-Period Plus.
The functionality of these billing type options has not been changed.
Billing Documents
If the Beginning-Period Fixed or Beginning-Period Plus billing type is specified for the service contract on the Service Contracts (FS305700) form, then in the beginning of the billing period, the system generates an AR invoice for the service contract. The AR invoice includes the price defined by the contract.
For any additional services or inventory items that have been used during an appointment (if any), the system generates a billing document from an appointment or service order document, depending on the billing cycle specified for a customer.
On the Service Contracts form, in the table on the Services per Period tab, the new Deferral Code column has been added. In this column, the system inserts the value that is specified for the item on the Deferral tab of the Non-Stock Items (IN202000) form. When the system generates an AR invoice from the service contract, it copies the deferral code value to the Deferral Code column of the Details tab on the Invoices and Memos (AR301000) form.
Flexible Statement Generation Options
In MYOB Advanced 2021.2, the printing of consolidated customer statements has been reworked to support the changes introduced by the Multiple Base Currencies feature (described in Finance: Support of Multiple Base Currencies).
Changes to the Accounts Receivable Preferences Form
On the Accounts Receivable Preferences (AR101000) form, the Consolidate Statements for All Branches check box on the General tab (Consolidation Settings section) has been replaced with the Prepare Statements field, which is shown in the following screenshot.
The Prepare Statements field appears on the form if the Multi-Branch Support feature has been enabled on the Enable/Disable Features (CS100000) form. A user can select one of the following options:
-
For Each Branch: If this option is selected, statements will be generated for each branch separately. This option corresponds to the Consolidate Statements for all Branches check box being cleared in previous versions of MYOB Advanced.
-
Consolidated for Company (default): If this option is selected, a separate statement will be generated for each company the customer is working with. This statement contains the documents originating from all the branches of the company.
-
Consolidated for All Companies: If this option is selected, statements from different branches will be consolidated. This option corresponds to the Consolidate Statements for all Branches check box being selected in the previous versions of MYOB Advanced. The option appears on the list if the Multiple Base Currencies feature is disabled.
If a user attempts to enable the Multiple Base Currencies feature on the Enable/Disable Features form and this option is selected, the system will display an error message that the user should select a different option in this field.
Changes to the Print Statements Form
On the Print Statements (AR503500) form, the Branch box appears on the form if For Each Branch is selected in the Prepare Statements field of the Accounts Receivable Preferences (AR101000) form. The Branch field and its lookup table are illustrated in the following screenshot.
This setting is required, and the Branch lookup table shows all active branches that can be accessed by the current user. By default, the Branch field displays the branch to which the user is signed in. The statements related to the selected branch are loaded to the table.
If Consolidated for Company is selected in the Prepare Statements field on the Accounts Receivable Preferences form, the Company field appears on the Print Statements form, as shown in the following screenshot.
This setting is required, and the Company lookup table shows all active companies whose branches can be accessed by the current user. By default, the Company field displays the company of the branch to which the user is signed in. The statements related to the branches of the selected company are grouped by customer and loaded to the table.
If Consolidated for All Companies is selected in the Prepare Statements field on the Accounts Receivable Preferences form, the Company and Branch fields are hidden on the Print Statements form. The statements of all branches are grouped by customer and loaded to the table.
Changes to the Customer Statement History Form
On the Customer Statement History (AR404600) form, the Branch field in the Selection area has been renamed to Company/Branch. The lookup table shows a list of the branches, companies, and company groups to which the current user has access, as shown in the following screenshot.
Depending on the option selected in the Prepare Statements field on the Accounts Receivable Preferences (AR101000) form, the default value in the Company/Branch field can be one of the following:
-
If For Each Branch is selected, the default value is the branch to which the user is signed in.
-
If Consolidated for Company is selected, the default value is the company of the branch to which the user is signed in.
-
If Consolidated for All Companies is selected, the field contains no default value.
Regardless of the settings on the Accounts Receivable Preferences form, the system loads to the table the statement records, which are grouped by branch for the base currency statements and grouped by branch and currency for the foreign currency statements.
Other Changes Related to Customer Statements
On the Customers (AR303000) and Statement History Details (AR404300) forms, a user clicks the Print Statement command to run the Customer Statement (AR641500) report with the Branch and Company report parameters left empty. The statements include only data related to the branches to which the current user has access. Depending on the option selected in the Prepare Statements field on the General tab of the Accounts Receivable Preferences (AR101000) form, the documents in the statements will be separated by company (if the Consolidated for Company option is selected) or by branch (if the For Each Branch option is selected), or they will be consolidated (if the Consolidated for All Companies option is selected).
Depending on the option selected in the Prepare Statements field on the Accounts Receivable Preferences form, the Customer Statement and Customer Statement MC (AR642000) reports will include the transactions listed in the following table.
|
Option in the Prepare Statements Field |
Transactions Displayed in the Reports |
|
For Each Branch |
Transactions related to each branch are included in a separate statement. |
|
Consolidate for Company |
Transactions related to all branches of the same company are included in a single statement. In the statement header, the company information will be displayed. |
|
Consolidate for All Companies |
Transactions related to all branches are included in a single statement. In the statement header, the address, phone, email, and tax registration ID of the branch selected in the Statement from Branch field on the General tab of the Accounts Receivable Preferences form will be displayed. |
Upgrade Notes
On the Accounts Receivable Preferences (AR101000) form, if in an earlier version of MYOB Advanced, the Consolidate Statements for all Branches check box was selected, after an upgrade to MYOB Advanced 2021.2, the Consolidate for All Companies option will be selected in the Prepare Statements field on this form. If the Consolidate Statements for all Branches check box was cleared before the upgrade, the For Each Branch option will be selected in the Prepare Statements field after the upgrade.
If the Customer Statement (AR641500) and Customer Statement MC (AR642000) reports have been customised, after the upgrade to MYOB Advanced 2021.2, the reports will work as follows:
-
If Consolidated for All Companies is selected in the Prepare Statements field on the Accounts Receivable Preferences form, the statements will be consolidated for all branches.
-
If For Each Branch or Consolidated for Company is selected in the Prepare Statements field on the Accounts Receivable Preferences form, the statements will be printed separately for each branch.
Customisers should modify the old customised reports to support the new Consolidated for Company option in the Prepare Statements field of the Accounts Receivable Preferences form.
Support of Multiple Base Currencies
In previous versions of MYOB Advanced, all companies within one tenant had the same base currency. If system administrators wanted to implement a related company that has a base currency that is different from the base currency of the parent company, they had to implement the related company in a separate tenant. As a result, because implementation spanned multiple tenants, it was difficult to maintain a shared list of items, there was no single place to manage approvals, and it was impossible to have joint projects that involved the employees of multiple companies.
In MYOB Advanced 2021.2, in one tenant, users can implement multiple companies with different base currencies.
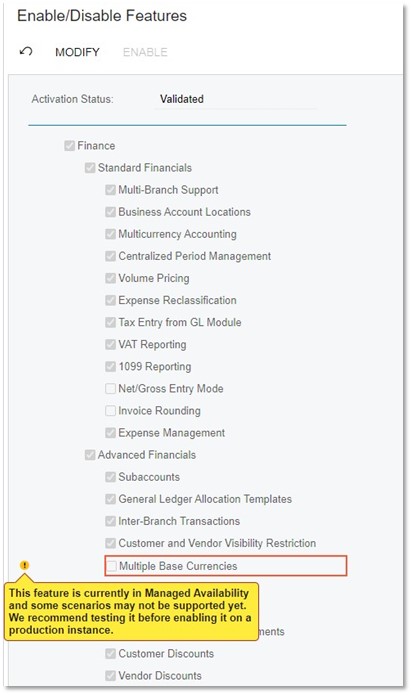
Changes to the Enable/Disable Features Form
On the Enable/Disable Features (CS100000) form, the Multiple Base Currencies feature has been added as shown in the following screenshot.
The system displays a warning message near the Multiple Base Currencies check box, informing users that the feature needs to be tested before enabling it on a production instance.
For the Multiple Base Currencies feature to be enabled, the following features need to be enabled on the Enable/ Disable Features (CS100000) form:
-
Multi-Branch Support
-
Multicurrency Accounting
-
Customer and Supplier Visibility Restriction
In 2021.2, multiple base currencies are supported for a limited set of financial areas—general ledger, accounts payable, accounts receivable, cash management, currency management, time and expenses, and taxes.
The following features are not supported if the Multiple Base Currencies feature has been enabled:
-
Deferred Revenue Management
-
Contract Management
-
Fixed Asset Management
-
Dunning Letter Management
-
Purchase Requisitions
-
Time Management
-
Projects
-
Customer Portal
-
Customer Management
-
Service Management
-
Payroll
-
Manufacturing
-
Commerce Integration
-
Procore Integration
If the Multiple Base Currencies feature is enabled and the user selects a check box corresponding to one of the listed features, the system displays an error message.
If one or all of the listed features are enabled and the user selects the check box corresponding to the Multiple Base Currencies feature, the system displays an error message that the feature cannot be enabled.
Changes to the Companies Form
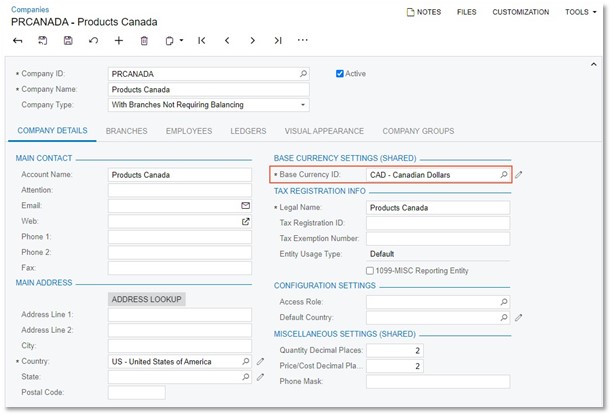
If the Multiple Base Currencies feature is enabled on the Enable/Disable Features (CS100000) form, on the Companies (CS101500) form, if a user is creating a new company, the Base Currency ID setting is required; no default value is inserted in this field. When the user saves the new company, the Base Currency ID field becomes unavailable for editing.
If the Multiple Base Currencies feature is disabled, when a new company record is being created, the Base Currency ID setting is required; the field has no default value if no other companies have been defined in the tenant. (For subsequent companies in the tenant, the field is populated with the base currency selected for the first company and cannot be modified.)
The following screenshot illustrates a new company with the CAD base currency being created.
On the Ledgers tab, the lookup table in the Ledger column contains ledgers of the Actual type only if the company's base currency is specified for them; it also contains all ledgers of other types. If a user clicks Create Ledger on the form toolbar, the system creates a ledger with the company's base currency.
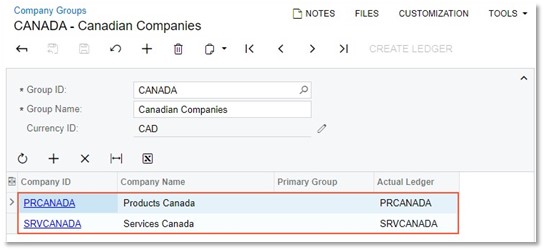
On the Company Groups tab, the lookup table in the Group ID column shows only groups with the same currency as the base currency of the company.
Changes to the Ledgers Form
If the Multiple Base Currencies feature is enabled on the Enable/Disable Features (CS100000) form, on the Ledgers (GL201500) form, the Currency field is available for an actual ledger if there are no companies associated with the ledger. If a user is creating a new ledger of the Actual type, the Currency setting is required; the field is empty by default.
For an actual ledger, on the Companies tab, a user can select only a company with the same base currency as the ledger's currency.
If the Multiple Base Currencies feature is disabled, the Currency field is disabled for an actual ledger. When an actual ledger is being created, the system inserts the currency used for all companies of the tenant.
Changes to the Company Groups Form
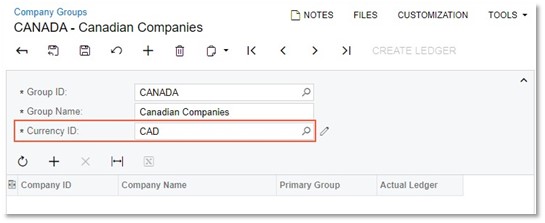
If the Multicurrency Accounting feature has been enabled on the Enable/Disable Features (CS100000) form, the Currency ID field appears in the Summary area of the Company Groups (CS102500) form, as shown in the following screenshot.
If the Multiple Base Currencies feature is enabled, when a user is creating a new company group, the Currency ID setting is required; the field is empty by default. The currency can be selected from the list of active currencies. The currency can be changed for an empty company group (a company group with no companies listed) only if the company group is not associated with any customer or supplier. If the Multiple Base Currencies feature is disabled, the Currency ID field contains the base currency used for all companies in the tenant and is unavailable for editing.
A user can add to the group only companies that have the same base currency as the currency of the group, as shown in the following screenshot.
Changes to the Customers Form
If the Multiple Base Currencies feature is enabled on the Enable/Disable Features (CS100000) form, the Restrict Visibility To setting on the Financial tab of the Customers (AR303000) form becomes required for regular customers. Users should associate each customer with an appropriate entity by selecting it in the Restrict Visibility To field. The base currency of the entity with which the customer is associated will be the currency in which the system stores the customer's balance and credit limit. As a result, customers can be used only in the transactions originating from the branches that have the same base currency as the customer has.
On the Customers form, if the Multiple Base Currencies feature is enabled, the base currency symbol in parenthesis is displayed for the Balance, Prepayment Balance, and Retained Balance fields in the Summary area, and the Write-Off Limit, Credit Limit, Unreleased Balance, and Remaining Credit Limit fields on the Financial tab.
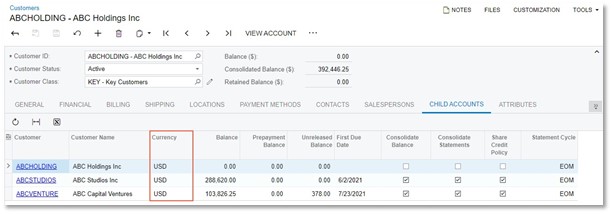
On the Child Accounts tab, the Currency column has been added to the table, as shown in the following screenshot.
If the Multiple Base Currencies feature is enabled, on the Customers form, the following changes have been implemented for customers extended from a branch:
-
The Restrict Visibility To setting on the Financial tab is not required.
If a customer is not associated with any entity, it is visible and can be used by any company in the tenant. A user can select an entity in the Restrict Visibility To field if no transactions have been posted for the customer in a currency different from the base currency of the selected entity.
-
The credit verification rules cannot be used for customers extended from a branch. That is, the Credit Verification Rules section and its fields do not appear on the Financial tab of the Customers form.
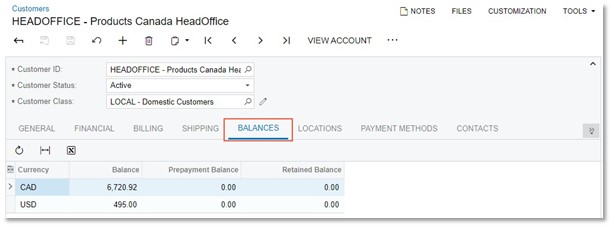
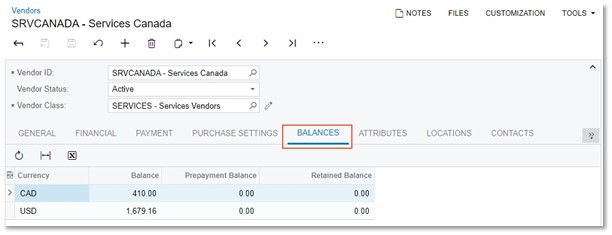
-
The Balances tab is now visible on the Customers form, as shown in the following screenshot. The tab is shown only if the current user is assigned to a role that gives users the ability to access companies with different base currencies.
The table on the Balances tab displays the balances of the customer grouped by base currency.
Changes to the Suppliers Form
If the Multiple Base Currencies feature is enabled on the Enable/Disable Features (CS100000) form, the Restrict Visibility To setting on the Financial tab of the Suppliers (AP303000) form becomes required for regular suppliers. Users should associate each supplier with an appropriate entity by selecting it in the Restrict Visibility To field. The base currency of the entity with which the supplier is associated will be the currency in which the system stores the supplier's balance. As a result, suppliers can be used only in the transactions originating from the branches that have the same base currency as the supplier has.
In the Summary area of the Suppliers form, if the Multiple Base Currencies feature is enabled, the base currency symbol in parenthesis is displayed for the Balance, Prepayment Balance, and Retained Balance fields.
If the Multiple Base Currencies feature is enabled, on the Suppliers form, the following changes have been implemented for suppliers extended from a branch:
-
The Restrict Visibility To setting on the Financial tab is not required.
If a supplier is not associated with any entity, it is visible and can be used by any company in the tenant. A user can select an entity in the Restrict Visibility To field if no transactions have been posted for the supplier in a currency different from the base currency of the selected entity.
-
The Balances tab is now visible on the Suppliers form, as shown in the following screenshot. The table on this tab displays the balances of the supplier grouped by base currency. The tab is shown only if the current user is assigned to a role that gives users the ability to access companies with different base currencies.
Changes to the Accounts Receivable Preferences Form
If the Multiple Base Currencies feature is enabled on the Enable/Disable Features (CS100000) form, on the Accounts Receivable Preferences (AR101000) form, the Consolidated for All Companies option is not available for selection in the Prepare Statements field. For more details about the changes on this form, see Finance: Flexible Statement Generation Options.
Support of Prices in Base Currencies
If multiple related companies with multiple base currencies are configured in the same tenant and the companies share the inventory item records, users can perform the following operations:
-
Upload a list of non-stock items with the default prices in a specific currency; this list will be valid for the companies with this base currency
-
Review and edit the default prices in the currency of the current branch
-
Maintain the MSRP for the products in different currencies that will be used by the companies with these base currencies
-
Maintain the standard cost of the non-stock items that are valid for a specific base currency
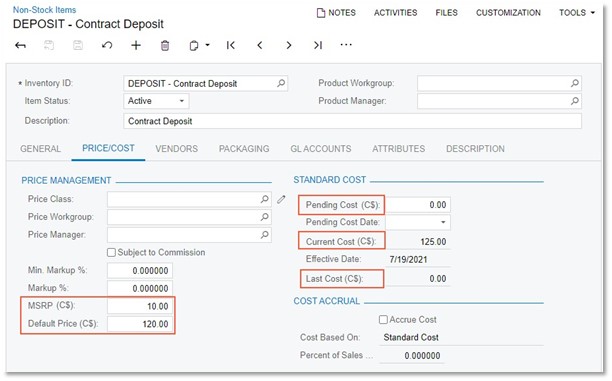
If the Multiple Base Currencies feature is enabled on the Enable/Disable Features (CS100000) form, on the Non-Stock Items (IN202000) form, item default price, MSRP, pending cost, standard cost, and last cost are displayed in the base currency of the branch to which the user is signed in. The currency symbol of the base currency is now displayed for the following fields: MSRP, Default Price, Pending Cost, Current Cost, and Last Cost, as shown in the following screenshot. (In this example, the Canadian dollar is the applicable base currency.)
On the Sales Price Worksheets (AR202010) form, in the Calculate Pending Prices dialog field, the Currency field has been added, as shown in the following screenshot.
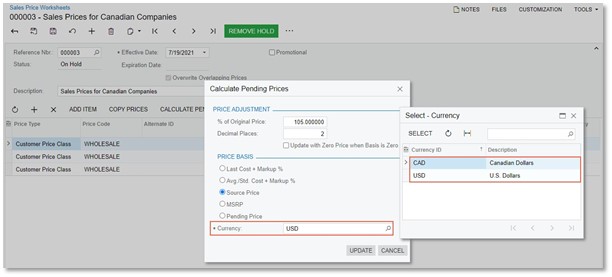
The lookup table shows the list of the base currencies set for the branches to which the user has access. The Currency field is available and this setting is required if one of the following option buttons is selected: Avg./Std. Cost + Markup % or MSRP. By default, the base currency of the current branch is displayed in the field. The system will use the standard cost or MSRP in the selected currency, respectively, as a price basis.
On the Invoices and Memos (AR301000) and Cash Sales (AR304000) forms, the system will insert the applicable price according to the following criteria:
-
If the Always Calculate Price from Base Currency Price check box is selected on the Accounts Receivable Preferences (AR101000) form, the system will look for a sales price of the item in the base currency of the document's originating branch effective on the document date and convert it to the document currency.
-
If the sales price is not found, the default price in the base currency of the document's originating branch will be used if this price has been specified. The price will be converted to the document currency.
In the transactions that write off the accrued cost of the non-stock items for which the Accrue Cost check box is selected and Standard Cost is selected in the Cost Based On field on the Price/Cost tab of the Non-Stock Items form, the standard cost specified in the base currency of the document's originating branch will be used.
On the Bills and Adjustments (AP301000) and Quick Checks (AP304000) forms, when the system searches for an applicable price that is effective on the document date, the standard cost in the base currency of the document's originating branch will be used if this cost has been specified.
Support of Company-Specific Base Currencies on Data Entry Forms
If the Multiple Base Currencies feature is enabled on the Enable/Disable Features (CS100000) form, the system converts each transaction to the base currency of the company by using the exchange rate effective on the transaction date.
On data entry forms, all branches involved in the transaction must have the same base currency. The system performs validation for manually created documents and for documents generated automatically.
To ensure that the base currency of the branches and customers or suppliers involved in a transaction is the same, on transaction release, the system validates that the base currency of the customer or supplier and of the branches is the same as the base currency saved for the transaction. These and other validations have been implemented on the following forms:
-
Allocations (GL204500)
-
Journal Transactions (GL301000)
-
Budgets (GL302010)
-
Trial Balance (GL303010)
-
Journal Vouchers (GL304000)
-
Reclassify Transactions (GL506000)
-
Cash Accounts (CA202000)
-
Funds Transfers (CA301000)
-
Transactions (CA304000)
-
Process Bank Transactions (CA306000)
-
Reclassify Payments (CA506500)
-
Bills and Adjustments (AP301000)
-
Checks and Payments (AP302000)
-
Suppliers (AP303000)
-
Supplier Locations (AP303010)
-
Quick Checks (AP304000)
-
Bills Pending Payments (AP403000)
-
Checks Pending Printing (AP404000)
-
Prepare Payments (AP503000)
-
Invoices and Memos (AR301000)
-
Payments and Applications (AR302000)
-
Customers (AR303000)
-
Customer Payment Methods (AR303010)
-
Cash Sales (AR304000)
-
Write Off Balances and Credits (AR505000)
-
Calculate Overdue Charges (AR507000)
-
Tax Adjustments (TX301000)
-
Tax Bills and Adjustments (TX303000)
-
Prepare Tax Report (TX501000)
-
Release Tax Report (TX502000)
-
Recognise Output VAT (TX503000)
-
Recognise Input VAT (TX503500)
-
Employees (EP203000)
-
Expense Receipt (EP301020)
-
Expense Claim (EP301000)
Changes in Reports and Inquiries
If the Multiple Base Currencies feature is enabled on the Enable/Disable Features (CS100000) form, the Company/ Branch setting is required on multiple report and inquiry forms related to accounts payable, accounts receivable, currency management, and taxes.
By default, the Company/Branch field displays the branch to which the user is signed in. The user can select another branch, company, or company group to which they have access.
Other UI Changes
To support the Multiple Base Currencies feature, the following UI changes have been introduced:
-
On the Calculate Commissions (AR505500) and Close Commission Period (AR506500) forms, the Currency column has been added to the table, showing the base currency of the documents and commissions. The column is visible if the Multiple Base Currencies feature has been enabled. All commissionable documents and commission history records are now grouped by their base currency.
-
On the Commission Details (AR403000) form, the Currency column has been added to the table, showing the base currency of the documents. The column is visible if the Multiple Base Currencies feature has been enabled.
-
On the Salespersons (AR205000) form, the Currency column has been added to the table on the Commission History tab, which shows the currency of the commissions. The column is visible if the Multiple Base Currencies feature has been enabled. All commission history records are now grouped by their currency.
-
On the Release AR Retainage (AR510000) and Release AP Retainage (AP510000) forms, the Branch field in the Selection area has been replaced with the Company/Branch field; this setting is required if the Multiple Base Currencies feature has been enabled. Users can select a branch, company, or company group to which they have access. If a company or a branch is selected in the Company/Branch field, the Post Period field shows the periods from the company calendar. If a company group is selected or the field is empty, the periods from the master calendar are shown.
-
On the Generate Intercompany Documents (AP503500) form, if the base currencies of the selling company and the purchasing company are different, the rate is not copied from an AR document to the corresponding AP document.
-
On the Cash Flow Forecast (CA401000) form, the Company/Branch field has been added to limit the cash accounts used in a forecast to the accounts that belong to the branches with the same base currency. The setting is required if the Multiple Base Currencies feature has been enabled. Users can select a branch, company, or company group to which they have access.
-
On the Revalue AP Accounts (CM504000), Revalue AR Accounts (CM505000), and Revalue GL Accounts (CM506000) forms, the Company/Branch field has been added to the Selection area. The setting is required if the Multiple Base Currencies feature has been enabled. In this field, users can select a branch, company,
or company group to which they have access. If a company or a branch is selected in the Company/Branch field, the Fin. Period field shows the periods from the company calendar. If a company group is selected or the field is empty, the periods from the master calendar are shown.
The base currency symbol in parenthesis has been added to the Revaluation Total field in the Selection area.
-
On the Supplier Summary (AP655000) report, the Currency column has been renamed to Supplier Currency, and the Balance Currency column has been added, which shows the currency of the supplier balance.
-
On the Supplier Profiles (AP655500) report, the Currency column has been renamed to Supplier Currency.
-
On the Customer Summary (AR650500) report, the Currency column has been renamed to Customer Currency, and the Balance Currency column has been added, which shows the currency of the customer balance.
-
On the Customer Profiles (AR651000) report, the Currency column has been renamed to Customer Currency. The currency ID of the customer's base currency has been added in parentheses to the Write-Off Limit and Credit Limit rows.
-
On the Employees (EP203000) form, the Base Currency ID field has been added. For more information, see Projects and Construction: Multiple Base Currencies in Expense Receipts and Claims.
Upgrade Notes
During an upgrade of MYOB Advanced to 2021.2, for customers and suppliers, the value in the Restrict Visibility To field on the Financial tab of the Customers (AR303000) and Suppliers (AP303000) forms will not be changed.
Users should associate each customer and supplier with the appropriate company or company group this customer or supplier will work with, by selecting the needed entity in the Restrict Visibility To field on the Customers (AR303000) and Suppliers (AP303000) form respectively.
Review of the Labour Efficiency in Production
A new report, Production Order Labour Efficiency (AM653000), has been added to MYOB Advanced Manufacturing Edition 2021.2. By using the report, production managers can analyze the labour efficiency of the employees involved in production. By default, the corresponding report form (shown in the following screenshot) can be accessed from the Reports category of the Production Management workspace. On the report form, a user can specify the needed parameters and then run the report.
Employee details can be displayed or hidden depending on whether the Show Employee Details check box is selected. In the following screenshot, the report displays data for a particular production order, including employee details.
In the report, the labour efficiency is calculated by using the following formula:
Efficiency = (Production Order Standard Time / Labour Actual Time) * 100
Manufacturing: Review of the Labour Efficiency in Production |
The formula's parameters mean the following:
-
Production Order Standard Time is the sum of the time of a production order's operations—that is, setup time and run time.
-
Labour Actual Time is the sum of times reported for each production order operation
The efficiency is calculated for production orders that have a status of Completed or Closed. Operations with backflushed labour always have 100% efficiency; therefore, the efficiency is not displayed for these operations.
Preassigned Lot and Serial Numbers
In previous versions of MYOB Advanced Manufacturing Edition, for a lot- or serial-tracked item being manufactured, a production manager was able to assign the lot or serial number to the item only when the item was moved to stock from a work centre. This was inconvenient for organisations that need to prepare labels and other paperwork prior to moving produced items to stock based on their production processes, as well as for organisations that need to trace the specific subassemblies and materials that make up the final product.
Version 2021.2 introduces the ability to specify a lot or serial number for a produced item on creation of a production order. Additionally, for organisations that need granular traceability, a production manager can set up the system so that it requires the lot or serial number of the produced item to be assigned to lot- or serial-tracked materials when the materials are being issued or when the produced item is being moved to stock.
The new functionality is available only when the Lot and Serial Tracking feature is enabled on the Enable/Disable Features (CS100000) form and only for produced items with an assigned lot or serial class that has the When Received assignment method selected on the Lot/Serial Classes (IN207000) form.
Preparation for the Preassignment of Lot and Serial Numbers
A production manager needs to create a production order type that will facilitate the processing of production orders with lot- or serial-tracked items whose lot or serial numbers need to be preassigned. On the Production Order Types (AM201100) form, the production manager needs to do the following for the production order type (as shown in the screenshot below):
-
In the Summary area, specify the identifier and description, and select the Regular function.
-
In the Data Entry section of the General tab, select the new Allow Preassigning Lot/Serial Numbers check box. With this check box selected, lot or serial numbers can be specified for items before a production order is released.
-
In the new Require Parent Lot/Serial Number field, which becomes available if the Allow Preassigning Lot/Serial Numbers check box is selected, select one of the following options:
-
Never if the assignment of lot or serial numbers of a parent item to lot- or serial-tracked materials is not needed or if most produced items do not contain lot- or serial-tracked materials. This is the default option.
-
On Issue if the lot or serial number of a produced item should be assigned to lot- or serial-tracked materials when a material transaction is released on the Materials (AM300000) form. The system will not release the transaction until the user assigns the lot or serial number of the produced item to each lot- or serial-tracked material.
With this option, backflushing of lot- or serial-tracked materials is not supported because this setting requires a lot or serial number to be assigned to the parent item when the materials are issued.
-
On Completion if the lot or serial number of a produced item must be assigned to lot- or serial-tracked materials before the movement of the produced items into stock through the release of the appropriate transaction on the last operation. On the new Late Assignment (AM312000) form, a user assigns lot or serial numbers of the produced item to its materials after the materials have been issued. The user must assign the lot or serial number of the produced item to each material to be able to release the transaction, which is a move transaction on the Move (AM302000) form or a labour transaction with a positive produced quantity on the Labour (AM301000) form.
When a user creates a production order on the Production Order Maintenance (AM201500) form, the Allow Preassigning Lot/Serial Numbers and Require Parent Lot/Serial Number settings from the selected production order type are copied to the production order (on the General tab), as shown in the following screenshot. The user can change these default settings for a particular order, if needed.
Preassignment of Lot and Serial Numbers
To assign lot or serial numbers to the units of a produced item in a production order, on the Production Order Maintenance (AM201500) form, a user does the following:
-
Creates a production order for the lot- or serial-tracked item.
-
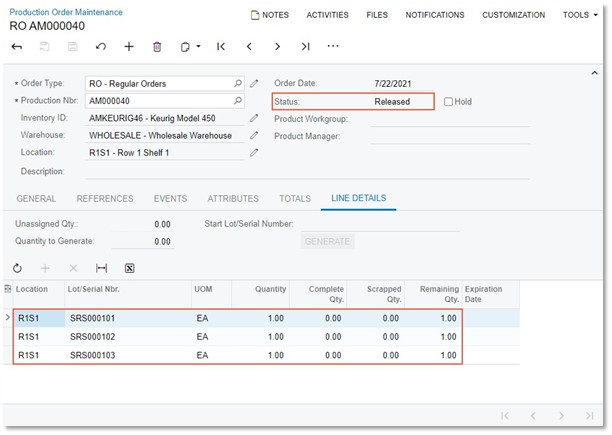
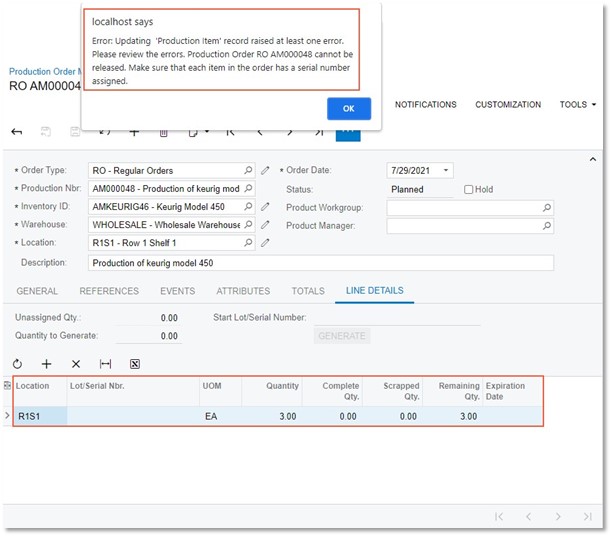
If the item is serialised, on the Line Details tab, adds a line for each unit of the item to be produced, and specifies its serial number in the Lot/Serial Nbr. column (see the following screenshot). When entry is complete, the number of rows on this tab must be equal to the Qty. to Produce value on the General tab.
-
If the item is tracked by lot, on the Line Details tab, adds one line for each lot number (which is entered in the Lot/Serial Nbr. column) to which units are assigned and specifies the quantity of units to which this lot number is assigned. The total sum in the Quantity column of all rows must be equal to the Qty. to Produce value on the General tab.
The production order can be released only when lot or serial numbers have been assigned to the full quantity of the produced item. Otherwise, an error message is displayed and the order is not released (see the following screenshot).
Assignment of Parent Lot or Serial Numbers on Issue of Materials
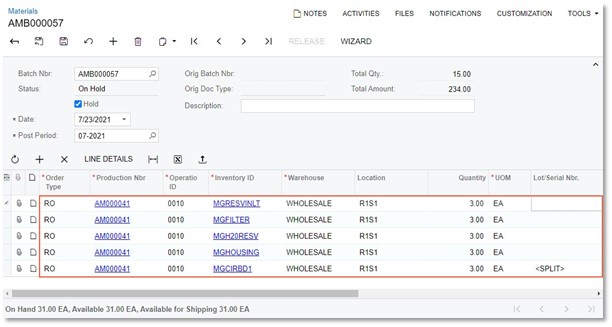
To assign lot or serial numbers of the item to be produced (the parent item) to lot- or serial-tracked materials when issuing materials for a production order—that is, if the On Issue value is specified in the Require Parent Lot/Serial Number field of the Production Order Maintenance (AM201500) form for the production order—the user does the following:
-
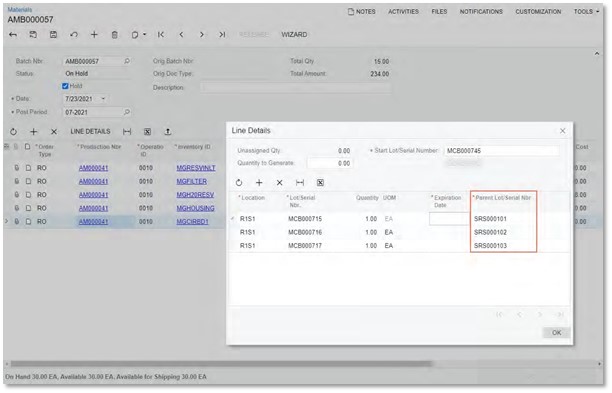
On the Materials (AM300000) form, adds the materials required for producing the lot- or-serial tracked item for a particular production order (see the following screenshot).
-
Clicks the row with the lot- or serial-tracked material, and clicks Line Details on the table toolbar. The system opens the Line Details dialog box.
-
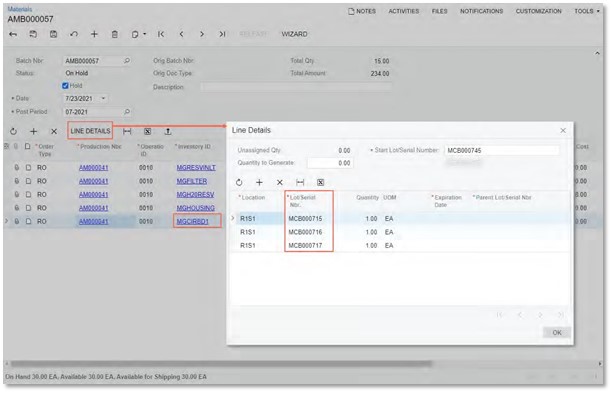
If the material is serialised, adds a line in the dialog box for each unit of the material item and either specifies its serial number in the Lot/Serial Nbr. column (see the following screenshot) or makes sure that the serial numbers have been generated automatically, depending on the settings of the serial class.
-
If the material is tracked by lot, adds one line for each lot number to which units are assigned, and specifies the quantity of units to which this lot number is assigned.
-
In the Parent Lot/Serial Nbr. column, specifies the lot or serial number of the parent item to be assigned to each line (see the following screenshot).
-
Clicks OK to save the changes and close the dialog box.
-
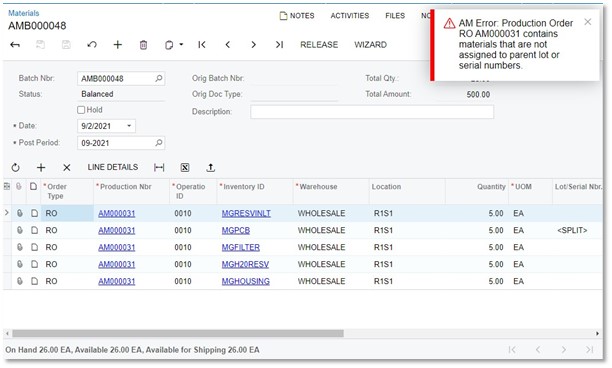
Releases the material transaction by clicking Release on the form toolbar.
If the lot or serial numbers of the parent item have not been assigned to some lot- or serial-tracked materials, the system displays an error message and does not release the transaction (see the following screenshot).
Assignment of Parent Lot or Serial Numbers to Materials on Completion
If the lot or serial numbers of a parent item to be produced can be assigned to lot- or serial-tracked materials before the movement of the parent item to stock—that is, if the On Completion value is specified in the Require Parent Lot/Serial Number field of the Production Order Maintenance (AM201500) form for the production order—the user does the following:
-
On the Materials (AM300000) form, adds the materials required for producing the lot- or serial-tracked item for a particular production order, including the lot- or serial-tracked materials.
-
Releases the material transaction.
-
Moves the units of the produced item between the operations involved in production, except the last operation, by using the Labour (AM301000) or Move (AM302000) form.
-
When moving the units of the produced item for the last operation on the Labour or Move form, clicks Late Assignment on the table toolbar to open the new Late Assignment (AM312000) form.
-
Assigns the parent lot or serial number to each material as follows:
-
In the Lot/Serial Nbr. field of the Summary area, selects the lot or serial number that will be assigned to materials (as shown in Item 1 of the first screenshot below).
-
In the Unallocated Materials table (the bottom table), clicks the material line to be allocated (Item 2).
-
On the form toolbar, clicks Allocate (Item 3). The system allocates the materials for the lot or serial number and moves the material line to the Allocated Materials table (the top table), as shown in the second screenshot below.
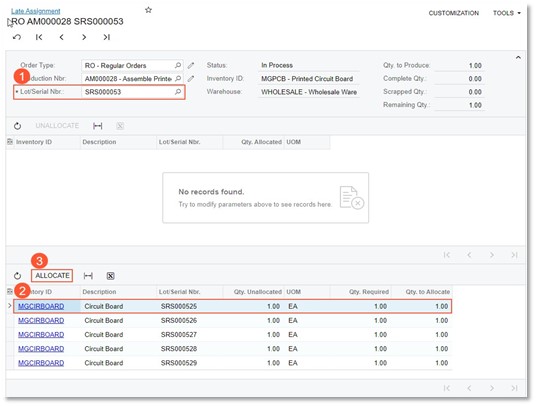
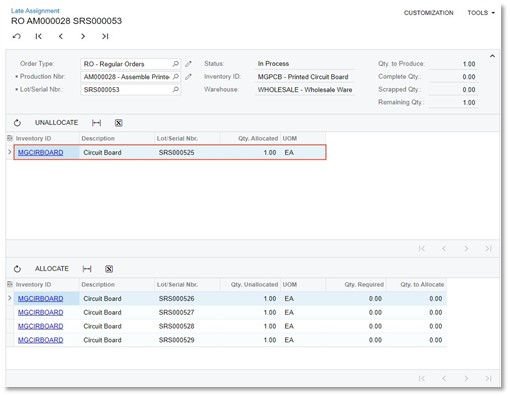
-
Repeats the previous two steps for each material to be allocated to the lot or serial number they select in the Lot/Serial Nbr. field.
-
-
When all needed materials have been allocated to parent lot or serial numbers, opens the Labour or Move form and releases the transaction for the last operation.
Viewing of Lot- and Serial-Tracked Items in Production Orders
A production manager can view the lot and serial numbers assigned to a parent item and materials in multiple ways.
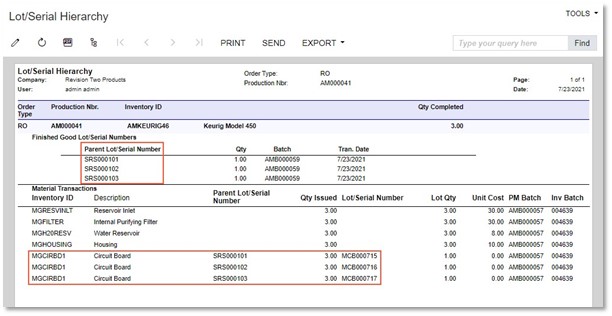
First, the Lot/Serial Hierarchy (AM600000) report has been modified to display the parent lot and serial numbers that have been assigned to materials (see the following screenshot).
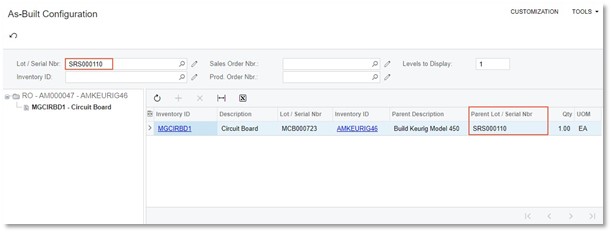
Second, the new As-Built Configuration (AM401700) inquiry form has been introduced (see the screenshot below). The form is useful when a user wants to view details about the original structure of the manufactured item as it came off the line; if the organisation provides warranties, the customer managers must be sure that the produced item has not been modified before authorising the warranty claim.
By using this form, a user can select an item by a serial number and view the lot- or serial-tracked materials used to produce this item. On the form, the user can also select items by inventory ID, reference number of a sales order, or reference number of a production order. For items that require subassemblies to be produced, in the Levels to Display field of the Selection area, the user can specify the number of levels of the nested subassemblies to be displayed in the tree on the left pane.
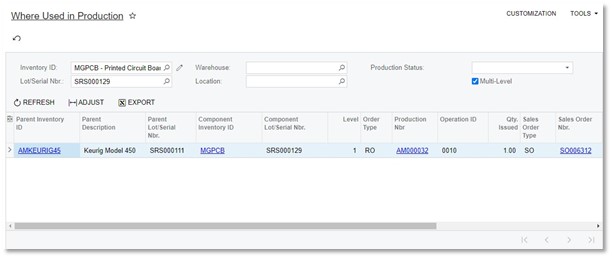
Third, the new Where Used in Production (AM402500) form has been introduced (shown in the following screenshot), where a user can view the parent items and subassemblies of a specific lot- or serial-tracked material used in the production of finished items or materials. This form is useful when the user needs to find all items that used a component with a specific lot or serial number and the related sales order (if any)—for example, when a defect has been discovered in a specific lot of components.
Other UI Enhancements
To support the functionality of preassigning lot or serial numbers, on the Line Details tab of the Production Order Maintenance (AM201500) form, the following columns have been added:
-
Complete Qty.
-
Scrapped Qty.
-
Remaining Qty.
These columns make it possible for users to track the quantities, including the quantity that cannot be used, at the lot- or serial-number level. The total quantities for all lot and serial numbers assigned in the production order are displayed on the General tab.
Supplier Shipment Enhancements
In MYOB Advanced Manufacturing Edition 2021.2, the functionality of supplier shipments has been enhanced to make the creation of supplier shipments more convenient to users.
Creation of a Purchase Order from a Production Order
Production managers can now create purchase orders with expenses for outside processing services directly from production orders. A production manager can create this type of purchase order as follows:
-
Create a production order for an item with a bill of material that contains an outside processing operation and release it by using the Production Order Maintenance (AM201500) form.
-
Open the production order on the Production Order Details (AM209000) form.
-
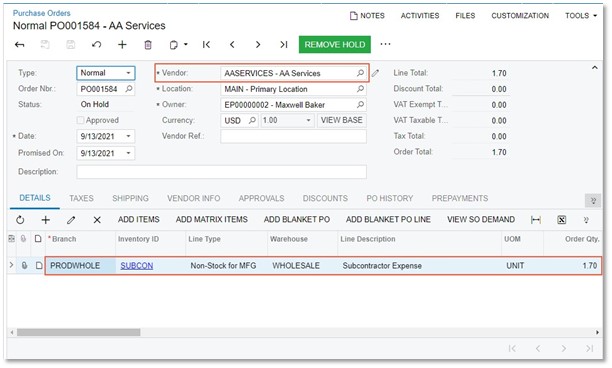
In the Operations table, click the row with the outside processing operation. Rows for services to be paid for should have Subcontract specified in the Material Type column and Purchase specified in the Subcontract Source column (see the following screenshot).
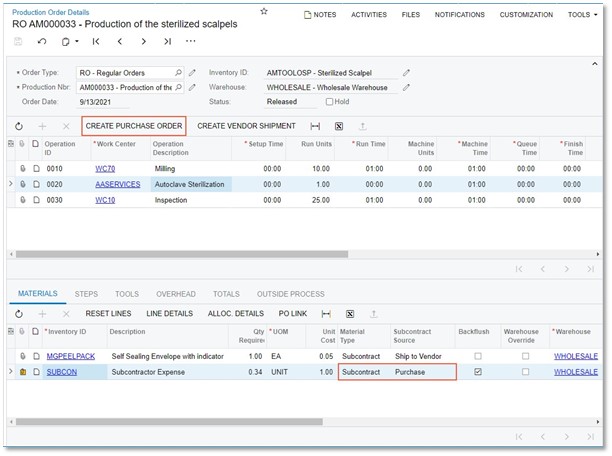
-
On the toolbar of the Operations table, click the new Create Purchase Order button (shown in the screenshot above). The system creates the purchase order for the supplier specified on the Outside Process tab and opens it on the Purchase Orders (PO301000) form. On the Details tab, the purchase order contains the row or rows with the services to be paid for (see the following screenshot).
If no supplier is specified on the Outside Process tab for the operation on the Production Order Details form, the system leaves the Supplier field empty, and the production manager has to specify the supplier manually.
Creation of a Supplier Shipment from a Production Order
It is now possible to create supplier shipments with materials for outside processing directly from production orders. A production manager can create this type of supplier shipment as follows:
-
Create a production order for an item with a bill of material that contains an outside processing operation and release it by using the Production Order Maintenance (AM201500) form.
-
Open the production order on the Production Order Details (AM209000) form.
-
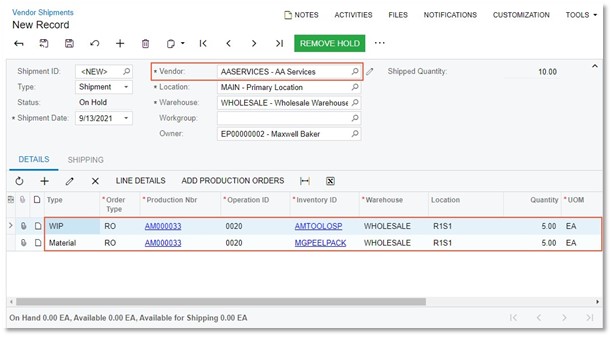
In the Operations table, click the row with the outside processing operation. Materials to be shipped to a supplier should have Subcontract specified in the Material Type column and Ship to Supplier specified in the Subcontract Source column (see the following screenshot).

-
On the toolbar of the Operations table, click the new Create Supplier Shipment button (shown in the screenshot above). The system creates the supplier shipment for the supplier specified on the Outside Process tab and opens it on the Supplier Shipments (AM310000) form. On the Document Details tab, the supplier shipment contains one row of the WIP type with the item to be produced and rows of the Material type with the materials to be shipped to the supplier (see the following screenshot).
If no supplier is specified on the Outside Process tab for the operation on the Production Order Details form, the system leaves the Supplier field empty and the production manager has to specify the supplier manually.
Addition of Multiple Production Orders to a Supplier Shipment
Some organisations may want to aggregate materials from multiple production orders in one supplier shipment. In previous versions of MYOB Advanced Manufacturing Edition, a production manager added the required lines manually line by line. In MYOB Advanced Manufacturing Edition 2021.2, the production manager can select a production order with the needed materials on the Supplier Shipments (AM310000) form, and the system adds the material lines to the supplier shipment. To add the materials from production orders to a supplier shipment, the production manager does the following:
-
Opens the supplier shipment to which materials from multiple production orders should be added on the Supplier Shipments form.
-
On the table toolbar of the Document Details tab, clicks the new Add Production Orders button. The system opens the Production Order Lookup dialog box (shown in the following screenshot).
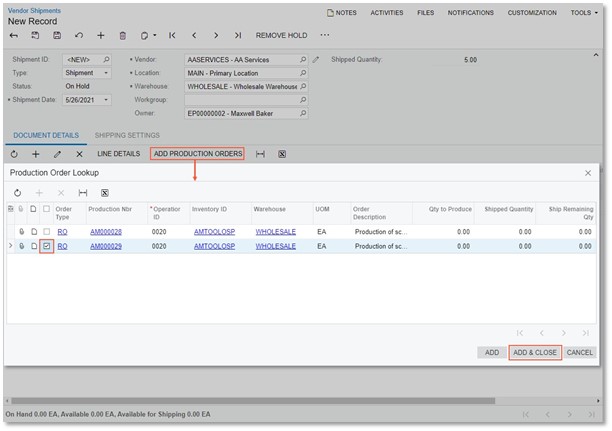
-
Selects the unlabeled check boxes in the rows of the production orders that will be used as material sources for the supplier shipment.
The Production Order Lookup dialog box displays only production orders that meet all of the following conditions:
-
They have the Planned, Released, or In Process status.
-
They contain materials with the Ship to Supplier subcontract source.
-
They have the same supplier specified on the Outside Process tab of the Production Order Details (AM209000) form as in the Supplier field on the Supplier Shipments form.
-
-
Clicks Add and Close to add the materials to the supplier shipment and close the dialog box.
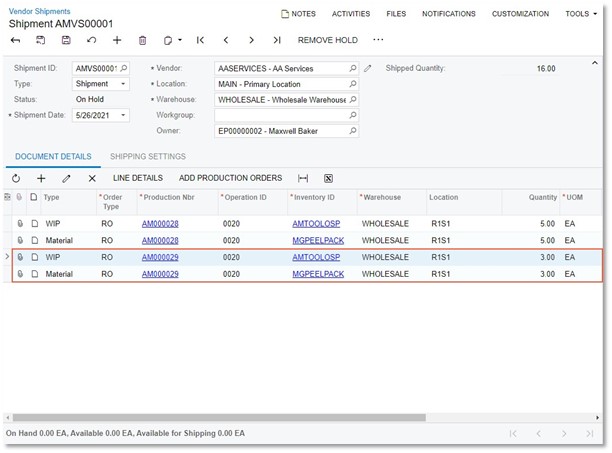
On the Document Details tab, for each selected production order, the system adds one row of the WIP type with the item to be produced and the rows for the Material type with the materials to be shipped to the supplier (see the following screenshot).
Enhanced Validation on Closing Production Orders
In previous versions of MYOB Advanced Manufacturing Edition, a production manager could close a production order even when a supplier shipment related to the order had not been completed. Now when a production manager closes a production order on the Close Production Orders (AM506000) form, the system makes sure that all production transactions and documents related to the production order, including supplier shipments, have been released or completed and prevents the order from being closed if finds any unprocessed transactions or documents.
Visual Production Schedule
MYOB Advanced Manufacturing Edition Version 2021.2 introduces a new visual tool designed to benefit organisations that use advanced planning and scheduling in the system and process many production orders with complex routing. This visual tool provides the ability to visualise whether and where existing production orders can be rescheduled to accommodate order escalations or emergencies on the shop floor.
The new functionality is available only when the Advanced Planning and Scheduling feature is enabled on the Enable/Disable Features (CS100000) form.
Visual Production Schedule
To give scheduling managers the ability to view the production schedule in a graphical form, the Production Schedule Board (AM215555) form has been implemented. On this form, a Gantt chart displays the schedule for the selected production orders over time. On this form, shown in the following screenshot, the production manager can adjust the timescale, assign colour coding of chart bars, and view missed commitment dates.
The form consists of the following parts (with the numbers corresponding to those in the screenshot above):
-
The form toolbar with form-specific commands. By using these commands, the scheduling manager can schedule or firm a production order. Also the manager can undo the Firm action for a previously firmed production order. For details about firm scheduling production orders, see Manufacturing: Firm Scheduling of Production Orders.
-
The Selection area, which holds the selection criteria for production orders to be displayed on the form. In the colour Coding field, the scheduling manager can also select the production order setting for which the bars in the Gantt chart will be colour coded, such as the production order status or order type.
-
The upper pane with the Production Orders tab, which displays the list of production orders that meet the selection criteria, the Gantt chart for each production order, and the pane toolbar.
-
The lower pane, which contains tabs with lists of all work centres and machines. These tabs show histograms with details for the available and scheduled capacity for each work centre and machine.
Gantt Chart for Production Orders
Each chart for production orders can display any of the following graphical elements (see the screenshot below):
-
A bar, which represents an operation of the production order and is displayed as follows:
-
The length represents the duration of the operation from the start date and time to the end date and time.
-
The label displays the operation number and the status of the production order.
-
The colour represents the option specified in the colour Coding field of the Selection area. If Production Order Status is selected, for example, each colour corresponds to a particular order status.
-
An optional diamond shape, which indicates that the production order is linked to a sales order. The system compares the Requested On date in the sales order, which is in the Summary area of the Sales Orders (SO301000) form, to the End Date in the production order, which is on the General tab of the Production
Order Maintenance (AM201500) form. Based on this comparison, one of the following colours is used for the diamond:
-
Green: The Requested On date in the sales order is later than the End Date in the production order. That is, the production order meets the date commitment.
-
Yellow: The Requested On date in the sales order is the same as the End Date in the production order. That is, the production schedule is tight, and production dates should not be shifted later to meet the commitment.
-
Red: The Requested On date in the sales order is earlier than the End Date in the production order. That is, the production order does not meet the commitment.
-
An optional lightening bolt icon, which indicates that the on-hand quantity of some materials required for the operation is insufficient.
-
An optional white circle shape, which indicates that the operation is performed outside of the organisation.
The scheduling manager can point to an element on the Gantt chart to view the details for the scheduled operation and the related production order (see the following screenshot).
The charts for work centres and machines consist of bars. The height of each bar represents the workload of the work centre or machine resource for a particular timescale unit. The scheduling manager can point to the bar to view details about the work centre or machine workload (see the following screenshot).
The scheduling manager can adjust the view of both panes as follows by using elements on the pane toolbar (located in the top right corner of the upper pane):
-
Change the timescale— which can be hours, days, weeks, or months—by selecting the appropriate option in the Timescale field
-
Show or hide the lower pane by clicking the Maximise button
-
Display the chart in full-screen mode by clicking the Fullscreen button
-
Display only late production orders by clicking the Late Orders button
The scheduling manager can schedule production orders directly on this form by doing the following:
-
In the Selection area, specifying the selection criteria to be used to filter the production orders to be scheduled, which are displayed on the Production Orders tab.
-
On the Production Orders tab, selecting the check box in the Selected column for each production order to be scheduled.
-
On the form toolbar, clicking Schedule.
-
On the form title bar, clicking the form name to refresh the page
Firm Scheduling of Production Orders
MYOB Advanced Manufacturing Edition Version 2021.2 gives users the ability to prevent a production order from being rescheduled if strict production dates are important for a production order (for example, due to commitment with a customer). A production manager can now firm the order—that is, fix the production dates. When the production manager runs finite scheduling of production orders, the system does not reschedule the firmed production orders.
Only the scheduled production orders can be firmed.
This functionality is available only when the Advanced Planning and Scheduling feature is enabled on the Enable/ Disable Features (CS100000) form.
Firm Scheduling of Production Orders
To firm any number of production orders that have been scheduled, on the Rough Cut Planning (AM501000) form, the scheduling manager does the following (with the numbers corresponding to those shown in the screenshot below):
-
Selects the check box in the unlabeled column of each row of a production order to be firmed.
-
In the Action field of the Selection area, selects Firm.
-
Clicks Process on the form toolbar. The schedule status of the orders is changed to Firm.
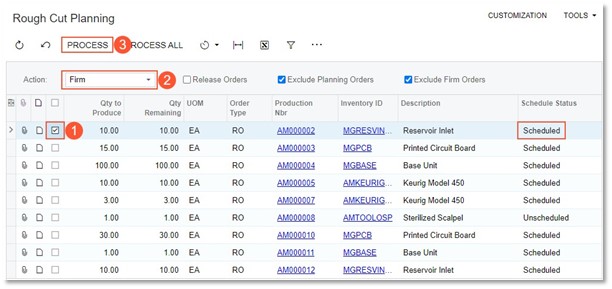
To undo the Firm action for a production order, the scheduling manager performs the same steps, but selects Undo Firm in the Actions field.
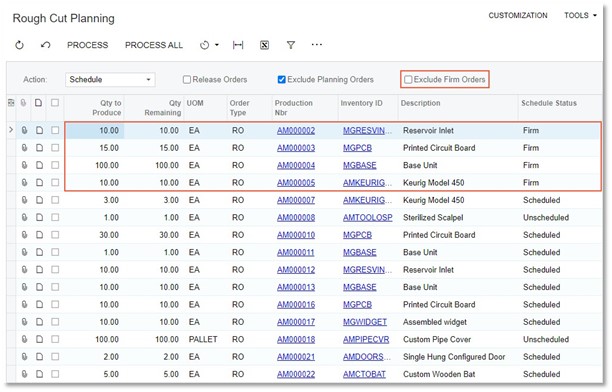
Firm production orders are hidden from the Rough Cut Planning form by default—that is, the new Exclude Firm Orders check box in the Selection area is selected—but the scheduling manager can display these orders by clearing the check box (see the following screenshot).
The scheduling manager can also firm production orders by doing the following on the new Production Schedule Board (AM215555) form (see the screenshot below):
-
On the Production Orders tab, selecting the Selected check box of each row that contains a production order to be firmed.
-
On the form toolbar, clicking Firm.
-
On the form title bar, clicking the form name to refresh the page.
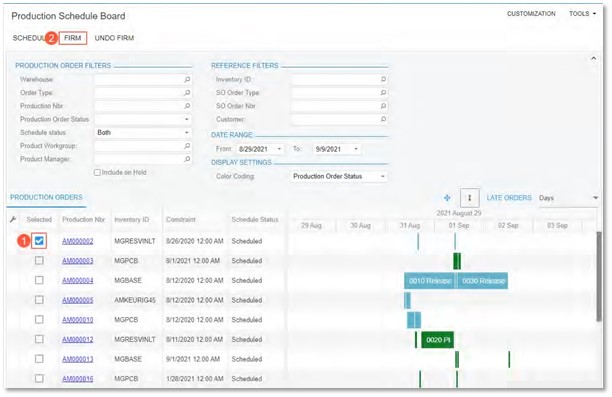
For the description of the Production Schedule Board form, see Manufacturing: Visual Production Schedule.
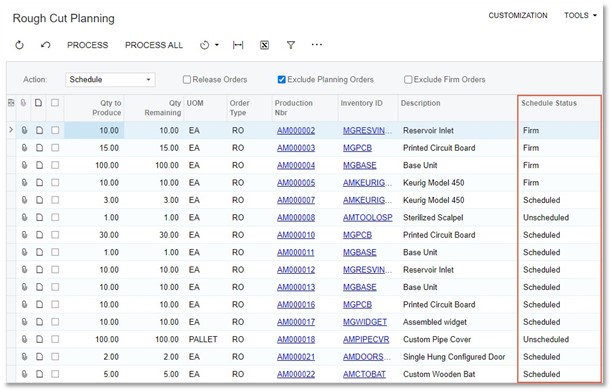
Schedule Status of Production Orders
Now a production manager can view the schedule status of production orders in any of the following places:
-
In the new Schedule Status column on the Rough Cut Planning (AM501000) form (as shown in the following screenshot). The option in this column reflects whether the production order has been scheduled.
-
In the new Schedule Status field on the Production Order Maintenance (AM201500) form (see the following screenshot). The option in this field reflects whether the production order has been scheduled.
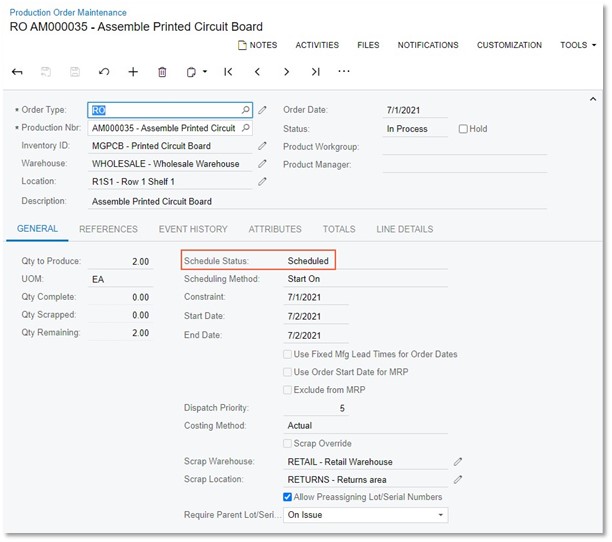
The possible schedule statuses are the following:
-
Scheduled: The production order has been scheduled.
-
Unscheduled: The production order has not been scheduled yet.
-
Firm: The production order has been firmed; that is, the system skips this production order during rescheduling.
Other UI Changes
The Rough Cut Planning (AM501000) form has been redesigned to support the scheduling enhancements as follows:
-
In the Summary area, the Action field has been added, where a scheduling manager can select any of the following actions (shown in the screenshot below):
-
Schedule: Schedules the production orders
-
Schedule and Firm: Schedules the production orders and firms the orders after scheduling
-
Firm: Firms the production orders that have already been scheduled
-
Undo Firm: Undoes the Firm action for the production orders that have previously been firmed
-
On the form toolbar, the Schedule and Schedule All commands have been replaced with the Process and
Process All commands (see the following screenshot). When a user clicks either of the commands, the
system performs the action specified in the Action field for the selected production orders or all production orders.
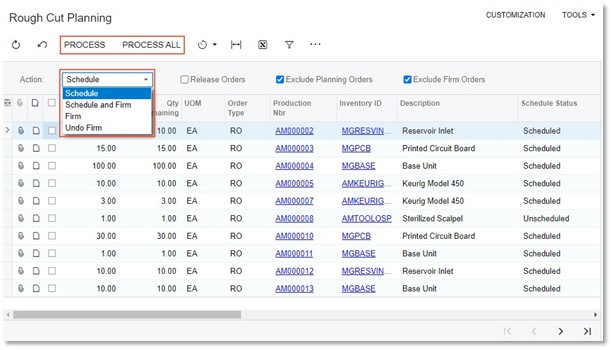
-
On the More menu, the Production Schedule Board command has been added, which opens the Production Schedule Board (AM215555) form.
Customer Refunds in Sales Orders and SO Invoices
In MYOB Advanced 2021.2, the ability to create customer refunds directly on the Sales Orders (SO301000) and Invoices (SO303000) forms has been implemented. Also, a user can now add or link existing customer refunds to sales orders with the RMA Order and Credit Memo automation behaviour and to credit memos.
Customer Refunds on the Sales Orders Form
On the Sales Orders (SO301000) form, a user can now create a customer refund for an order that has an order type whose settings on Template tab of the Order Types (SO201000) form meet the following criteria:
-
The Automation behaviour is RMA Order or Credit Memo.
-
In the AR Document Type field, the No Update option is not selected.
-
In the Operations table of the tab, one active operation is listed with Receipt selected in the Operations column.
In MYOB Advanced, the predefined RC and CM types of orders can be used to create customer refunds.
The Create Refund button has been added to the form toolbar of the Payments tab of the Sales Orders form (see the following screenshot).
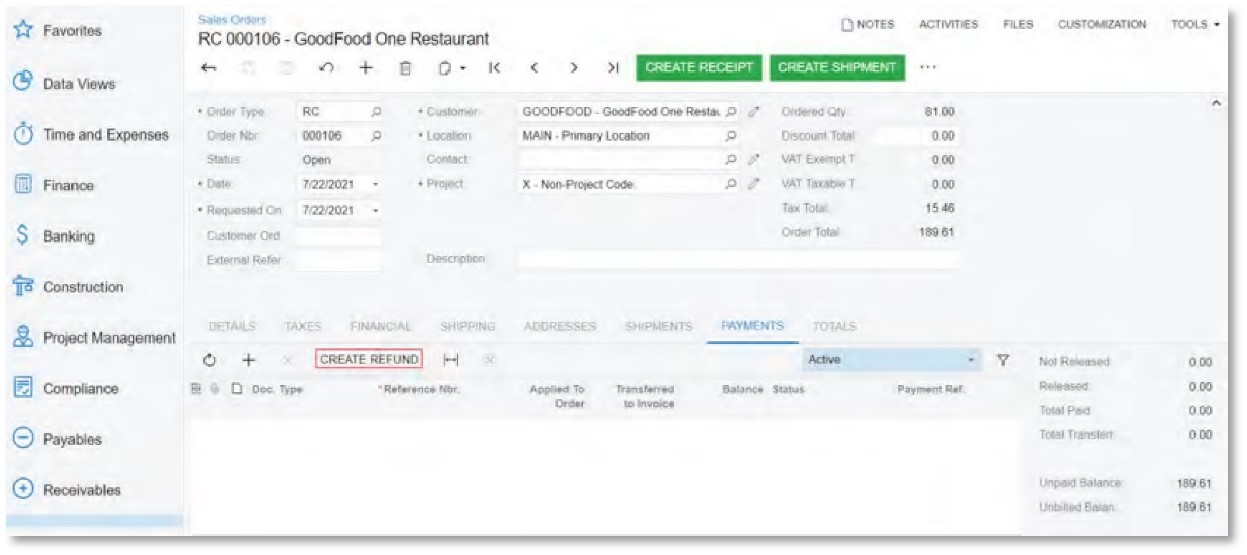
The Create Refund button appears in sales orders with the RMA Order and Credit Memo automation behaviour. The button is available if the order has the Open status and the Allow Refund Before Return check box is selected on the General tab of the Order Types form (shown on the following screenshot) for the order type of the sales order.
If the Allow Refund Before Return check box is cleared for the order type of the order, the Create Refund button is unavailable.
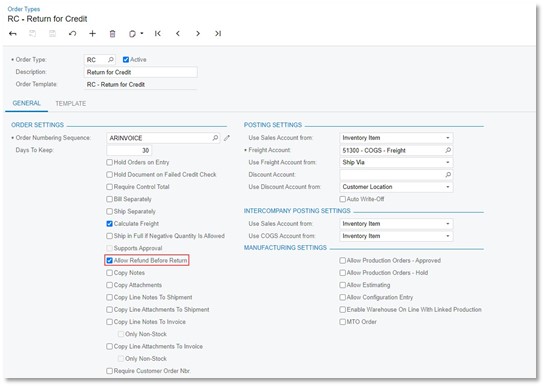
If the order has the On Hold status, the Create Refund button is unavailable, but the user can add an existing customer refund to the sales order by clicking the Add Row button on the Payments tab of the Sales Orders form.
When the user clicks the Create Refund button on the form toolbar, the Create Refund dialog box opens (see the following screenshot). By default, the system automatically inserts the values from the Payment Information section on the Financial tab of the Sales Orders form to the corresponding fields in the Create Refund dialog box.
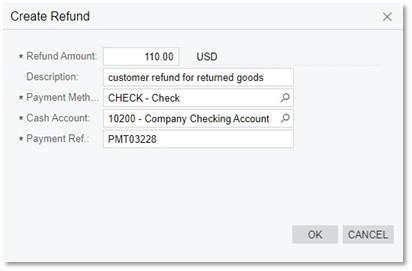
-
When a cash or check payment method is selected in the Payment Method field of the Create Refund dialog box, the dialog box has the following fields (as shown in the screenshot above, because it has a check payment method):
-
Refund Amount: The amount of the customer refund, which equals the total amount of the return order by default.
-
Description: The description of the customer refund. This field is always blank by default.
-
Payment Method: The payment method used to create the payment to be refunded.
-
Cash Account: The cash account used to create the payment to be refunded.
-
Payment Ref.: The reference number of the customer refund. The value of this field is inserted automatically if the AR -Suggest Next Number check box is selected on the Allowed Cash Accounts tab of the Payment Methods (CA204000) form for the payment method specified in the dialog box.
If a credit card payment method is selected in the Payment Method field, the Payment Ref. field is not shown, and the following fields are shown in the dialog box in addition to those listed above (see the following screenshot):
-
Orig. Transaction: The reference number of the payment's original credit card transaction. If the payment has more than one transaction, the field is blank by default.
-
Card/Account No: The card or account number used to create the payment to be refunded.
-
Proc. centre ID: The identifier of the plug-in used for integration with the processing centre.
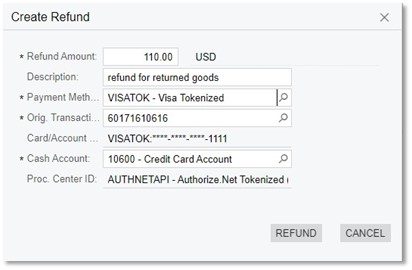
When the user selects a credit card payment method in the Payment Method field, the system checks whether the
Allow Unlinked Refunds check box is selected in the Summary area of the Processing centres (CA205000) form (shown on the following screenshot) for the default processing centre of the selected payment method. If the Allow Unlinked Refunds check box is selected, the Orig. Transaction setting is not required, and the Refund button is always available. If the Allow Unlinked Refunds check box is cleared, the Orig. Transaction setting is required, and the Refund button is unavailable until the original transaction is specified.
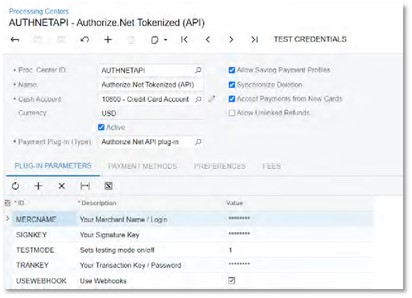
When the user clicks the Refund button in the Create Refund dialog box, the system creates a customer refund with the original transaction specified in this dialog box. If the transaction is not specified, the system generates a new refund transaction for the customer refund being created.
The status of a new customer refund with a cash or check payment method depends on the Hold Documents on Entry check box state on the Accounts Receivable Preferences (AR101000) form. A new customer refund with a credit card payment method is automatically released when the system successfully processes the refund transaction. If approval is configured for customer refunds on the Accounts Receivable Preferences form, all customer refunds are created with the On Hold status.
The customer refund is applied to the sales order for which it was created. On the Payments tab of the Sales Orders form for the sales order, the link to the customer refund can be found in the Reference Nbr. column of the table.
A sales order with a customer refund applied cannot be canceled or deleted.
If a user adds a customer refund to a sales order with the RMA Order or Credit Memo automation behaviour by adding a row on the Payments tab and saves the sales order, the system checks whether the linked customer refund has an original payment transaction and whether this original transaction is related to the invoices listed on the Details tab of the form. If the original transaction of the linked customer refund is not related to any of these invoices, the system displays an error message, and changes are not saved. The system also checks whether the original transaction in a customer refund is related to invoices that have a reference in the sales order with the RMA Order or Credit Memo automation behaviour when this sales order is linked to a customer refund on the Order to Apply tab of the Payments and Applications (AR302000) form.
When a credit memo is created for a sales order with the RMA Order or Credit Memo automation behaviour, the application to the customer refund is automatically transferred from the sales order to the credit memo. When the user releases the credit memo, the application to the customer refund is also released, if the customer refund has the Open status.
Customer Refunds on the Invoices Form
On the Invoices (SO303000) form, a user can now create a customer refund directly for an invoice of the Credit Memo type and any status by clicking the Create Refund button on the table toolbar of the Applications tab (shown in the following screenshot). The creation of customer refunds on this form works in the same way as the creation of customer refunds by using the Create Refund button on the Payments tab of the Sales Orders (SO30100) form.
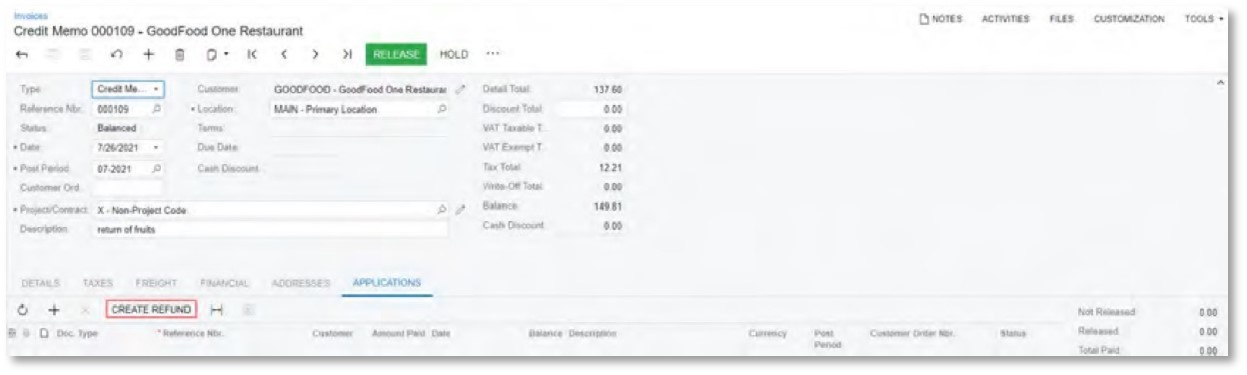
When the user adds a customer refund by clicking the Add Row button on the Applications tab of the Invoices form and saves the credit memo, the system checks whether the linked customer refund has an original transaction specified and whether this original transaction is related to invoices listed for the credit memo on the Details tab of the form.
On the far right of the Applications tab, the following fields have been added:
-
Not Released: The sum of the amounts of the documents (invoices, customers refunds, debit memos, and overdue charges) that have been applied to the credit memo and are not released yet.
-
Released: The sum of the amounts of the documents (invoices, customers refunds, debit memos, and overdue charges) that have been applied to the credit memo and released.
-
Total Paid: The sum of the amounts in the Not Released and Released fields.
Limitations
Documents with the Voided status are removed from the Applications tab automatically when the applied document is assigned this status.
The status of the credit memo is not affected by the status of the applied customer refund—that is, if a customer refund with the Pending Processing status is applied to a credit memo, the status of the credit memo does not change.
The user cannot remove the application of an unreleased credit memo to an unreleased customer refund on the Payments and Applications (AR302000) form.
An unreleased credit memo cannot be selected to be applied to customer refunds, payments, and prepayments on the Documents to Apply tab of the Payments and Applications form.
Other Changes on the Sales Orders and Invoices Forms
Now the system inserts the information about the customer's payment method in the Payment Information section on the Financial tab of the Sales Orders (SO301000) and Invoices (SO303000) forms for sales orders with the RMA Order or Credit Memo automation behaviour and credit memos. The information is copied from the payment method that is specified as the customer's default payment method on the Payment Methods tab of the Customers (AR303000) form.
Changes on the Order Types Form
On the Order Types (SO201000) form, the Validate Card Refunds Against Original Transactions check box has been added to the Payment Settings section (see the following screenshot).
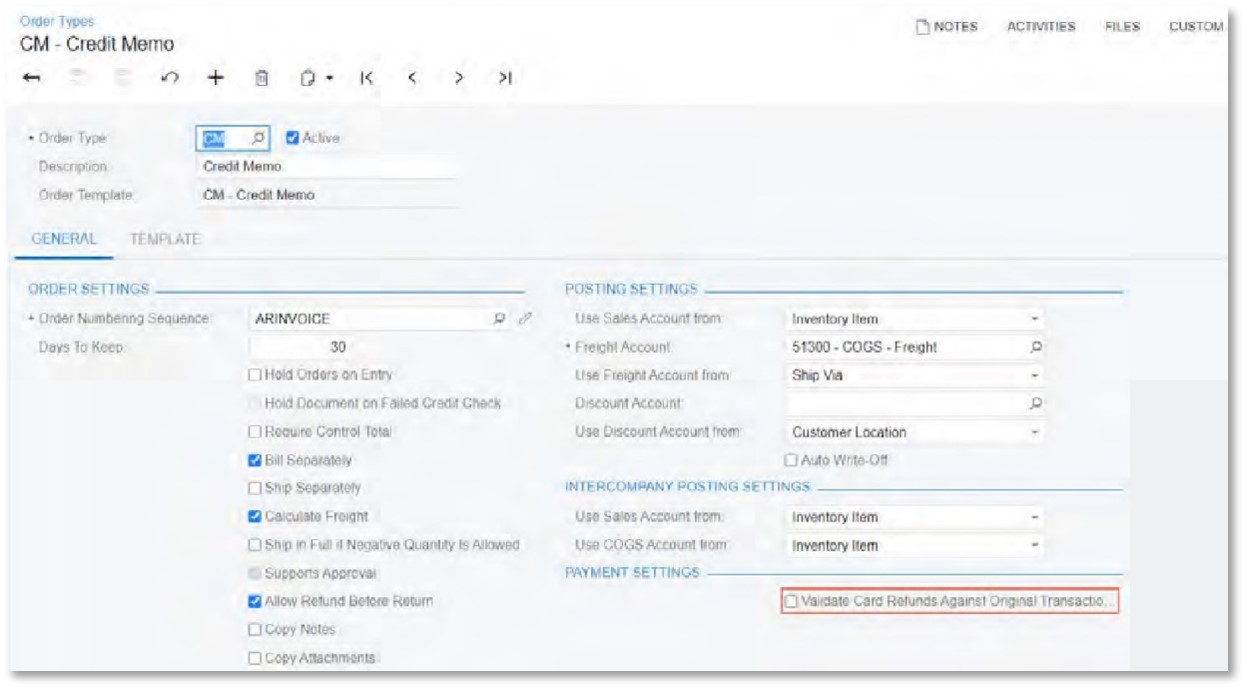
If this check box is selected, only the transaction of the credit card payment applied to the invoice with the returned items can be specified as the original transaction in a customer refund with the credit card payment method.
If the check box is cleared, a transaction from any card payment made by the customer can be specified as the original transaction in a customer refund with the credit card payment method.
Drop Shipments for Projects
In MYOB Advanced 2021.2, to give the users the ability to create purchase orders for goods and materials that should be delivered directly to the project site, the Project Drop-Ship type has been added to the Purchase Orders (PO301000) form. The functionality is available when the Inventory and Order Management and Projects features are enabled on the Enable/Disable Features (CS100000) form.
The Project Drop-Ship type of purchase orders cannot be used for processing drop-ship purchase orders for retail processes. To process drop shipments directly to customers, the Drop-Ship type of purchase orders must be used.
Changes on the Purchase Orders Form
The new Project Drop-Ship type of orders has been added to the Type field of the Summary area (shown on the following screenshot) of the Purchase Orders (PO301000) form. When this type is selected, the mandatory Project field appears in the Summary area. When a user specifies a project, on the Shipping tab, in the Shipping Destination Type field, the system selects the new Project Site option and copies the shipping contact and address to the Ship-To Contact and Ship-To Address sections from the Bill-To and Project Address sections on the Summary tab of the Projects (PM301000) form, respectively. The contact and address can be overridden by the user.
Also, the following new types of lines have been introduced on the Details tab:
-
Goods for Project for stock items.
-
Non-Stock for Project for non-stock items, for which the Require Receipt is selected on the General tab of on the Non-Stock Items (IN202000) form. If this check box is cleared, the line has the Service type (same as for other purchase order types).
In purchase orders of the Project Drop-Ship type, the system fills in the Account and Sub. fields based on the settings specified for a project in the Use Expense Account From and Combine Expense Sub. From fields on the Defaults tab of the Projects (PM301000) form.
If the user adds a line without an inventory ID, such as service or freight, the accounts defined by the standard functionality will be used for this line if the Posting Class or Item option is selected for the project in the Purchases section on the Defaults tab of the Projects form, or the account specified in the project or project task if the Project or Task option is selected. The subaccount for such lines is always defined by the standard functionality and does not depend on the project settings.
The purchase order is processed according to the settings specified for the project in the Drop-Ship Receipt Processing and Record Drop-Ship Expenses fields. If the related receipts are generated, the expense can be recorded either on the bill release or receipt release.
-
The warehouse is not required in the purchase order and the Warehouse column on the Details tab of the Purchase Orders form is hidden. In the purchase receipt, the user still has to specify a warehouse but the inventory stock of the warehouse will not be affected.
-
The project drop-ship orders are always processed without sales orders. It is not possible to create a project drop-ship order from a sales order.
-
PPV is always recorded in the bill transaction regardless of the Allocation Mode setting on the Purchase Orders Preferences (PO301000) form.
If the project drop-ship return is created, the system will process this order based on the settings which were specified for the purchase order. The Cost by Issue Strategy option in the Cost of Inventory Return From field in the Summary area of the Purchase Receipts (SO302000) form is available for the project drop-ship returns.
Changes on Other Forms
The Purchases section has been added to the General tab of the Projects Preferences (PM101000) form and the Defaults tab of the Project Templates (PM208000), and Projects (PM301000) forms (shown on the following screenshot).
The settings of the Purchases section apply only to purchase orders of the Project Drop-Ship type.
The Purchases section contains the following fields:
-
Use Expense Account From: The source of the expense account to be used in the project drop-ship order. The following options are available:
-
Posting Class or Item (the default option): The system inserts the expense account according to the standard functionality. For non-stock items that do not require a receipt, the expense account is inserted from the Expense Account field on the GL Accounts tab of the Non-Stock Items (IN202000) form. For non-stock items that require a receipt and for stock items, the account is inserted according to the option selected in the Use COGS/Expense Account from field on the General tab of the Posting Classes (IN206000) form.
-
Project: The system inserts the expense account from the Default Cost Account field on the Defaults tab of the Projects (PM301000) form for the project specified in the project drop-ship document.
-
Task: The system inserts the expense account from the Default Cost Account field on the Summary tab of the Project Tasks (PM302000) form for the project specified in the project drop-ship document line.
-
Combine Expense Sub. From: The subaccount mask for items used in the project drop-ships orders. The following options are available: • I (the default option): Inventory item
-
P: Posting class
-
J: Project
-
T: Task
After an upgrade to MYOB Advanced 2021.2, by default, the system assigns I to all segments of the subaccount mask.
The value for Project in subaccount masks has been changed from P to J in the system. The following fields and forms have been affected:
-
Sales Subaccount Mask field on the Billing Rules (PM207000) form
-
Subaccount fields on the Allocation Rules (PM207500) form
-
Expense Sub. Source and Expense Accrual Sub. Source fields on the Projects Preferences (PM101000) form
-
Combine Expense Sub. From field on the Accounts Payable Preferences (AP101000) form
-
Combine Sales Sub. From and Combine Expense Sub. From fields on the Time and Expenses Preferences (EP101000) form
-
Combine Expense Sub. From on the Defaults tab of the Project Templates (PM208000) form
-
Combine Expense Sub. From on the Defaults tab of the Projects (PM301000) form
-
Drop-Ship Receipt Processing: The setting that defines whether a receipt will be generated for project drop shipment. This setting contains the following options: Generate Receipt (the default option) and Skip Receipt Generation.
-
Record Drop-Ship Expenses: The setting that defines when the expense transaction should be recorded. This setting contains the following options: On Bill Release (the default option) and On Receipt Release.
If the On Bill Release option is selected, the system does not generate an inventory receipt on release of the purchase receipt. The system generates the transaction that updates expense account for both stock and non-stock items, when the related AP bill is released.
If the On Receipt Release option is selected, the system generates an inventory receipt and a transaction that updates the expense account when the purchase receipt is released. The system updates expense accounts for both stock and non-stock items in this case, and the system does not update any inventory accounts.
This field is not available if the Skip Receipt Generation option is selected in the Drop-Ship Receipt Processing field.
The Drop-Ship Receipt Processing and Record Drop-Ship Expenses fields are displayed only if the Inventory feature is enabled on the Enable/Disable Features (CS100000) form.
The Purchases section on Project Templates (PM208000) inherits settings from the Projects Preferences (PM101000) form. The section on Projects (PM301000) inherits settings from the Project Templates form. If a project has been created without a template, the values in the Purchases section on the Projects form are derived from the settings specified on the Projects Preferences form.
On the Purchase Orders Preferences (PO101000) form, the For Project Drop-Ship Orders check box has been added to the Validate Total on Entry section on the General tab (see the following screenshot). If this check box is selected, to save an order with the Project Drop-Ship type with a status other than On Hold, the user has to enter the total amount in the Control Amount field on the Purchase Orders (PO301000) form.
Also, on the Approval tab of the Purchase Orders Preferences form, the user can specify an approval map for the project drop-ship orders.
Limitations
The following limitations apply to the project drop-ship order functionality in MYOB Advanced 2021.2 :
-
Landed costs are not supported for the project drop-ship orders. • Project drop-ship orders cannot be created from a change order.
Item Substitution, Up-Sell, and CrossSell
In MYOB Advanced 2021.2, the new Related Items feature has been added to facilitate cross-sales, up-sales, and item substitutions for stock and non-stock items, which can increase sales while improving the customer experience. The feature has been added to the Inventory and Order Management group of features on the Enable/ Disable Features (CS100000) form.
When the feature is enabled, on the Stock Items (IN202500) and Non-Stock Items (IN202000) forms, the Related
Items tab appears so that related items can be listed; this tab was previously displayed only when the Commerce Integration feature was enabled. Also, with the Related Items feature enabled, the new related item functionality becomes available on the Sales Orders (SO301000) and Invoices (SO303000) forms so that users can quickly assess the items related to the initially specified items.
Changes to the Related Items Tab
If the Related Items feature is enabled, on the Stock Items (IN202500) and Non-Stock Items (IN202000) forms, the Related Items tab is shown. On this tab, a user can list the items related to the original item (which in this context is the stock or non-stock item that is selected on the form) and the settings of the relation. The following changes have been made to the Related Items tab (shown in the following screenshot):
-
The Alternative and Related relation types have been replaced with the Other type in the Relation column. (The possible relation types are Cross-Sell, Up-Sell, Substitute, and Other, as the screenshot shows.)
-
The following columns have been added:
-
Files: An icon the user can click in the row of the related item to attach a file to the relation.
-
Quantity: The quantity of the related item required to replace one original item (for substitute and upsell items) or the quantity of the item of the Cross-Sell or Other relation type to be added to one original item.
-
Customer Approval Not Needed: A check box that indicates that this related item can be selected without obtaining approval from a customer. If this check box is cleared, the salesperson has to confirm with the customer that the item can be replaced. This check box can be selected for only a related item with the Substitute type of relation.
-
Required: A check box that indicates that this related item is required for the original item when the original item is sold. The check box can be selected if the related item has the Substitute, Cross-Sell, or Other type of relation. If this check box is selected for an item with the Substitute relation type, on the Sales Orders (SO301000) or Invoices (SO303000) form, the Substitution Required check box is selected for the item in a sales order or invoice.
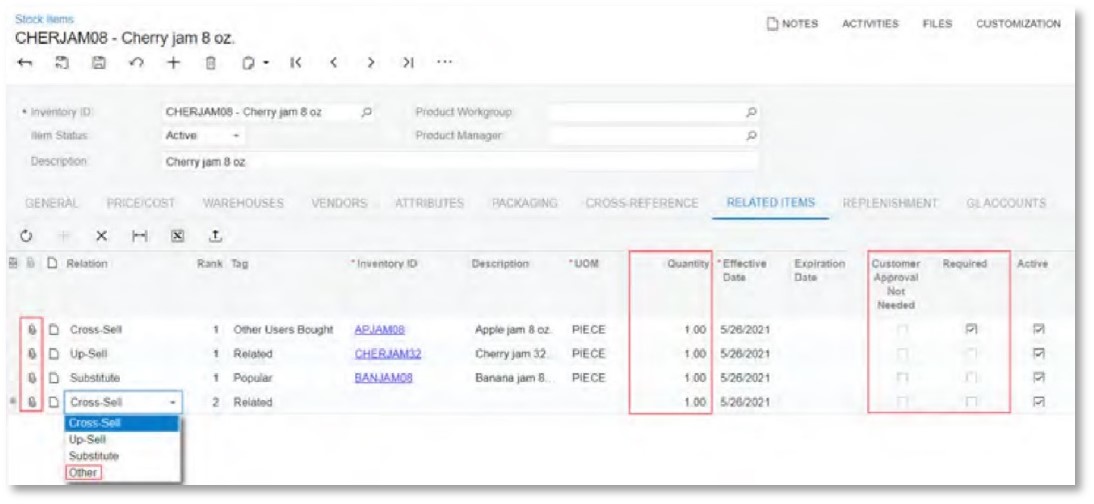
New Section on the Sales Orders Preferences Form
On the Sales Orders Preferences (SO101000) form, the Related Item Settings section has been added (see the following screenshot). The section contains the Show Only Available Items check box. If this check box is selected, on the Details tab of the Sales Orders (SO301000) and Invoices (SO303000) forms, the system performs validation of the available quantity of related items and suggests only related items that are available. By default, this check box is cleared.
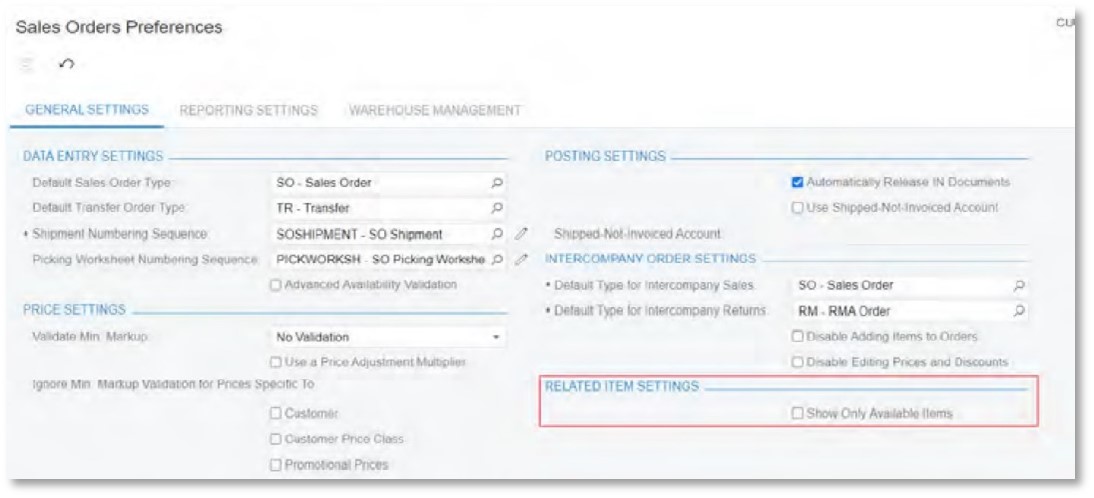
New Functionality on the Sales Orders and Invoices Forms
When a user adds an item on the Details tab of the Sales Orders (SO301000) or Invoices (SO303000) form (which is the original item in this case) and this item has related items specified on the Related Items tab of the Stock Items (IN202500) or Non-Stock Items (IN202000) forms, the system displays a button in the Related Items column of the Details tab (see the following screenshot). The user can click these buttons to view information about the related items in the Add Related Items dialog box, and make any needed additions and replacements.
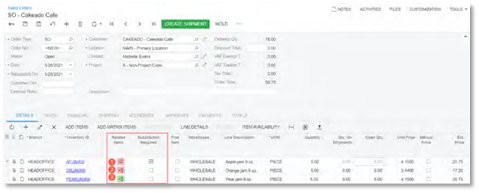
The buttons that may appear in the Related Items column are described below:
-
An item with the Substitute relation type has been specified for the original item and specified as required. The original item has to be replaced.
-
At least one item with the Cross-Sell or Other relation type has been specified for the original item and specified as required (as the red shading indicates). The user needs to add the specified item to the sales order.
-
At least one item with one of the relation types (Cross-Sell, Up-Sell, Substitute, or Other) has been specified for the original item in the item settings but is not defined as required. Thus, the user can assess the required item or items and determine whether to offer any to the customer.
If the related item with the Substitution relation has the Required check box selected on the Related Items tab of the Stock Items or Non-Stock Items form, when the original item is selected on the Details tab of the Sales Orders and Invoices forms, the system automatically selects the check box in the Substitution Required column. If this check box is selected for an item listed in a sales order, the user cannot create a shipment based on the sales order, and if it is selected for an item in an invoice, the user cannot release the invoice.
By default, the Substitution Required check box is available for editing but the availability of the check box can be restricted by user roles. For example, a user with the administrative rights can select the View Only option for the Substitution Required column for specific roles on the Access Rights by Screen (SM201020) form.
When the user clicks any of these buttons in the Related Items column on the Details tab of the Sales Orders or Invoices form, the system opens the Add Related Items dialog box (shown in the following screenshot). In the dialog box, the user can select a line with a substitute or up-sell item to replace or partially replace the original item, or select any number of lines with the Cross-Sell or Other relation type to add these to the original item in the sales order or invoice.
In the Quantity field of the Selection area of the dialog box, the user can specify the quantity of the original item to which the related items will be applied. For example, if a customer orders 10 laptops and the salesperson persuades the customer to buy 5 laptops of another model (which represents an up-sell), then in the Add Related Items dialog box, the salesperson specifies 5 in the Quantity field, selects the unlabelled check box in the line with the up-sell laptops, and clicks Add & Close. On the Details tab of Sales Orders or Invoices form, the system automatically reduces the value in the Quantity column for the line with the original laptops to 5, and inserts another line with 5 up-sell laptops.
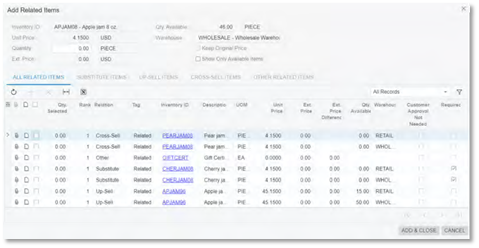
If a line with the substitute item is selected in the dialog box, the user can select the Keep Original Price check box in the Selection area to replace the original item with the substitute item but keep the value in the Ext. Price column of the original item line. The user can view the difference between those prices of the original and related items in the Ext. Price Difference column of the tab. A negative value means that the related item is cheaper than the original item. A positive value means that the related item is more expensive than the original item.
On the Invoices (SO303000) form, the button in the Related Items column of the Details tab appears for only the lines that have been added to the invoice directly (that is, they have not been processed through a sales order).
On the Invoices form, if a related item with serial number tracking has been added to the document by using the Add Related Items dialog box and its quantity is more than one, the system will insert a separate line for each piece of the item (with a quantity of 1).
The Related Item History Inquiry Form
The new Related Item History (IN401600) inquiry form has been added and listed in the Inquiries group of the Sales Orders workspace (shown in the following screenshot). The user can use this inquiry form to view related items that have replaced or complemented the original items specified on a sales order or invoice. The inquiry contains only records of related items that have been sold—that is, the invoices with these items have been released.
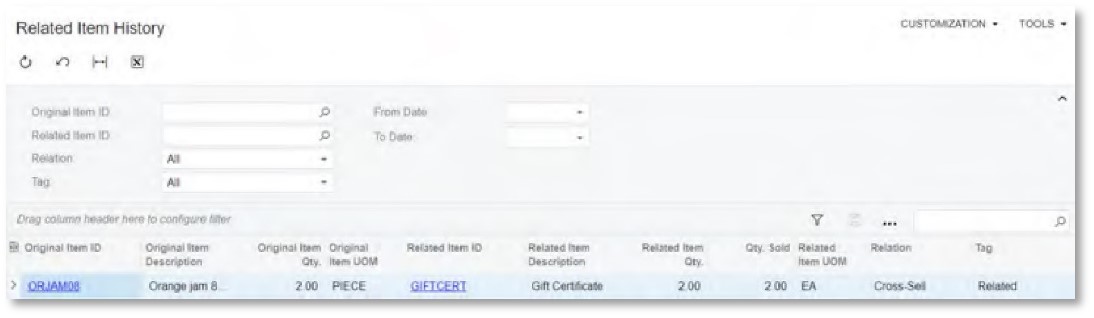
The user can narrow the search by using the following fields:
-
Original Item ID: Records are shown for the selected original item only.
-
Related Item ID: Records are shown for the selected related item only.
-
Relation: Records are shown for the selected relation only. If the user selects All, the records are shown for all relations.
-
Tag: Records are shown for the selected tag only. If the user selects All, the records are shown for all tags.
-
From Date: Records are shown for related items with a sale date that is later than or equal to the specified date.
-
To Date: Records are shown for related items with a sale date that is earlier than or equal to the specified date.
Changes to the Customers Form
Some customers stick with familiar items and may not be willing to be informed about substitutes, cross-sell, or up-sell items. The Suggest Related Items check box has been added on the Shipping tab of the Customers (AR303000) form. If the check box is cleared for a customer, the Related Items and Substitution Required columns are not displayed on the Details tab of the Sales Orders (SO301000) and Invoices (SO303000) forms if this customer is selected in the document.
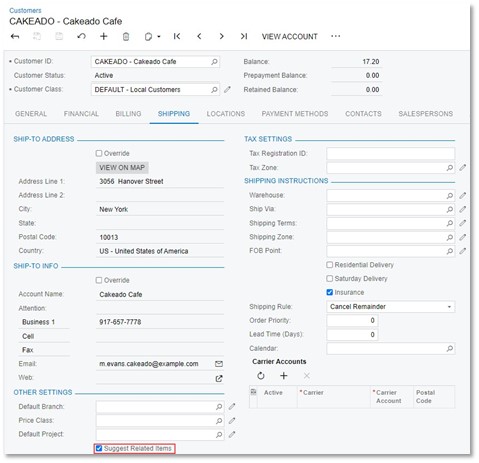
Multiple Base Currencies
In MYOB Advanced 2021.2, the support of the Multiple Base Currencies feature in inventory, purchase orders, and sales orders functionality has been delivered. The user can now implement multiple companies with different base currencies within one tenant and process these documents in different base currencies.
For detailed information about multiple base currencies in MYOB Advanced 2021.2, see Finance: Support of Multiple Base Currencies
Inventory Functionality
The new Currency field has been added to the Financial tab of the Receipts (IN301000), Issues (IN302000),
Adjustments (IN303000), Transfers (IN304000), and Kit Assembly (IN307000) forms (shown in the following screenshot). The value in the new field is derived from the currency of the branch specified in the Branch field on the same tab of the forms listed above. This branch is the originating branch of inventory documents.

On the Transfers form, the Branch and Currency fields are empty until a warehouse is selected in the Warehouse ID field in the Summary area of the same form. When the warehouse is selected, the system automatically inserts values to the Branch and Currency fields. The branch is inherited from the branch specified for this warehouse in the Branch field in the Summary area of the Warehouses (IN204000) form.
The transfers between warehouses associated with different branches that have different base currencies are not possible—that is, the user cannot specify warehouses that are associated with branches with different base currencies in the Warehouse ID and To Warehouse fields in the Summary area of the Transfers (IN304000) form.
When the Multiple Base Currencies feature is enabled, the user can process an inventory document only if this document has branches with the same base currency. That is, if the Branch field on the Financial tab of the
Receipts (IN301000), Issues (IN302000), Adjustments (IN303000), Transfers (IN304000), and Kit Assembly (IN307000) forms has a value, the system will not allow selecting a branch with a different base currency for the Branch field on the Details tab of these forms.
The following limitations also appear when the Multiple Base Currencies feature is enabled:
-
It is forbidden to change a branch in the Branch field on the Warehouses form to a branch with other base currency than the initial branch if at least one transaction record in the base currency of the initial branch exists for the warehouse.
-
It is forbidden to change a branch in the Branch field on the Warehouses form to a branch with the same base currency if there is non-zero stock in at least one warehouse location.
The default warehouse, price, cost, and some other settings of a stock and non-stock items on the Stock Items (IN202500) and Non-Stock Items (IN202000) forms are defined separately for each base currency. The values that are displayed on the Stock Items and Non-Stock Items forms depend on the base currency of the current branch.
Once the Multiple Base Currencies feature is enabled, the user needs to configure settings of stock and nonstock items for each base currency on the Stock Items and Non-Stock Items forms. To configure the settings for a particular base currency, the user must select a branch that uses this base currency (the name of the branch can be checked in the upper right part of the browser window) and specify the following settings:
-
The value in the Default Warehouse on the General tab. The user can select warehouses with associated branches that have the same base currency as a current branch base currency.
-
The values in some fields on the Price/Cost tab that are displayed in the base currency of the current branch. A user can specify the values of the Markup %, Default Price, Current Cost, and Last Cost fields. These values will be used for the stock item in documents with branches that have the same base currency as the branch for which these values are specified.
-
The settings on the Warehouses tab. The user can add only those warehouses that are associated with branches that have the same base currency as the base currency of the current branch (only for stock items).
-
The settings on the Replenishment tab. The user can set as a replenishment warehouse only a warehouse that is associated with the branch that has the same base currency as the current company or branch. (only for stock items)
-
The settings on the Suppliers tab. Only suppliers with visibility restricted to the branch with the same base currency as the current branch can be selected.
If the user has more than one branch with the same base currency, settings specified for this base currency will be active for all branches with this base currency within the tenant.
On the Template Items (IN203000) form, the values in the Price Management and Standard Cost sections on the Price/Cost tab, the value of the Default Warehouse field on the General tab, and the default supplier on the Suppliers tab are specified for each base currency.
On the Suppliers tab of the Template Items (IN203000) forms, only the suppliers restricted to the branch that has the same base currency as the current branch can be selected. For each base currency, a separate default supplier must be specified.
When the user creates or updates matrix items on the Template Items (IN203000) form, the settings that are specific for the base currency of the current branch will be copied to matrix items.
Note: After the system upgrade, the existing stock, non-stock, and matrix items and their prices and costs are set to the base currency used in the tenant before the system upgrade and enabling of the Multiple Base Currencies feature.
On the Update Standard Costs (IN502000) form, the values of the Pending Cost and Current Cost columns are displayed in a base currency of the branch associated with the warehouse that is selected in the table. If the Std. Cost Override check box is cleared for a stock or non-stock item, when the user clicks the Process button on the form toolbar, the system updates the cost of this item in all warehouses associated with branches that have the same base currency as the base currency of the branch associated with the warehouse of the stock item.
On the General tab of the Item Classes (IN201000) form, the user can set as the default warehouse only a warehouse associated with the branch that has the same base currency as the current company or branch. On the Replenishment tab of the Item Classes form, the settings of each item class should be specified separately for each base currency (except the Demand Calculation field). The user can set as a replenishment warehouse only a warehouse that is associated with the branch that has the same base currency as the current company or branch. When the user creates a stock item, the default warehouse and replenishment settings (if any replenishment settings were defined) for all base currencies will be copied from the item class to the stock item.
When the user changes the settings of an item class and selects the Apply to Children command on the More menu, the settings that are specific for the base currency of the current branch will be propagated to the child item classes.
On the Replenishment tab of the Item Warehouse Details (IN204500) form, the user can set as the replenishment warehouse only a warehouse that is associated with the branch that has the same base currency as the branch of the warehouse selected in the Warehouse field in the Selection area. In the Preferred Supplier field, only the suppliers restricted to the branches that have the same base currency as the base currency of the branch of the warehouse selected in the Warehouse field in the Selection area can be selected.
The values in the Price Management and Standard Cost sections on the Price/Cost tab and the value in the Replenishment Warehouse field on the Replenishment tab of the Item Warehouse Details form are specified for each base currency.
On the Stock Items, Non-Stock Items, Template Items, and Item Classes (IN201000) forms, when the Copy and Paste actions are used for stock, non-stock, template, or matrix items or item class, the settings that are specific for the base currency of the current branch will be copied from and pasted to the new item or item class. If the original item or item class has settings specified for another base currency, those settings will not be copied from and pasted to a new item or item class.
Purchase Orders Functionality
In purchase orders, purchase receipts and returns, and landed costs documents, the base currency of the document is the base currency of the branch specified in the Branch field on the Other tab of the Purchase Orders (PO301000) and Purchase Receipts (PO302000) forms and on the Financial tab of the Landed Costs (PO303000) form respectively. This branch is the originating branch of documents for the purchase order functionality.
On these forms, the user can only select suppliers that are:
-
restricted to the document branch
-
not restricted to any entity but have the same base currency as the base currency of the document branch
The user cannot change the value of the Restrict Visibility To field on the Suppliers (AP303000) form to a different group, company, or branch with other base currency than the base currency of the current group, company, or branch if at least one of the following conditions is met:
-
A record on the Supplier Inventory (PO201000) form exists for this supplier.
-
A purchase receipt or landed cost document with this supplier exists.
-
This supplier is selected as the preferred supplier on the Replenishment tab of the Item Warehouse Details (IN204500) form.
After the system upgrade, all existing suppliers are set to the base currency same as the base currency set in the tenant before the upgrade.
On the Details tab of the Purchase Orders and Purchase Receipts forms, when the user adds a stock item, the system inserts the last cost of the item to the Unit Cost field in the base currency of the branch which is selected in the Branch field on the Other tab of the form if the system cannot find the value in the Last Supplier Price column on the Suppliers tab of the Stock Items (IN202500) form and the Price column on the Supplier Prices (AP202000) form. Also, the default warehouse with the base currency of the branch selected in the Branch field on the Other tab of the Purchase Orders and Purchase Receipts forms is automatically inserted to the Warehouse column on the Details tab of these forms.
Once the branch is specified in the Branch field on the Other tab of the Purchase Orders and Purchase Receipts forms or on the Financial tab of the Landed Costs form, the user cannot select a branch with the base currency different from the base currency of this branch in the Branch column on the Details tab of the same forms.
On the Purchase Orders form, in purchase orders of the Drop-Ship type, the user can only select a customer that has the same base currency as the base currency of the purchase order branch in the Ship-To field on the Shipping tab and in the Customer field of the Create Sales Order dialog box.
On the Create Purchase Orders (PO505000) form, the PO Creation Branch field has been added (shown in the following screenshot). On this form, only lines with warehouses that are associated with a branch in the same base currency as the branch in the PO Creation Branch field are shown. Purchase orders that are created on this form will be created with the branch that is selected in the PO Creation Branch field.
In prepayment requests created from a purchase order, the originating branch is copied from this purchase order.
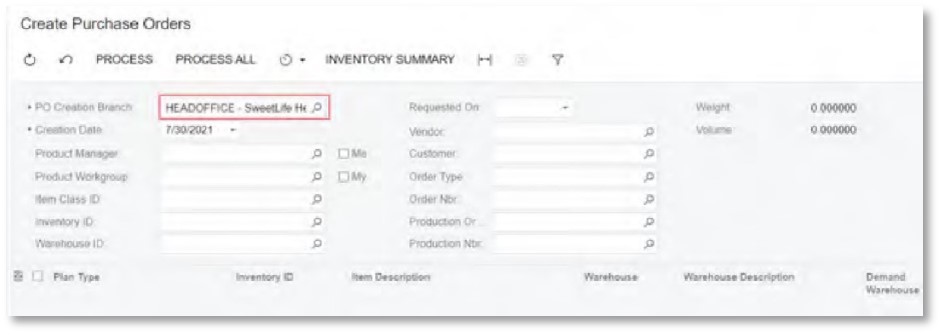
On the Create Purchase Orders form, suppliers that are restricted to the purchase order creation branch or are not restricted to any entity but have the same base currency as the purchase order creation branch can be selected. When the system generates inventory receipts, issues, and adjustments on the release of purchase receipts or returns and landed costs documents, the generated documents inherit the branch of the originating document. They are also posted in the base currency of the inherited branch.
Sales Orders Functionality
In sales orders and invoices, the base currency of the document is the currency of the branch specified in the Branch field on the Financial tab of the Sales Orders (SO301000) and Invoices (SO303000) forms respectively. This branch is the originating branch of documents for the sales order functionality.
On these forms, the user can only select customers that are:
-
restricted to the document branch
-
not restricted to any entity but have the same customer base currency as the base currency of the document branch
Once the branch is specified in the Branch field on the Financial tab of the Sales Orders and Invoices forms, the user cannot specify a branch with a different base currency in the Branch column on the Details tab of these forms.
On these forms, the user can select customers that are restricted to the document branch or that are not restricted to any entity but have the same currency as the base currency of the document branch.
After the system upgrade, all existing customers are set to the base currency same as the base currency set in the tenant before the upgrade.
On the Details tab of the Sales Orders or Invoices forms, when the user adds a stock item, the system inserts the default unit price in the base currency of the document branch if no item price is defined in the customer's price sheets. Also, the default warehouse with the base currency of the branch selected in the Branch field on the Financial tab of Sales Orders or Invoices forms is automatically inserted to the Warehouse column on the Details tab of these forms.
The user cannot change the value of the Restrict Visibility To field on the Customers (AR303000) form to a different group, company, or branch with other base currency than the base currency of the current group, company, or branch if a shipment with this customer exists.
In the PO Link dialog box on the Details tab of the Sales Orders form, the user can select only purchase orders from suppliers that have the same base currency as the base currency of the sales order branch.
When the system generates inventory issues on the release of SO invoices, credit memos, cash sales, cash returns, and debit adjustments, the generated documents inherit the branch of the originating document. They also are posted in the base currency of the inherited branch.
The transfers between warehouses associated with different branches that have different base currencies are not possible—that is, the user cannot specify warehouses that are associated with branches with different base currencies in the Warehouse ID and To Warehouse fields in the Summary area of the Sales Orders (SO301000) form for sales orders with the Transfer Order automation behaviour.
Intercompany Sales and Purchases
For customers and suppliers that are extended from branches and are not restricted to a group, company, or branch and that do not have any base currency specified in any associated entities, the following rules of document processing exists:
If the base currencies of related intercompany sales orders and purchase orders are different, the currency rate of the sales orders (or sales returns) is automatically inserted by the system according to the sales order date. The currency rate type applied to the currency rate in the sales order is defined by the value in the Cur. Rate Type field on the Customers form for this customer.
Customers and suppliers that are extended from branches and are not restricted to any entity with the base currency specified can be selected in sales and purchase orders with any base currency. For example, if a branch has the USD base currency, and this branch is extended as a supplier that does not have any visibility restrictions, this supplier can be selected in purchase orders with the EUR base currency. The same rule applies to customers extended from branches and specified in sales orders.
If the supplier, who is not restricted to any entity, is selected as the default supplier in any stock or non-stock item on the Suppliers tab of the Stock Items (IN202500), Non-Stock Items (IN202000), this supplier will be set as the default supplier for all branches in the tenant.
If an intercompany supplier or customer is specified in documents with different base currencies on the Shipments (SO302000), Purchase Receipts (PO302000), or Landed Costs (PO303000) forms, the Restrict Visibility To field on the Financial tab of the Customers or Suppliers form for this supplier or customer can be empty only. This rule is also applicable if a supplier is specified as the preferred supplier in a record on the Item Warehouse Details (IN204500) form for a warehouse with a branch that has a different base currency.
Other Changes
In all inquiries and reports of the inventory, purchase orders, and sales orders functionality that show the amount in documents, the Company/Branch field has been added (shown in the following screenshot). To view an inquiry or prepare a report for a group of companies, a company or branch must be selected in the field.
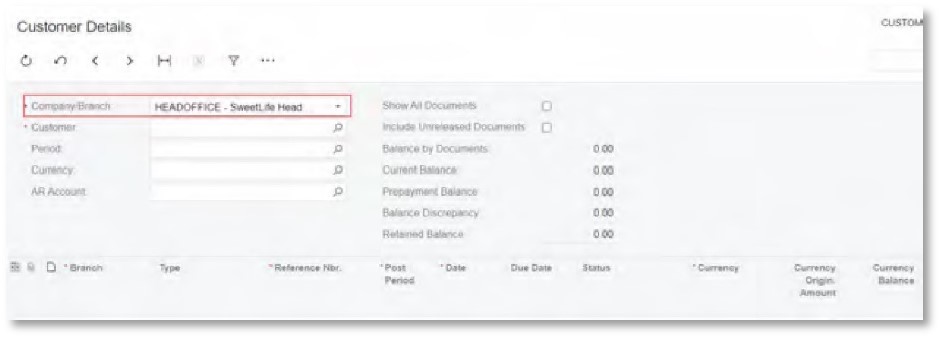
When the Multiple Base Currencies feature is enabled, the Restrict Visibility To field on the Financial tab of the Customers (AR303000) and Suppliers (AP303000) forms becomes mandatory. If the branch is selected in the Restrict Visibility To field for a customer or supplier, by default the system inserts the selected branch to the Default Branch field for a customer: on the Shipping tab of the Customers (AR303000) form and on the General tab of the Customer Locations (AR303020) form, or for a supplier on the Purchase Settings tab of the Suppliers (AP303000) form and on the General tab of the Supplier Locations (AP303010) form. Once the default branch is specified for a customer or supplier, the system automatically inserts the specified branch as the originating branch in all documents that the user creates for this customer or supplier including the documents that the user generates from other documents and that should have inherited the originating branches of the documents they have been generated from (for example, an invoice created for a sales order).
Inventory Tracking
In previous MYOB Advanced versions, to receive stock items that had been purchased for a project to a warehouse and issue the items from the warehouse, users had to configure a warehouse location for each project task. This configuration was necessary for the system to keep project-specific stock items separate from other inventory and to have project quantities and costs segregated in inventory balances. However, businesses often could not use this configuration for many reasons, including the following:
-
If a project task was linked to a warehouse location, a user was no longer able to use this location for any other project. Therefore, a physical location could not be assigned to a project: a user could either use linked warehouse locations for projects, or use physical locations without being able to allocate particular stock items on projects.
-
If many projects were being processed at the same time, and materials were purchased frequently for each project, the maintenance of warehouse locations could become very complex. The users were forced to create numerous locations in the system for each project and task combination within the same physical warehouse.
In MYOB Advanced 2021.2, with the new Project-Specific Inventory feature enabled on the Enable/Disable Features (CS100000) form, users can set up the tracking of the quantity and cost of inventory items for projects without any additional configuration of each warehouse. Users can receive the stock items of projects to regular warehouse locations where the items are easy to locate and are protected from being issued to other projects or to customers outside of projects. Items related to projects are recorded as separate inventory quantities and costs. These items are available for shipping only for a particular project; for other projects the items are not available unless users explicitly transfer them to those projects first. As a project's stock items are consumed and users issue them, depending on the inventory tracking setting of the project, the project expenses will be captured at the costs that are calculated within the physical warehouse, a separate warehouse location, or within the virtual project location based on valuation method of the item.
The remainder of this topic contains details about how to initialise, configure, and use the new functionality, and provides an example which explains in detail how inventory tracking is performed.
System Preparation
For inventory tracking to be used for projects, the following features must be enabled on the Enable/Disable Features (CS100000) form:
-
Inventory and Order Management
-
Inventory
-
Project-Specific Inventory
When the Project-Specific Inventory feature is enabled, an administrative user must perform the stock initialisation procedure by clicking Initialise Stock on the form toolbar of the Recalculate Project Balances (PM504000) form.
Inventory Tracking Modes
When the Project-Specific Inventory feature is enabled on the Enable/Disable Features (CS100000) form, on the Summary tab of the Projects (PM301000) form, the new Inventory Tracking field has been added. For a new project, a user can select one of the following modes in the field (see the following screenshot):
-
Track by Location: The quantity and cost of the purchased materials are tracked at the warehouse location level. The system does not reserve the purchased quantity and does not track the cost of materials for the project.
This is a backward-compatible mode that corresponds to the inventory tracking process that has been used in previous MYOB Advanced versions. In this mode, a user configures inventory tracking by linking warehouse locations to particular projects and project tasks.
-
Track by Project Quantity: The quantity of the purchased materials is tracked at the project level, whereas the cost of the materials is tracked at the warehouse location level. The system tracks the quantity but not the cost of the materials reserved for the project.
-
Track by Project Quantity and Cost: The quantity and cost of the purchased materials are tracked at the project level. The system tracks the quantity and cost of the materials reserved for the project.
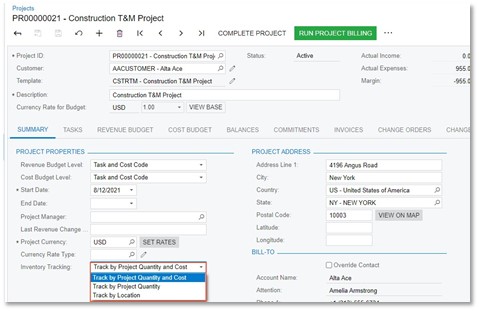
Tracking by Location
The Track by Location inventory tracking mode corresponds to the functionality of previous MYOB Advanced versions. In this mode, a dedicated warehouse location is created for the project or project task on the Locations tab of the Warehouses (IN204000) form, as the following screenshot shows. For this location, the Cost Separately check box is selected automatically.
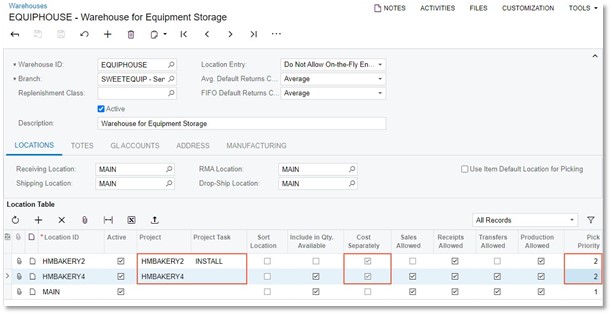
With these settings, the quantity and cost of the items purchased for the project are tracked at the warehouse location level. The system does not reserve the purchased quantity and does not track the cost of materials for the project. A user (typically a project manager or purchasing manager) creates and processes the following documents with project stock items:
-
For the purchase of project items, the user creates a purchase order on the Purchase Orders (PO301000) form. These expenses can be captured to the project as project commitments. The purchased materials are not reserved for the project and can be shipped for other projects and customers. The purchased materials are received to the warehouse location with a purchase receipt that the user creates on the Purchase Receipts (PO302000) form.
In this mode, the system tracks assets purchased for the project only if the inventory account of the corresponding stock items is linked to an account group. Also, with this configuration, the system does not track project-specific quantity and cost of purchased items.
-
For the sale of project items, the user creates a sales order on the Sales Orders (SO301000) form. The shipment is processed for the sales order from the same location on the Shipments (SO302000) form with the quantity available for shipping that is defined by the warehouse location.
Tracking Project Inventory
For a project in which Track by Project Quantity or Track by Project Quantity and Cost inventory tracking mode is selected, a project manager or purchasing manager creates and processes the following documents with stock items:
-
To purchase stock items for project, the user creates a purchase order on the Purchase Orders (PO301000) form. The expenses are captured to the project cost budget as a project commitment.
-
To receive items to a warehouse, the user processes a purchase receipt on the Purchase Receipts (PO302000) form, or processes an inventory receipt on the Receipts (IN301000) form. The system automatically creates a virtual project-specific location within the warehouse location where the materials are received to separate the project items from free stock. The purchased materials are reserved for the project and cannot be issued for another project.
-
To issue the materials for the customer, the user processes an inventory issue for the project on the Issues
(IN302000) form, or processes a sales order on the Sales Orders form and a corresponding shipment on the Shipments (SO302000) form. The quantity available for issuing is defined by the warehouse location, the project, and project task.
Item Cost Calculation
When the Project-Specific Inventory feature is enabled on the Enable/Disable Features (CS100000) form, more levels of inventory tracking can be used for inventory and order management and the complete set of inventory operations is supported—receipts, issues, adjustments, transfers, and physical counts. All the valuation methods that are supported in inventory and order management are also supported with the Project-Specific Inventory feature.
In a project with the Track by Location mode, the cost of the issued materials is not project-specific and is defined by general cost calculation rules. The cost of an item depends on the item valuation method and is affected by other factors: the warehouse location from which the item is issued, the account and subaccount, the selected subitem, and the lot or serial number of the item.
In a project with the Track by Project Quantity mode, the cost of the issued materials is not project-specific and is defined by general cost calculation rules. The cost of an item depends on the item valuation method and is affected by other factors: the warehouse location from which the item is issued, the account and subaccount, the selected subitem, and the lot or serial number of the item).
In a project with the Track by Project Quantity and Cost mode, the system tracks project-specific cost layers. That is, for each combination of project and project task, the system calculates the cost of an item depending on the item valuation method and other applicable factors: the warehouse location from which the item is issued, the account and subaccount, the selected subitem, and the lot or serial number of the item.
For example, suppose that the project is configured to use the Track by Project Quantity and Cost inventory tracking mode. Further suppose that a stock item with the Average valuation method is purchased as follows:
-
10 units (at a cost of $100) that are not related to any project
-
10 units (at a cost of $100) that are not related to any project
-
10 units (at a cost of $100) that are purchased for Project A
-
12 units (at a cost of $110) that are purchased for Project A
The system will issue the item for Project A at the unit cost of $105.45; the unit cost is calculated as follows: (10 * $100 + 12 * $110) / 22. The system will issue the item for a non-project-specific shipment at a unit cost of $100; the unit cost is calculated as follows: (10 * $100 + 10 * $100) / 20.
Calculation of Item Availability
When a user adds a line with an inventory item to a sales order, shipment, transfer, or issue, in the table footer, the system calculates and shows the availability status of the item of the selected line, based on the line attributes, such as subitem, lot or serial number, and warehouse location. When the Project-Specific Inventory feature is enabled on the Enable/Disable Features (CS100000) form, the system calculates two figures for each availability bucket, such as On Hand, Available, Available for Shipping, and Allocated (see the following screenshot).
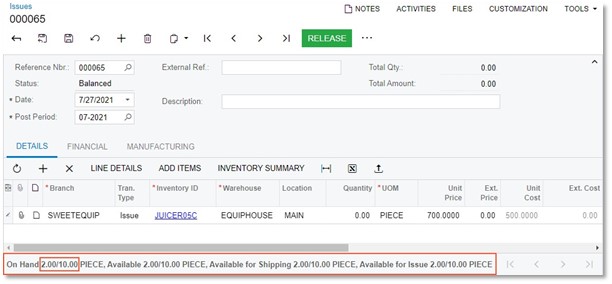
The first figure is the available quantity for the selected line, which depends on the inventory tracking mode of the project selected in the line or at the document level as follows:
-
Track by Location: The quantity of items related to the project linked to the selected location and items that correspond to no project (that is, that have the non-project code specified)
-
Track by Project Quantity: The quantity of items related to the selected project and project task
-
Track by Project Quantity and Cost: The quantity of items related to the selected project and project task
-
None (the non-project code, which is X by default, is selected in the line): The quantity of items that correspond to no project (that is, that have the non-project code specified) and the items related to the projects linked to the selected location
The second figure is the entire available quantity of the item of selected line, including the quantity related to the selected project.
Transferring of Project-Related Items
When the Project-Specific Inventory feature is enabled on the Enable/Disable Features (CS100000) form, issuing materials for a project tracked by quantity (for example, Project 1) or by quantity and cost (for example, Project 2) is allowed only within a single project. In order to issue materials reserved for Project 1 but utilise those materials for Project 2 (and thus, capture the expenses for this project), a user has to process a transfer from Project 1 to Project 2 on the Transfers (IN304000) form first; only then the user can create an issue for Project 2.
Also, issuing items from the free stock (that is, materials related to the non-project code, which is X by default) to Project 1 or Project 2 is not supported. This scenario is also addressed with a preliminary transfer (as illustrated in the following screenshot).
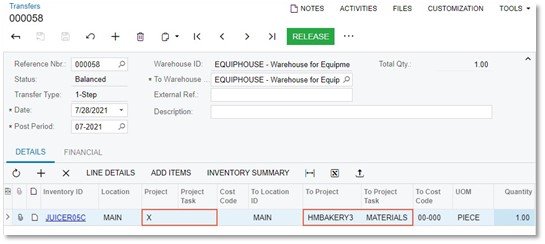
Physical Inventory Review
With the new Project-Specific Inventory feature enabled on the Enable/Disable Features (CS100000) form, at the time of actual physical counting, warehouse clerks count units without taking projects into consideration because the clerks may not have information which particular items are reserved for projects and which are not. The Physical Inventory Review (IN305000) form does not contain information about projects and their virtual locations within the physical bin locations, as the screenshot below shows. Because the physical count process stops all the inventory operations and it is important to quickly get back to the operating system state, the decision on which projects to affect is made at the stage of the inventory adjustment generated from the physical count.
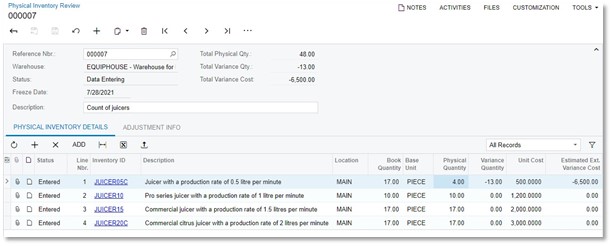
On the Adjustments (IN303000) form, in the adjustment generated based on a physical count, the number of adjustment lines created for a physical count line equals the number of different cost layers found for the physical count line. For projects with the Track by Project Quantity and Cost inventory tracking mode, the system auto-splits free stock items by their cost layers. For those cost layers, a user can then manually select a project and a project task to adjust the corresponding virtual location.
After a physical count on the Physical Inventory Review form, if a negative variance quantity of an item is greater than the number of this item that corresponds to no project (the non-project code), the adjustment originating from this physical inventory review is generated but cannot be released until the variance is manually distributed between projects on the Adjustments form. A user performs this distribution by selecting the line and clicking the Split button on the toolbar of the Details tab of the Adjustments form, as shown in the following screenshot.
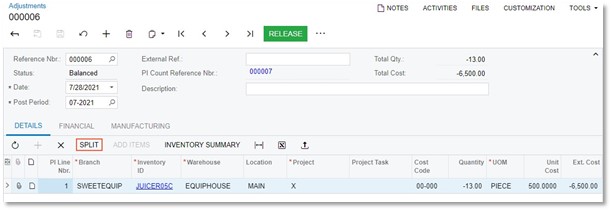
A user can perform a split operation for the following projects:
-
The X non-project code.
-
Projects that have the Track by Location inventory tracking mode. In the split line, the user can change only the cost code because each project tracked by location has a single cost layer
-
Projects that have the Track by Quantity inventory tracking mode.
For projects that have the Track by Quantity and Cost inventory tracking mode, the manual split functionality is not supported.
Inventory Tracking Process
Suppose that a company has two different physical warehouses: one in New York, and one in Seattle. Each warehouse has two physical bin locations that initially are empty.
Also, in the company, there are currently three active projects:
-
Project A, in which the Track by Location mode is used; in the project, the TA project task is configured
-
Project B, in which the Track by Project Quantity mode is used; in the project, the TB1 and TB2 project tasks are configured
-
Project C, in which the Track by Project Quantity and Cost mode is used; in the project, the TC3 and TC4 project tasks are configured
Then suppose that the purchasing manager has processed an inventory receipt (shown in the following diagram) with two types of stock items: Item 1 and Item 2. For both items, the Average costing method is used.
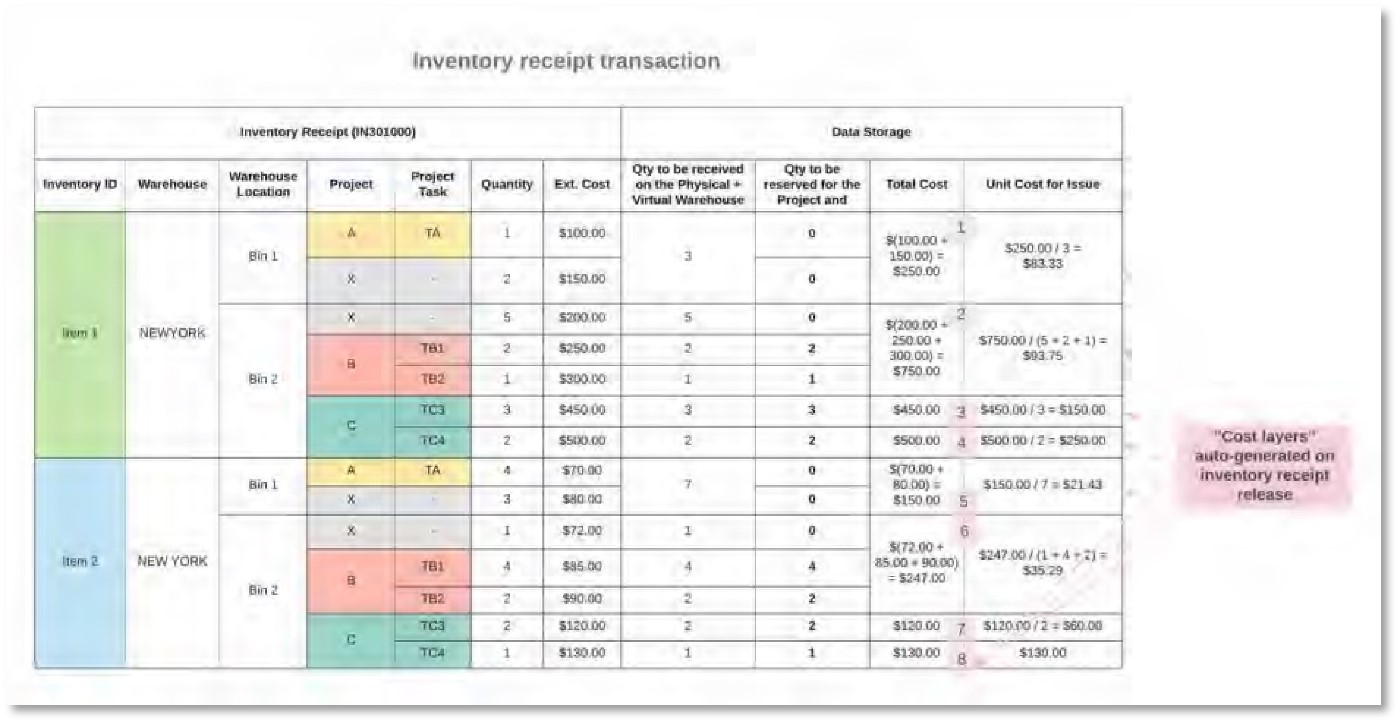
The system automatically tracks which particular units of item 1 and item 2 are reserved for which project and which of these items are free stock not related to any project. The item availability information and the structure of company warehouses is shown in the following diagram).
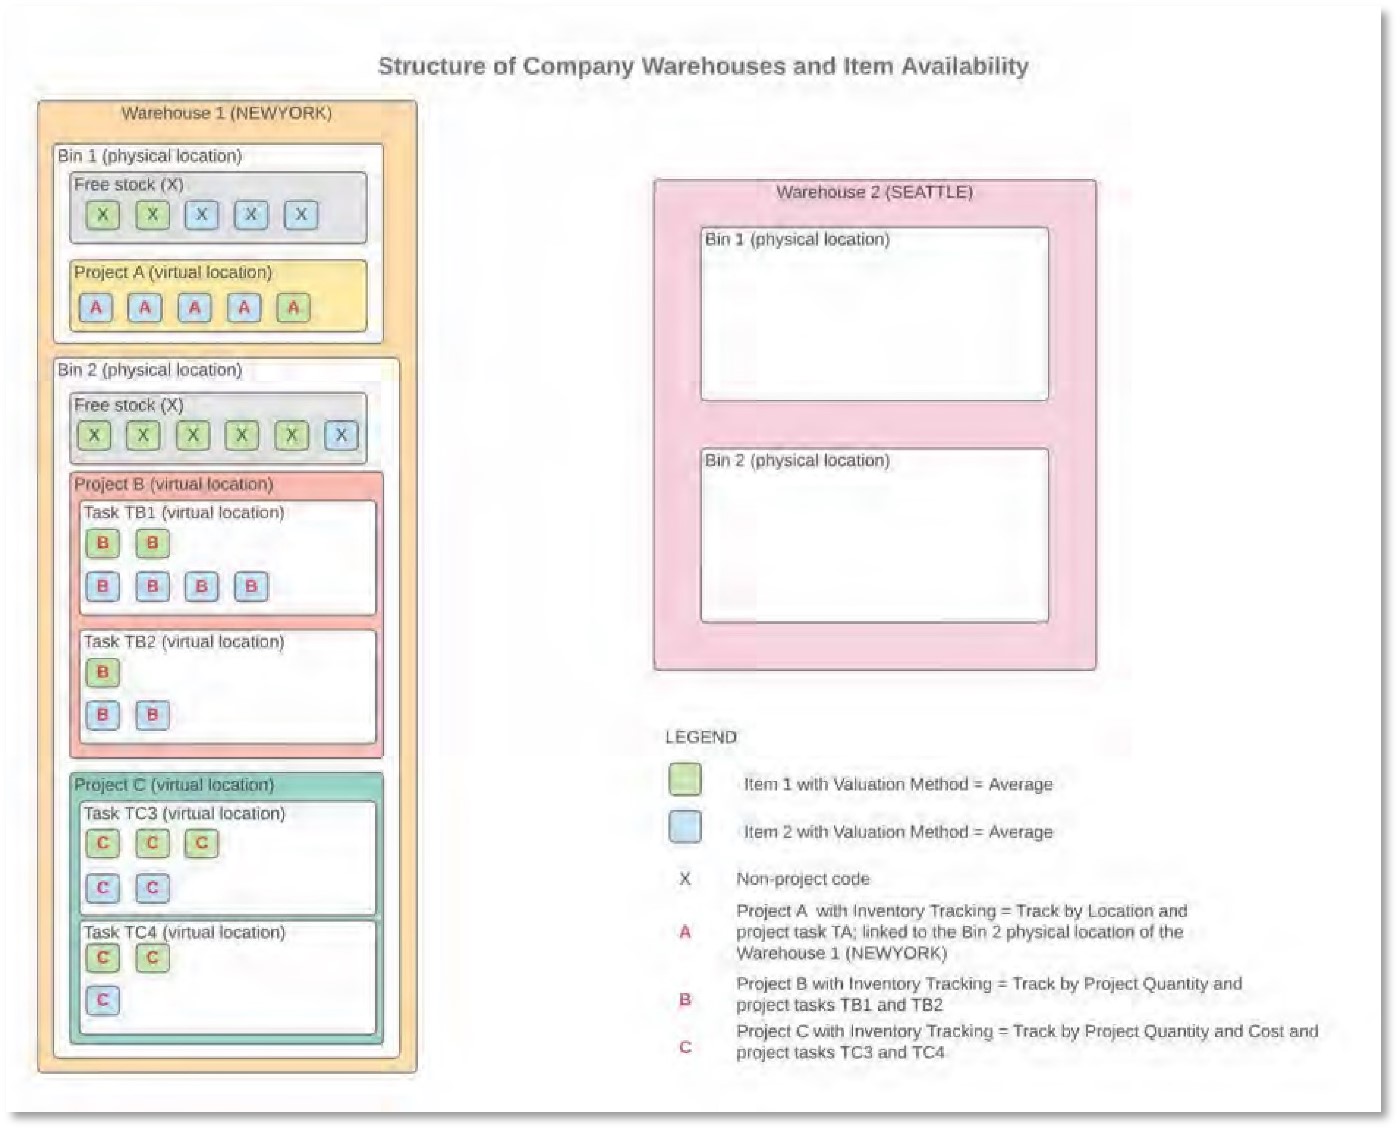
In the diagram above, the quantity of items in the warehouse locations after releasing the inventory receipt transaction is as follows:
-
Warehouse 1 (New York):
-
Bin 1, non-project code: Two units of Item 1 and three units of Item 2
-
Bin 1, items reserved for project A: One unit of Item 1 and four units of Item 2
-
Bin 1, items reserved for project B: No units
-
Bin 1, items reserved for project C: No units
-
Bin 2, non-project code: Five units of Item 1 and one unit of Item 2
-
Bin 2, items reserved for project A: No units
-
Bin 2, items reserved for project B: Three units of Item 1 and six unit of Item 2 • Bin 2, items reserved for project C: Five units of Item 1 and three unit of Item 2
-
Warehouse 2 (Seattle):
-
Bin 1, non-project code: no units
-
Bin 1, items reserved for project A: No units
-
Bin 1, items reserved for project B: No units
-
Bin 1, items reserved for project C: No units
-
Bin 2, non-project code: no units
-
Bin 2, items reserved for project A: No units
-
Bin 2, items reserved for project B: No units
-
Bin 2, items reserved for project C: No units
The inventory items are shown as assets in the balance sheet.
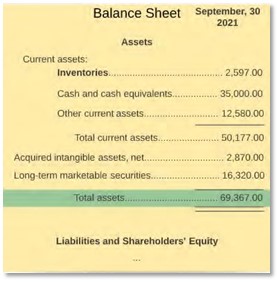
Then suppose that purchasing manager has processed the inventory issue shown in the following diagram.
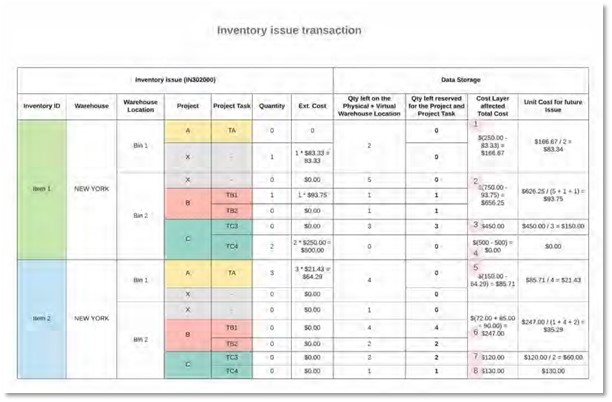
With this transaction, the following inventory operation are performed in the New York warehouse:
-
One unit of Item 1 is issued from free stock of bin 1.
-
One unit of Item 1 that has been reserved for project task TB1 of project B is issued from Bin 2.
-
Two units of Item 1 that have been reserved for project task TC4 of project C are issued from Bin 2. • Three units of Item 2 that have been reserved for project task TA of project A are issued from Bin 1.
After that, the purchasing manager has processed the inventory transfer transactions shown in the following diagram.
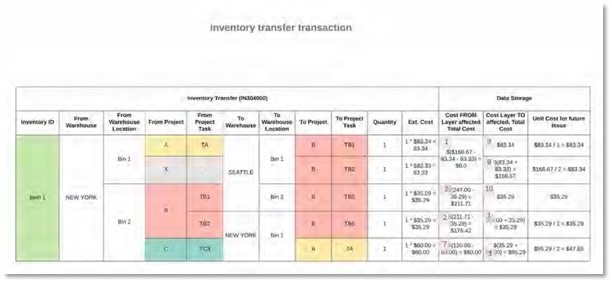
With this transaction, the following inventory operation are performed:
-
One unit of Item 1 that has been reserved for project A is issued from Bin 1 of the New York warehouse and is received to Bin 1 of the Seattle warehouse and reserved for project B.
-
One unit of Item 1 is issued from the free stock of Bin 1 of the New York warehouse and is received to Bin 1 of the Seattle warehouse.
-
One unit of Item 1 that has been reserved for project task TB1 of project B is issued from Bin 2 of the New York warehouse. The item is received to Bin 2 of the Seattle warehouse and is reserved for project task TB2 of project B.
-
One unit of Item 1 that has been reserved for project task TB2 of project B is issued from Bin 2 of the New York warehouse. The item is received to Bin 1 of the Seattle warehouse and is reserved for project task TB1 of project B.
-
One unit of Item 1 that has been reserved for project task TC3 of project C is issued from Bin 2 of the New York warehouse. The item is received to Bin 1 of the Seattle warehouse and is reserved for project task TA of project A.
As a result of the processed transactions, the following items are available in the warehouses:
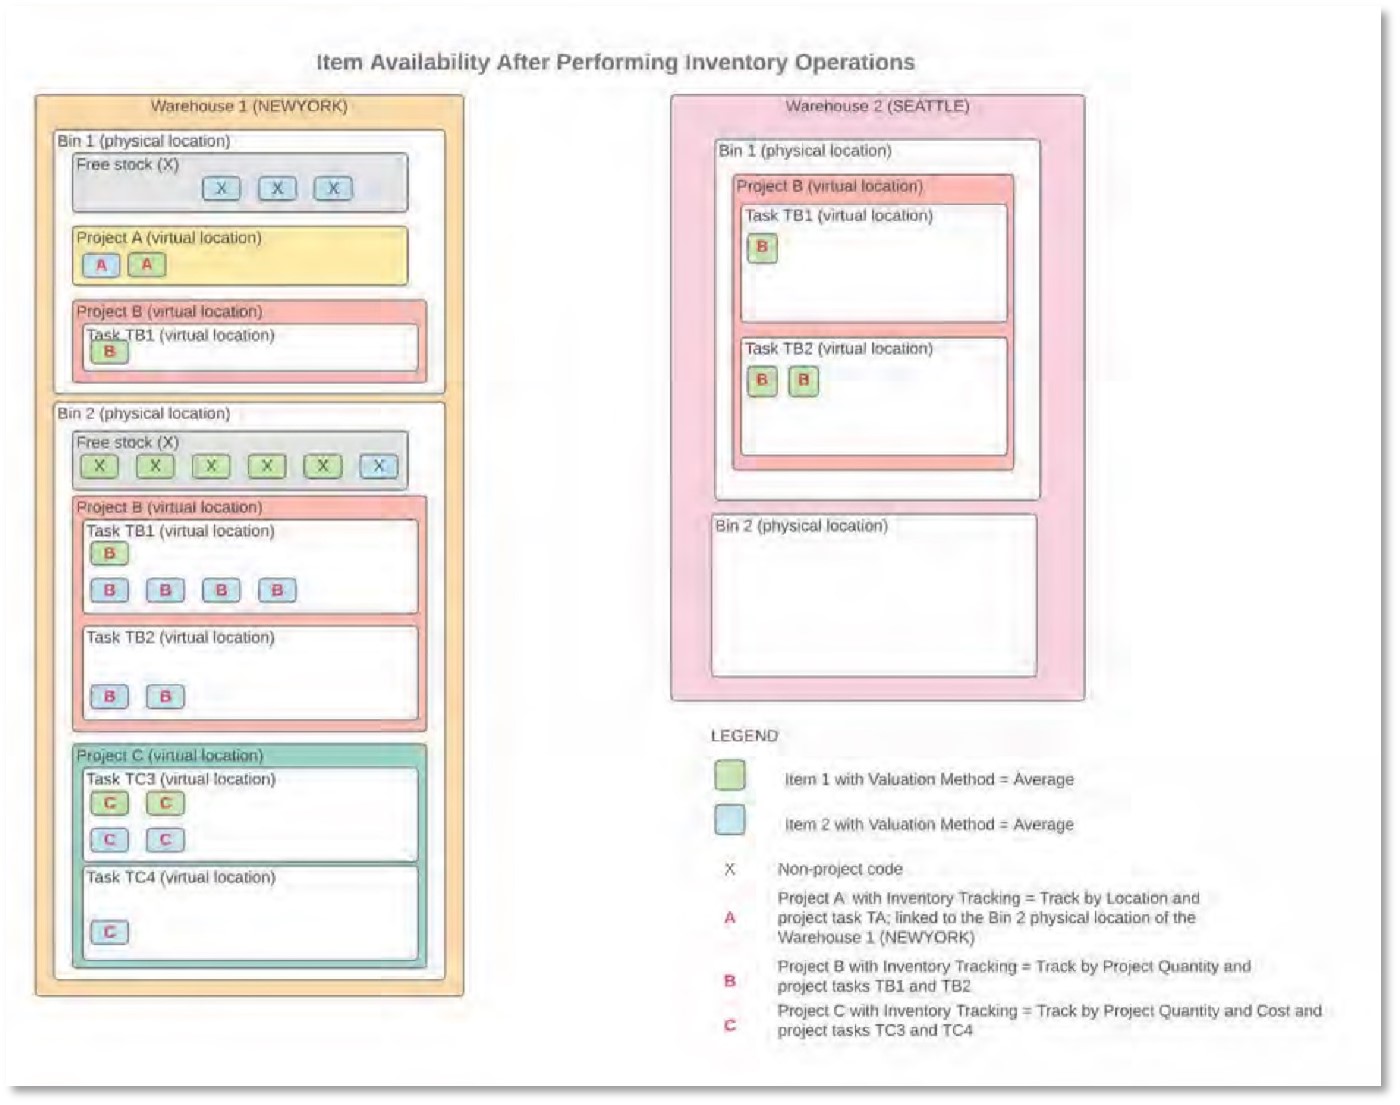
In the diagram above, the resulting quantity of items in the warehouse bins is as follows:
Italic text highlights the changes in item availability after performing inventory operations.
-
Warehouse 1 (New York):
-
Bin 1, non-project code: No units of item 1 and three units of Item 2
-
Bin 1, items reserved for project A: One unit of Item 1 and one unit of Item 2
-
Bin 1, items reserved for project B: One unit of Item 1
-
Bin 1, items reserved for project C: No units
-
Bin 2, non-project code: Five units of Item 1 and one unit of Item 2
-
Bin 2, items reserved for project A: No units
-
Bin 2, items reserved for project B: One unit of Item 1 and six units of Item 2 • Bin 2, items reserved for project C: Two units of Item 1 and three unit of Item 2
-
Warehouse 2 (Seattle):
-
Bin 1, non-project code: no units
-
Bin 1, items reserved for project A: No units
-
Bin 1, items reserved for project B: Three units of Item 1
-
Bin 1, items reserved for project C: No units
-
Bin 2, non-project code: no units
-
Bin 2, items reserved for project A: No units
-
Bin 2, items reserved for project B: No units
-
Bin 2, items reserved for project C: No units
Reclassification of Bills
In previous versions of MYOB Advanced, there was no ability to quickly correct the lines of an accounts payable bill after bill release if an incorrect account or subaccount had been specified in these lines. Also, there was no ability to correct actual amounts for a project (that is, move a bill from a project budget line with a particular project, project task, and cost code to another project budget line) after the bill has been released.
Starting in MYOB Advanced 2021.2, a user can reclassify an accounts payable bill—that is, change the account, subaccount, project, project task, or cost code in the lines of the bill. Also, a user can now link a commitmentrelated line of a bill to another commitment line to reclassify it in the project budget.
Configuration of the Bill Reclassification Functionality
In the Posting Settings section on the Accounts Payable Preferences (AP101000) form, a new Allow Bill Reclassification check box has been added (see the screenshot below). If this check box is selected, the bill reclassification functionality is available for users that are assigned either (or both) of the following predefined roles: Financial Supervisor and Project Accountant.
No other access roles can be configured to provide access to the functionality.
That is, a user with the Financial Supervisor or Project Accountant role (or both roles) can select the Allow Bill
Reclassification check box on the Accounts Payable Preferences form; after that, this user can use the Reclassify Bill menu command on the Bills and Adjustments (AP301000) form for bills that are assigned the Open or Closed status.
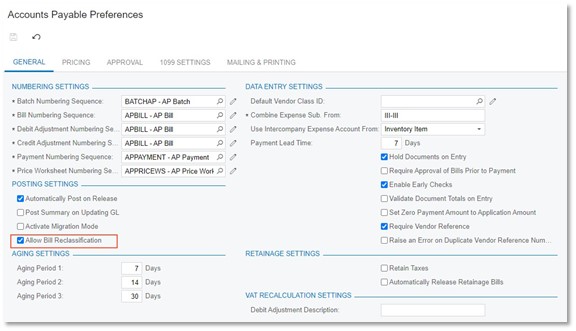
To reclassify a bill, this user opens it on the Bills and Adjustments form and on the More menu, clicks Reclassify Bill (under Corrections), as shown in the following screenshot.

The system changes the status of the bill to Under Reclassification (which is the new status that has been introduced for the reclassification functionality). In the bill lines on the Document Details tab, the columns whose values are available for reclassification become editable and are highlighted in green (see the following screenshot).
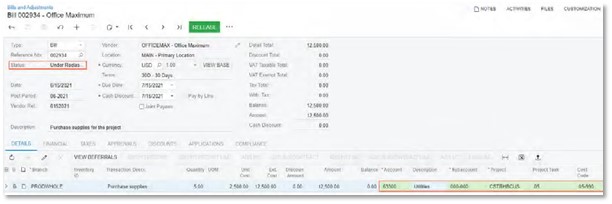
For each bill line, the user can change the values in any of the following columns:
-
Account
-
Subaccount, which appears on the form if the Subaccounts feature is enabled on the Enable/Disable Features (CS100000) form,
-
Project, which appears on the form if the Project Accounting feature is enabled on the Enable/Disable Features form
-
Project Task, which appears on the form if the Project Accounting feature is enabled on the Enable/Disable Features form
-
Cost Code, which appears on the form if the Cost Codes feature is enabled on the Enable/Disable Features form
After the user has made changes to the bill being reclassified, the user releases the bill. On release of the bill, the system reverses the original transaction linked to the bill and generates a new GL transaction based on the updated bill details. In the bill, the link to the reversed transaction is replaced with a link to the newly generated GL transaction. See the following screenshots, which show the batches on the Journal Transactions (GL301000) form that were affected by the reclassification process:
-
In the Summary area of the form, for the batch that was initially created on release of the bill, the link to the reversing batch is shown in the Orig. Batch Number field, as shown in the following screenshot.
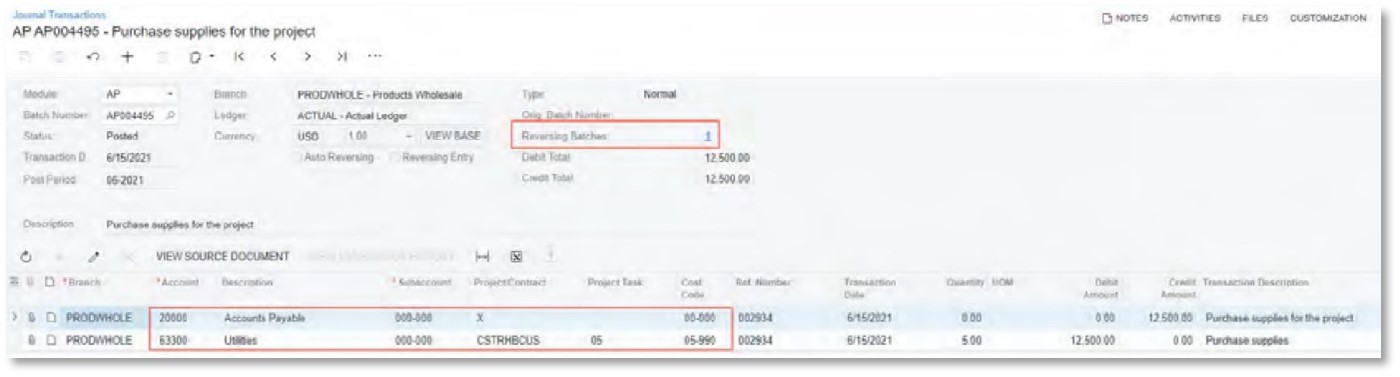
-
In the Summary area of the form, for the reversing batch, the link to the original batch is shown in the Orig. Batch Number field, as shown in the following screenshot.
The reversing batch is posted to the general ledger automatically if the Automatically Post on Release check box is selected in the Posting Settings section of the Accounts Payable Preferences form. If the check box is cleared, the reversing batch is saved with the Unposted status.

-
In the Summary area of the form, for the batch that has been created on release of the reclassified bill, the link to the original batch is shown in the Orig. Batch Number field
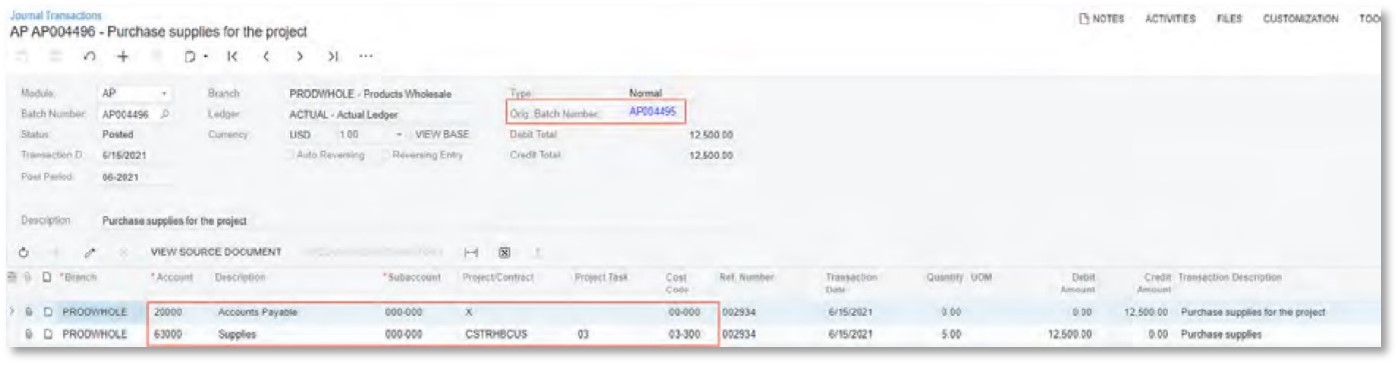
If there were no changes made to the bill with the Under Reclassification status, on release of the bill, the system assigns the previous status (Open or Closed) to it and does not reverse the original batch.
For the project-related bills, the system also reverses the original project transaction (the first screenshot below shows the original project transaction, and the second screenshot shows the reversing project transaction) and generates a new project transaction (see the third screenshot below) with the new project budget key and GL selected in the Summary area of the Project Transactions (PM304000) form.
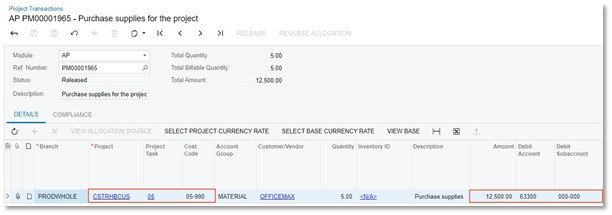
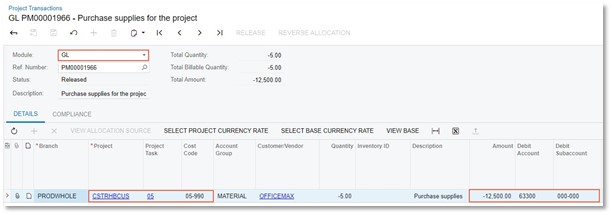
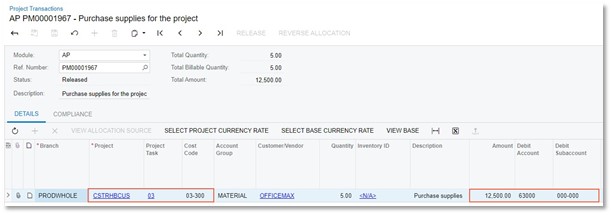
In the reclassified project transaction, the system will specify the account group to which the specified general ledger account is linked.
If a project-related bill has been reclassified as a non-project bill (that is, a particular project has been changed to a non-project code), the system reverses the original project transaction and does not generate a new one.
Reclassification of Commitment-Related Bill Lines
If a bill being reclassified includes lines related to commitments (that is, purchase orders or subcontracts) on the
Details tab of the Bills and Adjustments (AP301000) form, the only columns available for editing in these lines are PO Line and Subcontract Line, as shown in the following screenshot.
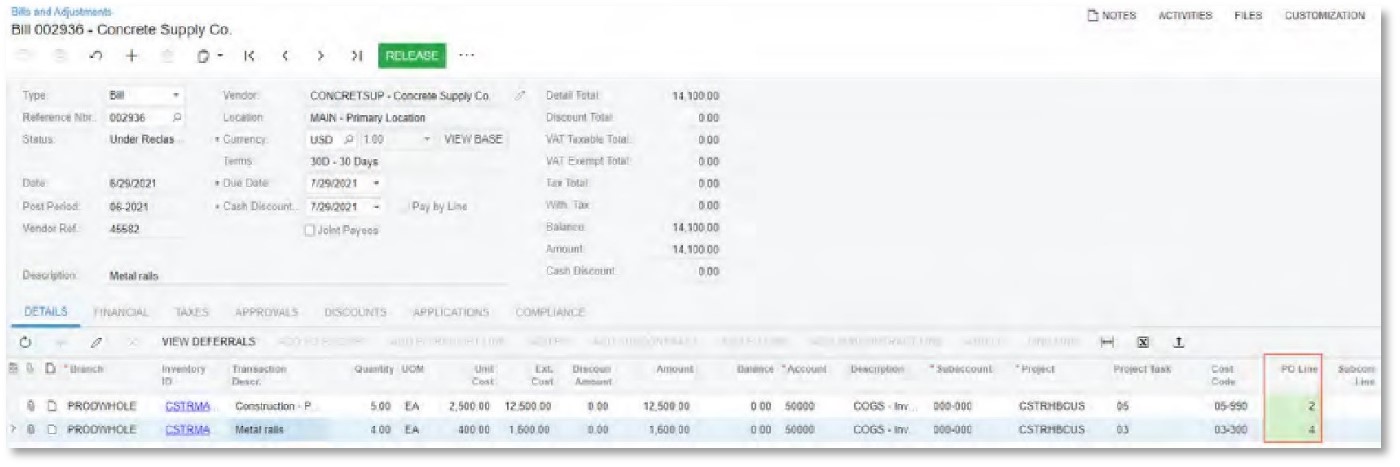
By default, the PO Line and Subcontract Line columns are hidden on the Details tab of the Bills and Adjustments form. The user needs to add these columns via the Column Configuration dialog box.
A user can link a bill line to another commitment line with the same Inventory ID. Once a user selects a new commitment line to be linked to a bill line, the system copies the following settings from the newly specified commitment line to the bill line: Account, Subaccount, Project, Project Task, and Cost Code, as shown in the following screenshot.
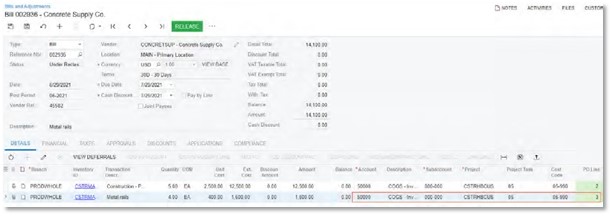
A commitment line can be linked to only one line of a particular bill.
Reports with Reclassification Information
A new Reclassified Bills (AP657000) report has been added. This report shows the bills that have been reclassified and the bills that are assigned the Under Reclassification status (see the following screenshot). The user can run the report even if the Allow Bill Reclassification check box has been cleared on the Accounts Payable Preferences (AP101000) form.
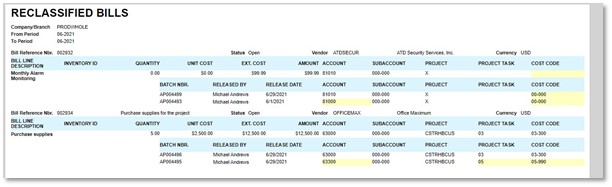
The following reports also now include the bills with the Under Reclassification status:
-
AP Edit Detailed (AP610500)
-
AP Register Detailed (AP622000)
-
Unreleased AP Documents (AP656100)
Notes on Reclassification Processing
A user should be aware of the following specifics of processing reclassified bills:
-
If the approval process is configured for AP bills on the Approval tab of the Accounts Payable Preferences (AP101000) form, for the bills with the Under Reclassification status, the system skips the approval process.
-
If a bill in the system has the Under Reclassification status, a user will not be able to close the corresponding financial period in AP on the Manage Financial Periods (GL503000) form.
-
A user cannot clear the Allow Bill Reclassification check box on the Accounts Payable Preferences form if at least one bill is still assigned the Under Reclassification status.
-
Bills assigned the Under Reclassification status cannot be mass-released and thus are not shown on the Release AP Documents (AP501000) form.
-
If the Pay by Line check box is selected for a bill on the Bills and Adjustments (AP301000) and if a payment has been applied to this bill, the payment lines will not be updated during reclassification.
-
If the system is configured to use a single project for all bill lines—that is, if the Require Single Project per Document check box is selected on the Accounts Payable Preferences (AP101000) form—and a user changes the project in the Project field on the Bills and Adjustments (AP301000) form, the system updates the project in all lines of the bill accordingly. If there is at least one bill line linked to a commitment, a user cannot change the project in the Project field.
Limitations on Bill Reclassification
A bill cannot be reclassified if any of the following criteria are met:
-
The bill has the applied retainage; the retainage has been released.
-
It is a retainage bill.
-
The bill has multiple-installment credit terms.
-
For the bill, a consolidated GL transaction has been generated if the Generate Consolidated Batches check box was selected on the General Ledger Preferences (GL102000) form or the Post Summary on Updating GL check box was selected on the Accounts Payable Preferences (AP101000) form.
-
For the bill, the corresponding GL transaction has been reclassified on the Journal Transactions (GL301000) form.
-
The project transaction corresponding to the bill has been reallocated.
-
The project transaction corresponding to the bill has been billed.
-
The bill has been created in migration mode.
-
The bills is linked to an expense claim.
-
The bill is linked to a service order or appointment.
An individual bill line cannot be reclassified if any of the following is true:
-
It has a specified deferral code.
-
It is linked to purchase order line with a line type other than Service.
-
It is linked to a purchase order that is linked to a receipt.
Reclassification of GL Transactions
In previous versions of MYOB Advanced, the functionality of the reclassification of general ledger transactions was limited, so that users were able to reclassify only general ledger transactions that were not linked to projects. In MYOB Advanced 2021.2, this functionality has been extended so that a user can now perform the reclassification of a project-related general ledger transaction to change an incorrectly specified account, subaccount, or branch, or to move posted amounts between the projects, project tasks, and cost codes.
UI Changes on the General Ledger Forms
New UI elements have been added to general ledger forms to support the functionality of the reclassification of general ledger transactions.
The project-related fields and columns are shown on the form if the Project Accounting feature is enabled on the Enable/Disable Features (CS100000) form. The cost code-related fields and columns are shown on the form if the Cost Codes feature is enabled.
The following UI elements have been added to the Reclassify Transactions (GL506000) form:
-
In the table, the Project, To Project, Project Task, To Project Task, Cost Code, and To Cost Code columns have been added.
-
In the Load Transactions dialog box, the Project, From Project Task, To Project Task, From Cost Code, and To Cost Code fields have been added.
-
In both the Find section and the Replace section of the Find and Replace dialog box, the Project, Project Task, and Cost Code fields have been added.
Also, on the Reclassification History (GL405000) form, the Project, Project Task, and Cost Code columns have been added.
Reclassification of GL Transactions
To reclassify a particular transaction, a user clicks Reclassify on the form toolbar of the Account Details (GL404000) or Journal Transactions (GL301000). To reclassify a transaction that corresponds to a particular document, the user opens this documents and clicks Reclassify GL Batch on the form toolbar of the Invoices and Memos (AR301000) or Bills and Adjustments (AP301000) form.
Alternatively, the user can open the Reclassify Transactions (GL506000) form, specify the selection criteria in the Load Transactions dialog box, and load the required list of transactions to be reclassified. Then in each transaction line to be reclassified, the user specifies new values in any of the following columns:
-
To Branch, which appears if the Multi-Branch Support feature is enabled on the Enable/Disable Features (CS100000) form
-
To Account
-
To Subaccount, which appears on the form if the Subaccounts feature is enabled on the Enable/Disable Features form
-
The transaction date (New Tran. Date)
-
The transaction description (New Transaction Description)
-
To Project, which appears on the form if the Project Accounting feature is enabled on the Enable/Disable Features form
-
To Project Task, which appears on the form if the Project Accounting feature is enabled on the Enable/ Disable Features form
-
To Cost Code, which appears on the form if the Cost Codes feature is enabled on the Enable/Disable Features form
In a modified transaction line, the system automatically selects the unlabelled check box. The following screenshot illustrates the details of a general ledger transaction being reclassified.

After the user has made changes to the transaction line and clicked Process on the form toolbar of the Reclassify Transactions form, the system generates a new GL transaction of the Reclassification type (shown in the following screenshot) that offsets the original transaction and posts the transaction amounts.
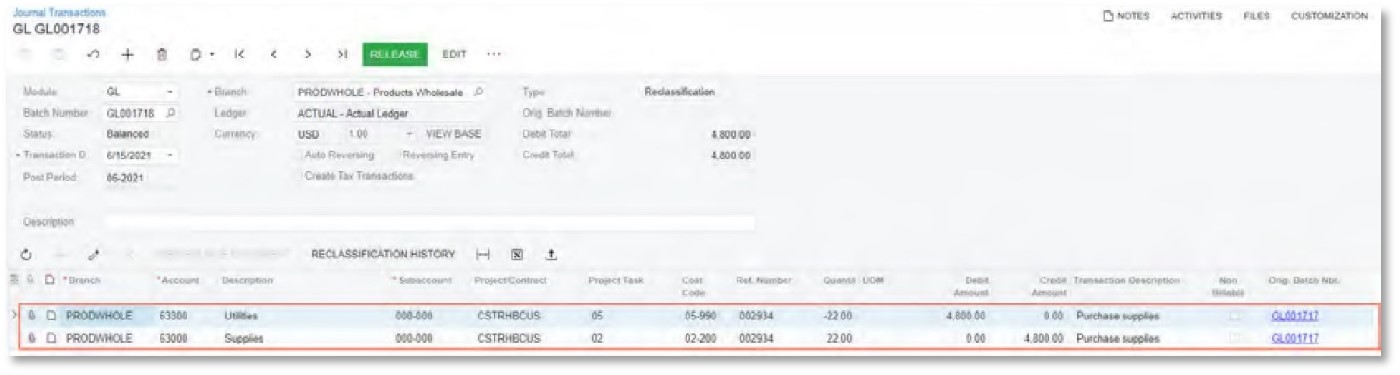
If the reclassified transaction relates to a project, the corresponding project transaction is generated to updated the actual project values, as shown in the following screenshot.
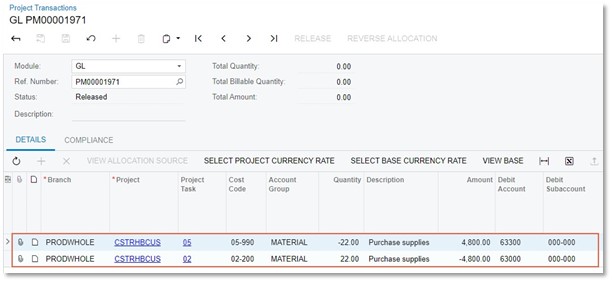
Limitations on Transaction Reclassification
The following project-related transactions cannot be reclassified:
-
Transactions that have been billed
-
Transactions that have been allocated
-
Transactions linked to project commitments
-
Transactions that are related to the project that is not active