2021.1.2 Release Notes
Introduction
The 2021.1.2 release adds features that enable MYOB Advanced People to integrate with the MYOB Advanced Workforce Management product and provides a range of other updates to the Advanced People module. This release also addresses issues identified in previous releases.
This page provides an overview of the major new features in this release - for full information on all of the changes, see the 2021.1.2 Release Notes document:
New Features
WFM Onboarding Integration
This release expands the integration between MYOB Advanced People and MYOB Advanced Workforce Management (WFM) introduced in the 2020.8 release to support the Workforce Management employee onboarding process. When employees are created in Advanced Workforce Management, matching employee records are now automatically created in Advanced People.
To integrate with Advanced Workforce Management, the “Work Force Management” feature must be enabled on the Enable/Disable Features screen (CS100000).
Integration features were introduced in the 2020.8.0 release. See the 2020.8 Release Notes for information on setting up Advanced People and Advanced Workforce Management to import timesheet data and include it in pay runs.
Setting up Integration
This release adds a new Workforce Management Preference screen (MPAT1010), which lets you set default values for details that aren’t brought across by the integration:
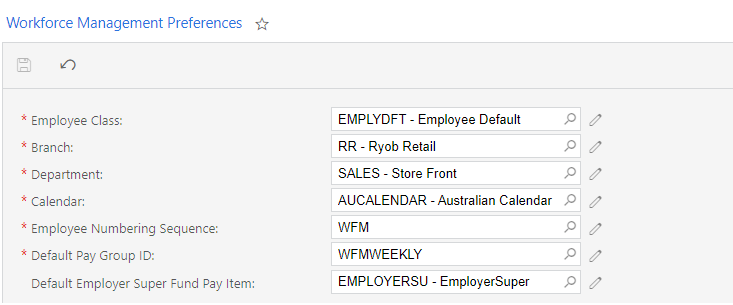
The previous screenshot shows the Workforce Management Preference screen for Australian companies—in New Zealand, some of the fields differ:
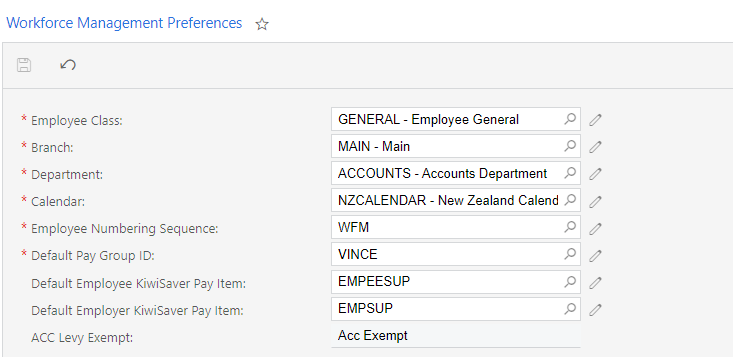
These settings must be configured before syncing employees from Advanced Workforce Management.
For New Zealand companies, the Default KiwiSaver employer contribution must be set in Advanced Workforce Management at Management > Settings > Company Settings before creating employees.
Synchronising Employee Records
Once the integration has been set up, any time an employee is created in Advanced Workforce Management, a matching employee record will be created in Advanced People. Employees can be created in two ways:
- By an employee following the Advanced Workforce Management onboarding process. When the employee clicks Submit at the end of the process, the information they entered is used to create the employee record in Advanced.
- By a manager clicking the + button on the Management > Employees screen in Advanced Workforce Management. After the manager completes the Add New Employee form and clicks Add Employee, the information they entered is used to create the employee record in Advanced.
In MYOB Advanced, the employee record is created with the following details:
- Employees screen (EP203000)
- The Personal Info, Contact Info and Address Info sections are populated with information entered by the employee during the onboarding process.
- The Employee Settings section is populated with the defaults from the Workforce Management Preferences screen (see above).
- Pay Details screen (MPPP2310)
- Pay items are added to the employee’s Standard Pay
- Superannuation/KiwiSaver pay items are added to the employee’s Standard Pay where possible—see “Synchronising Superannuation” below.
- The Pay Distribution tab is populated with the bank account details entered by the employee during the onboarding process.
- In Australia, the Taxation tab is populated with the TFN declaration details entered by the employee during the onboarding process.
- In NZ, the Definition of Week tab is populated with the employee’s Standard Hours (if they exist).
The employee is initially set to Inactive—the record can be made Active once a payroll administrator has checked the record to make sure that it has all of the necessary information (see “Validating the Synchronisation” on page 5).
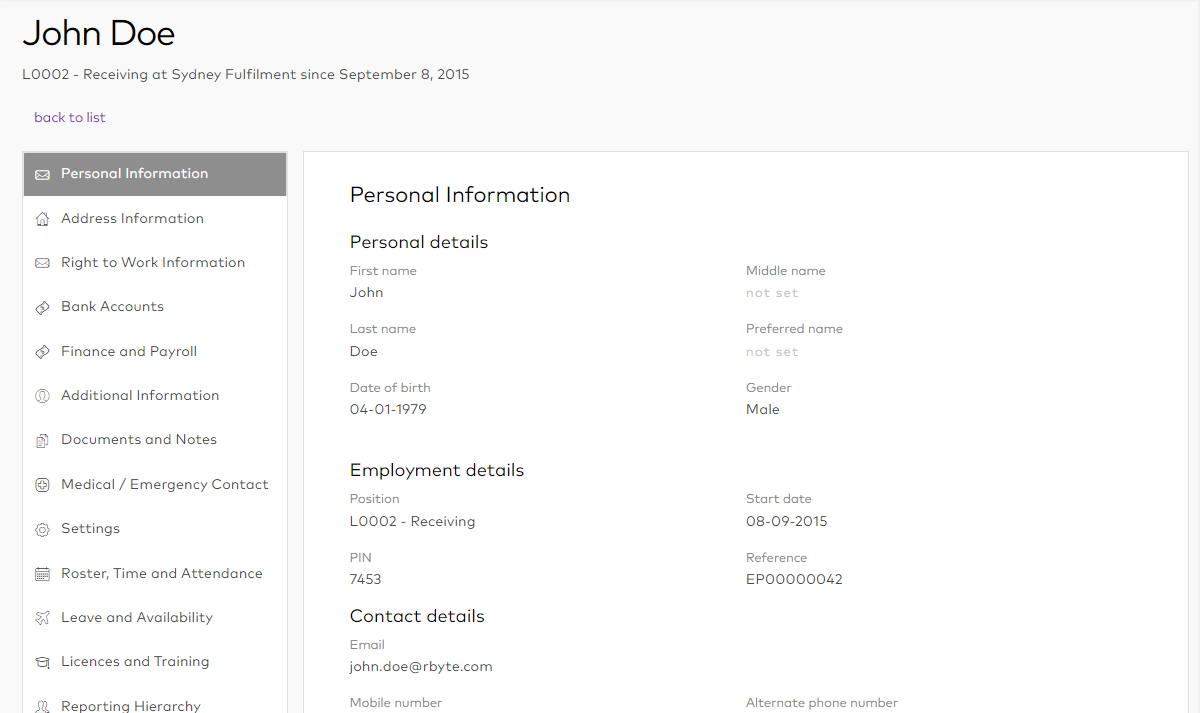
The employee record is assigned an Employee ID by Advanced People—this ID is displayed in Advanced Workforce Management in the Reference field on the employee’s Personal Information tab:
Synchronising Superannuation
When an employee is added from Advanced Workforce Management, superannuation pay items are added to their Standard Pay, as long as pay items that correspond to the employee’s superannuation details exist in Advanced People. (If corresponding pay items don’t exist, they should be created before syncing employees.)
- In Australia, if a pay item exists in Advanced People for the Super fund that the employee chose during the onboarding process, that super pay item will be added to their Standard Pay.
- In New Zealand, if a pay item exists in Advanced People for the KiwiSaver rate that the employee chose during the onboarding process, that KiwiSaver pay item will be added to their Standard Pay.
In both cases, if there is no pay item in Advanced People that matches the employee’s superannuation information, an action will be displayed for this on the employee’s Onboarding Actions tab (see “Onboarding Actions” below).
Validating the Synchronisation
When an employee was added automatically from Advanced Workforce Management, a WFM Status field is available on the Pay Details screen (MPPP2310):
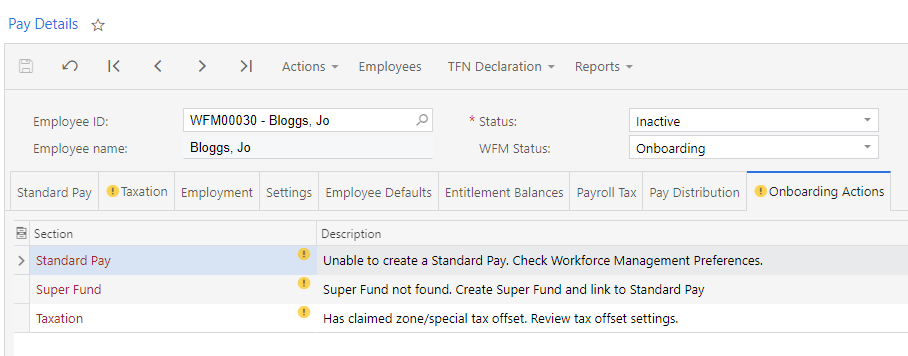
When the employee is first created, this field is set to “Onboarding”. Once a payroll administrator has reviewed the new employee record and taken any actions necessary (see below), they can change the status to “Onboarded”. The employee’s Status cannot be set to “Active” until their WFM Status is “Onboarded”.
Once the employee is Active, you can include them in pays in Advanced People and import timesheet data for the employee from Advanced Workforce Management into Advanced People.
Onboarding Actions
A new Onboarding Actions tab has been added to the Pay Details screen for employees who were added from Advanced Workforce Management. This tab displays any actions that a payroll administrator may need to take before activating the employee record, e.g. reviewing settings or adding missing information.

Employee Sync Issues Report
An Employee Sync Issues report is available in Advanced Workforce Management at Management > Reporting > Employee. This report displays any issues that occurred when Workforce Management attempted to send employee information to Advanced People.
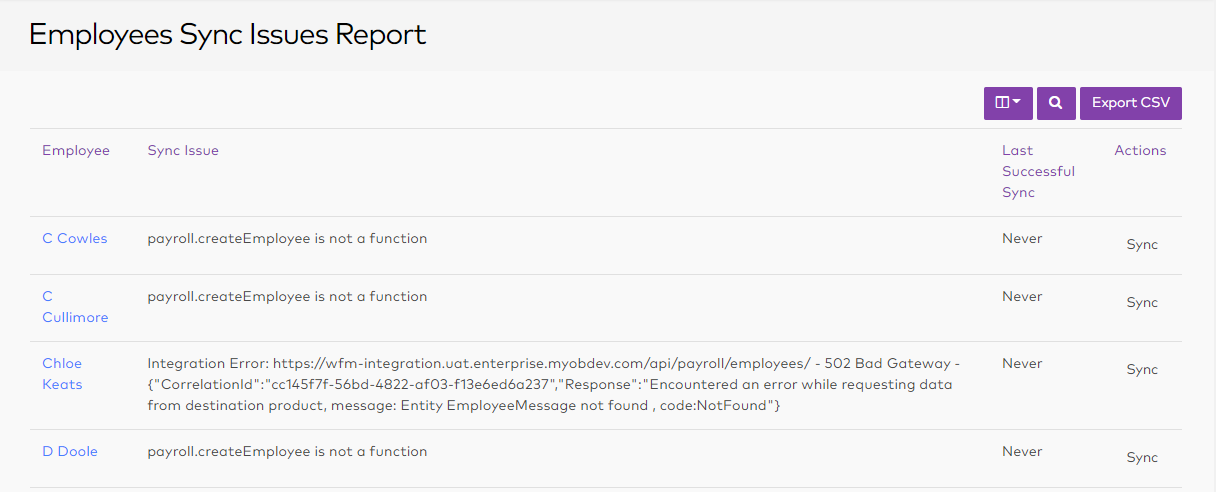
If the sync failed because of a connection or setup issue, click the Sync link in the Actions column to resend the employee information to Advanced People.
If the sync failed due to errors in the employee’s data, e.g. the employee has the wrong postcode for their country, a manager should update the employee’s record on the Employees screen in Advanced Workforce Management; when they click Update Employee, the system will resync the employee‘s information with Advanced People.
Importing Employees
As in Advanced 2020.8, you can export employees from the MYOB Advanced People system via an export scenario and import them into MYOB Advanced Workforce Management from the Settings > Importers > Import Employees screen.
See Importing employees via Excel/CSV on the MYOB Advanced Workforce Management Help Centre for information on the import file specification.
This release adds a new externalId field to the exporter. When employees are exported from Advanced People and imported into Advanced Workforce Management, this field is used to stop the employee being synchronised back to Advanced People.
Advanced People
Updates to Entitlement Rollover Dates
New Zealand only
This release adds the ability for NZ companies to set custom entitlement trigger dates on a per-employee basis. (The entitlement trigger date when an employee becomes entitled and is used to calculate entitlement accruals and entitlement rollovers.) In previous releases, entitlements could be triggered per employee based on their start date; the ability to enter a custom trigger date for each employee allows for scenarios such as when an employee transitions from contract to permanent employment, which means their entitlement begins at the date of their transition, not their original start date.
In NZ companies, the Trigger Date field on the Entitlements screen (MPPP3300), has a new “Employee Specific” option, replacing the existing “Employee Start Date” option:
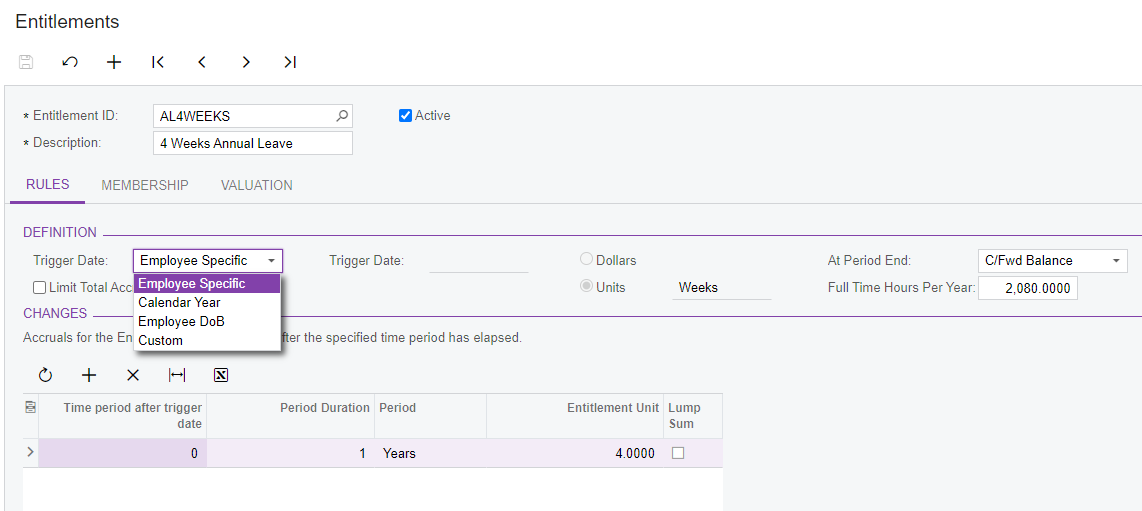
When the “Employee Specific” option is selected for an entitlement, the trigger date is taken from the employee’s pay details. For NZ companies, the Employment tab of the Pay Details screen (MPPP2310) contains a new table that shows the trigger dates for all of the employee’s entitlements:
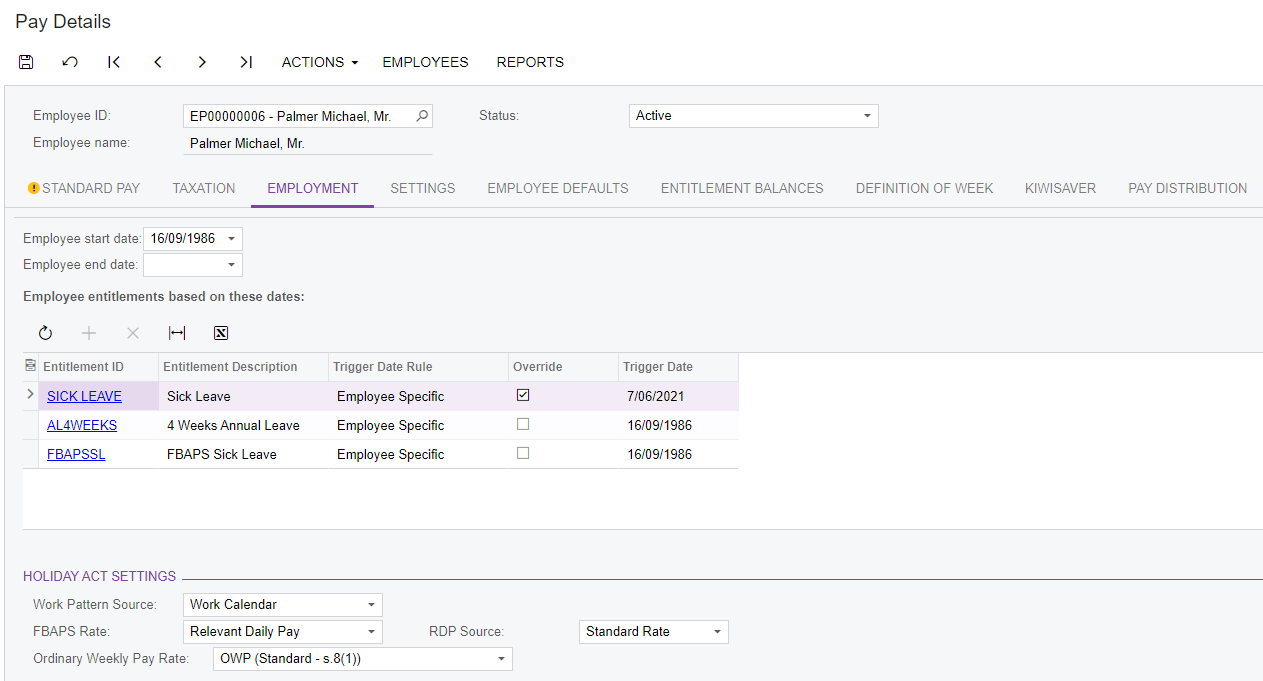
For entitlements where the Trigger Date Rule is “Employee Specific”, the trigger date defaults to the employee’s start date; however, you can tick the box in the Override column, then enter a new date specific to the employee.
As with other entitlement settings, once the entitlement accruals have started through completed pay runs, changes to the trigger date value could result in incorrect accrual movements and rates. If you need to change the date, the recommended process is to create a new entitlement and entitlement adjustment to transfer existing accrued values.
Update to Entitlement Adjustments
New Zealand only
Entitlement Adjustments now include the ability to adjust an employee’s accrued leave that was paid in advance. When creating an entitlement adjustment record, a new “Leave Paid in Advance” option is available in the Type column of the main table.
When an entitlement adjustment containing a “Leave Paid in Advance” line is released, the system generates an additional Entitlement Movement transaction with the reason “Normal Payment in Advance” (the other fields of the transaction behave as for an “Accrual Balance” line). The “Leave Paid in Advance” line does not generate a GL Batch transaction.
Attachment Orders
New Zealand only
This release adds support for District Court attachment orders in NZ companies. An attachment order tells an employer to transfer money from the debtor’s wages or benefit to the creditor (WINZ or the Ministry of Justice).
You will be notified by the District Court if you need to add an attachment order for an employee. Attachment orders are set up as “Deduction” pay items and added to employees’ pays in the same was as any other deduction.
New options for attachment orders are available on the Pay Items screen (MPPP2210):
- A new “Attachment Order” option has been added to the Deduction Category dropdown. Select this option to mark the deduction as an attachment order.
- When the “Attachment Order” option is selected, a new Attachment Order Type dropdown becomes available. Use this option to specify the kind of attachment order that this pay item should be used for. Choose from:
- Court Fine
- WINZ Order
The Protected Earnings options that are available for “Child Support” deductions are also available for attachment orders.
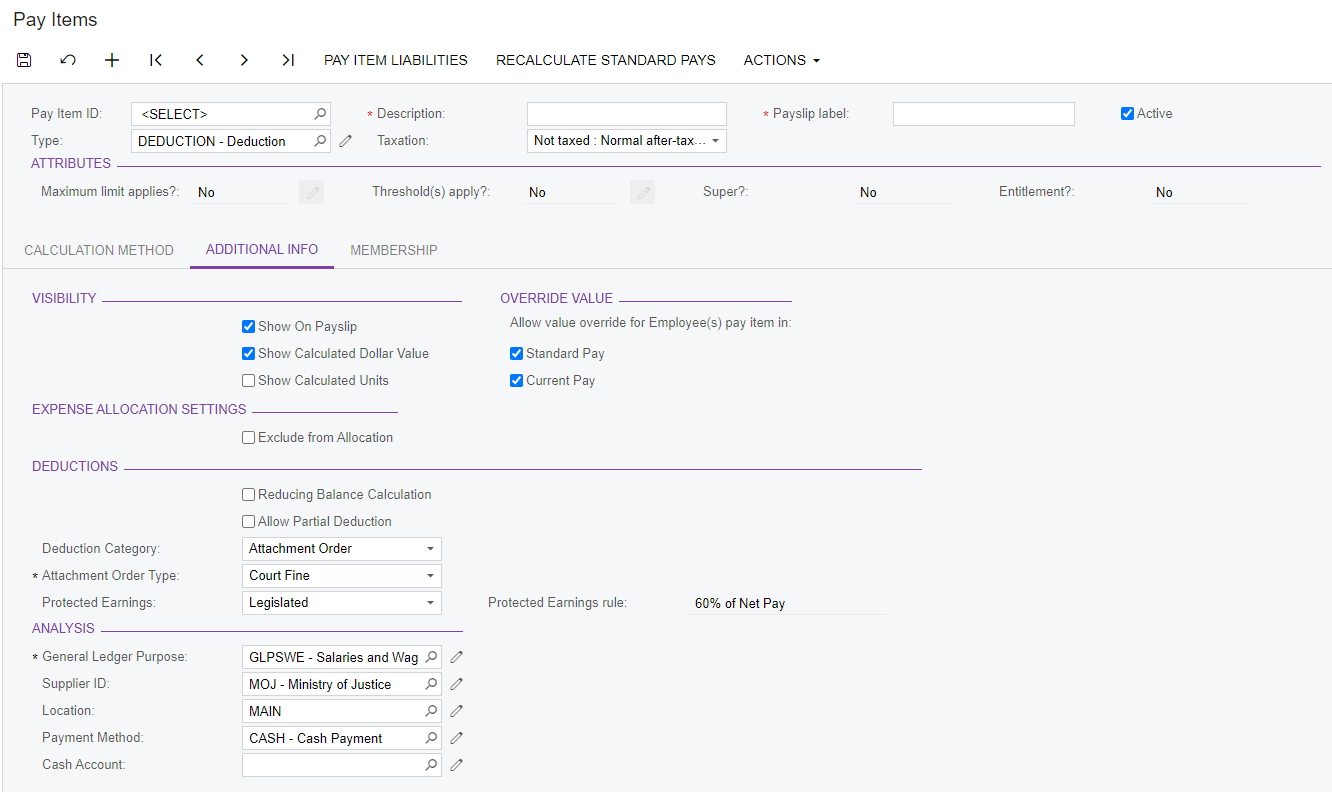
Default pay items for attachment orders are added to new NZ installs. “Court Fine” attachment order pay items should have the Ministry of Justice as their supplier, while “WINZ Order” attachment orders should have WINZ as their supplier. Default suppliers for these organisations are also added to new NZ installs.
Updates have been made to the Standard Pay tab of Pay Details screen (MPPP2310) and the Employee’s Current Pay screen (MPPP3130) to support attachment orders:
- The Child Support column has been renamed to Deduction Details. This column now displays “Child Support” or “Attachment Order” to indicate the kind of deduction in each line. (For pay items that are neither of these, the column is blank.)
- When selecting an attachment order pay item, Payment Reference,Code and Particulars fields are available in the footer. These details are required for attachment orders so that payment can be made to WINZ or the Ministry of Justice—the required details will be given to you when you receive notice of the attachment order. (The Payment Reference field contains the same data as the Payment Reference column of the main table on this screen; changing one changes the other.)
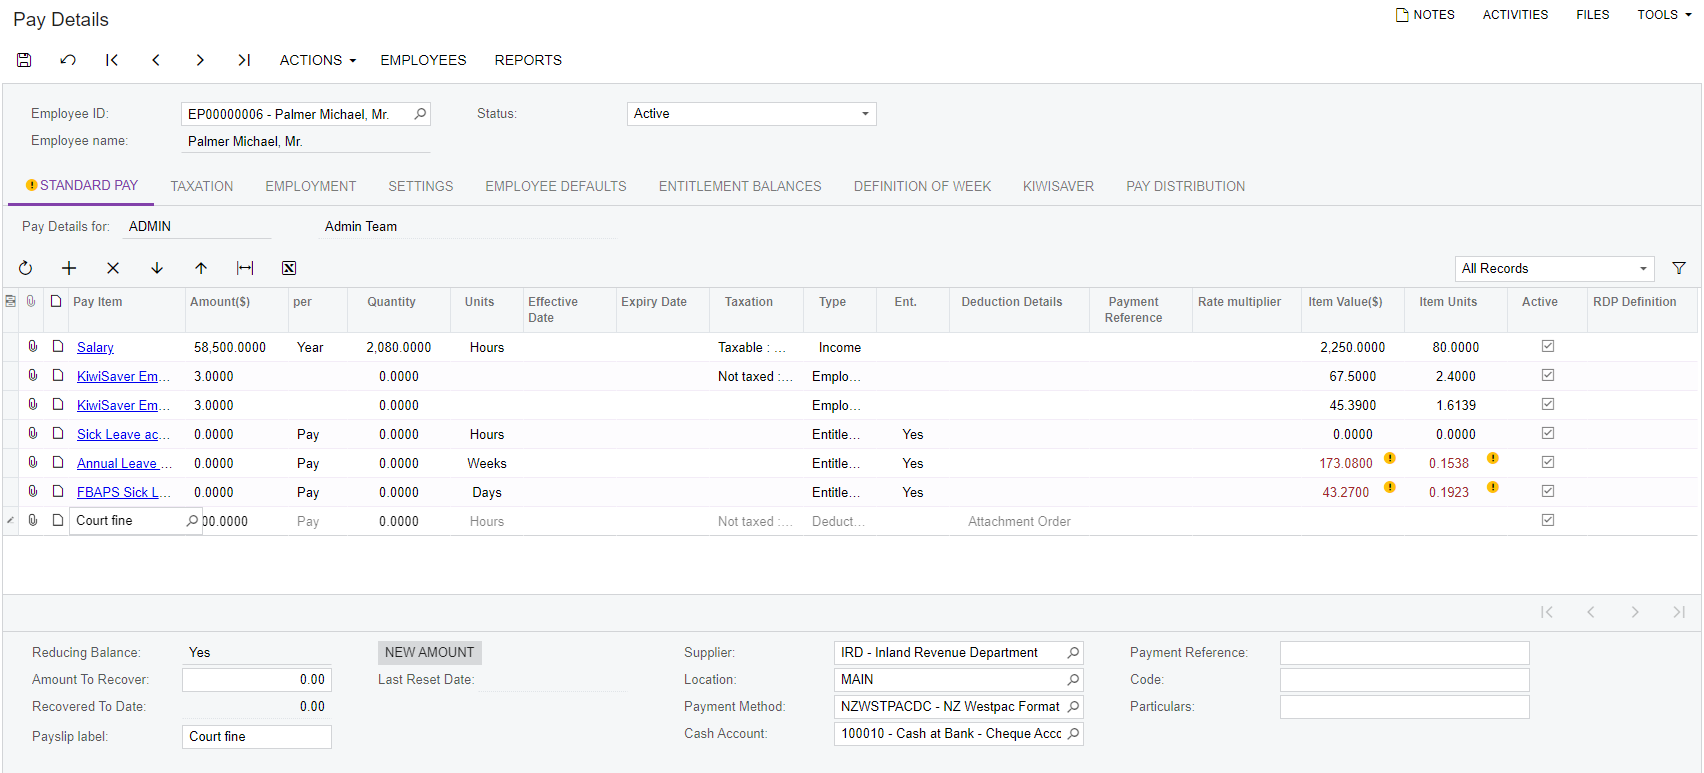
As per IRD directions, child support deductions are always deducted from employees’ pay first. When adding these items to an employee’s pay, attachment order pay items cannot be placed above child support pay items.
Payroll Expense Allocation Settings
This release updates the payroll expense allocation features to support allocating leave, superannuation and WorkCover/ACC expenses.
The Expense Allocation Settings tab on the Payroll Preferences screen (MPPP1100) has been redesigned to support these updates:
- The existing Group by Labour Item and Automatically Release Allocation settings have been moved to a new Flow Settings Section.
- A new OnCost Allocation Settings section contains tick boxes that let you enable or disable the allocation of leave, superannuation and WorkCover/ACC expenses.
- The Fixed Allocation Settings and Time Allocation settings have been removed and replaced with a table that lets you set up as many allocation settings as required.
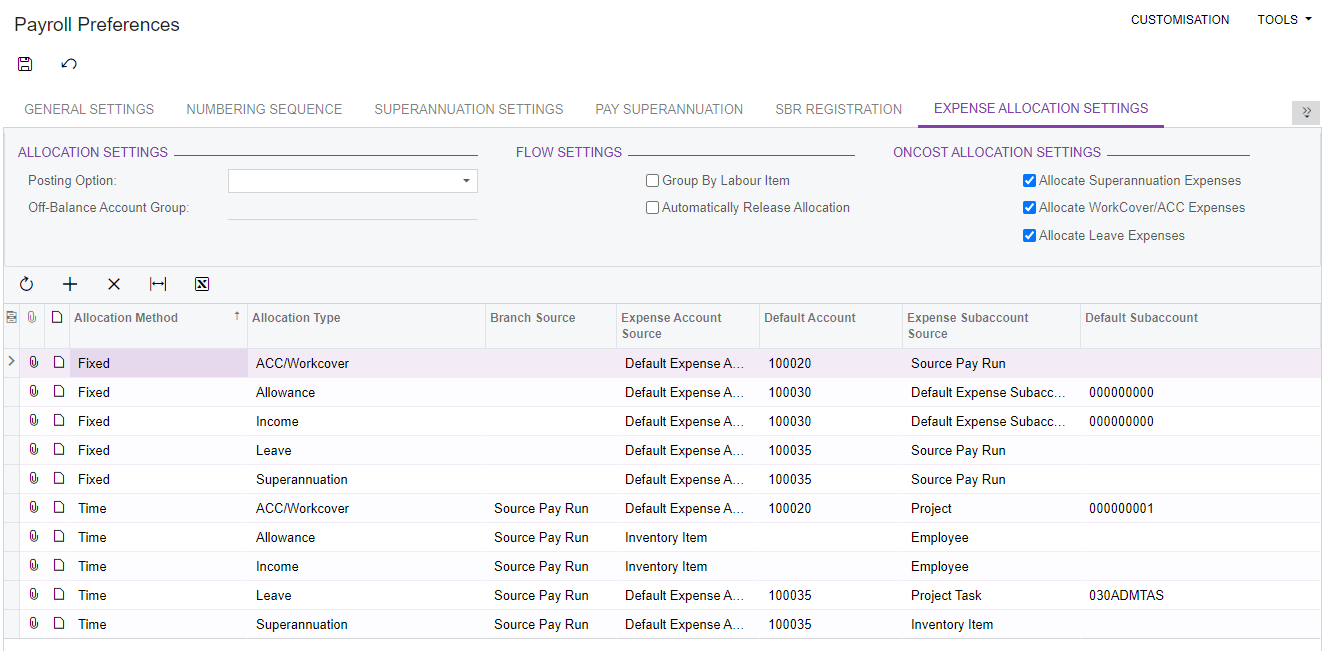
After upgrading to MYOB Advanced 2021.1.2, the table will contain entries for fixed and time-based costs for Income and Allowances, based on the settings you had previously—any other allocation settings will need to be added manually after upgrading. To add a new allocation settings entry:
- Click the + button, then select the Allocation Method: Fixed or Time.
- Select the Allocation Type. Choose from:
- Income
- Allowance
- Superannuation
- Leave
- ACC/WorkCover
- The remaining columns contain the same options that were available in previous versions. Use these to specify where the system should get the branch and expense accounts for allocations of this type.
As in previous versions, the Branch Source applies to time-based allocations only—this column is blank for fixed allocations.
This release also adds the ability to post quantities to the GL when allocating time-based expenses. A new Update Quantity for Time Allocation setting is available on the Additional Information tab of the Pay Items screen (MPPP221) for Income and Allowance pay items:
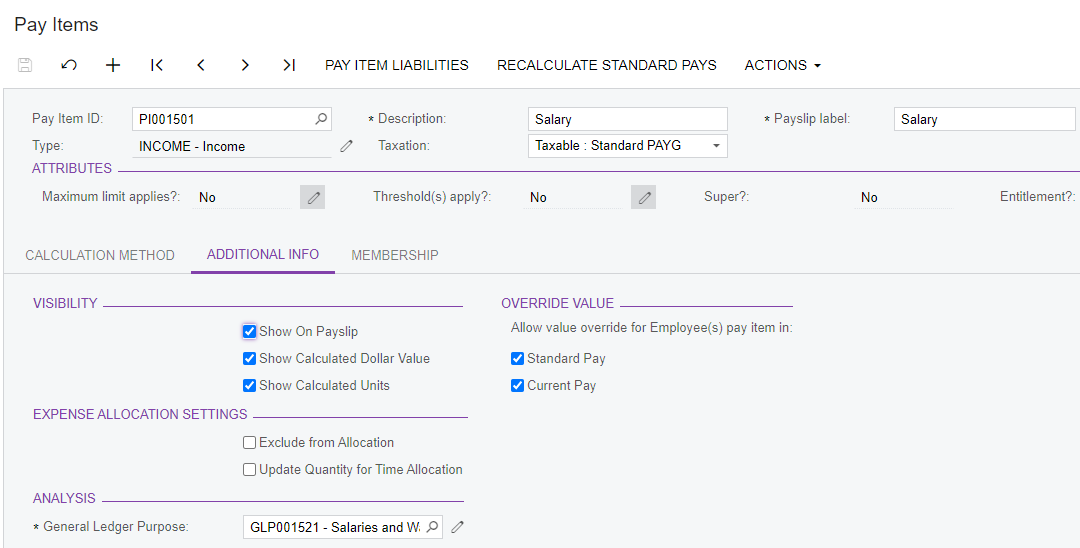
The existing Exclude from Allocation setting can be used to exclude pay items from leave, superannuation and WorkCover/ACC expense allocations.
Multiple Leave Requests on One Day
MYOB Advanced People now supports the scenario where an employee has multiple, partial day leave requests in a single day, e.g. a two hour leave request in the morning and another two hour leave request in the afternoon. Leave can be added via the Self-Service portal or from the Employee’s Current Pay screen (MPPP3130). Leave requests on the same day cannot add up to more than one day.
Leave requests on the same day are shown separately on the Employee Calendar screen (MPES4001).
The system supports leave requests of less than one day and requests of one or more whole days. Requests of 2.5 days, for example, are not supported—in this case, there would need to be two requests: one for two days and another for the extra half day.
Update to Timesheet Imports
This release adds options to specify an external subaccount when importing timesheet data from MYOB Advanced time cards—in previous versions, the Ext. sub account column on the Import Timesheets screen (MPPP7030) would always be blank for lines that were imported from time cards.
A new Subaccount Source column is available on the Data Map Source Types screen (MPPP7001). For lines where the Time Card type option is ticked, this column contains a dropdown that lets you specify where to take the subaccount from when importing time card data using this source type:

Selecting an option from this columns means that the Ext. sub account column on the Import Timesheets screen will now be populated. Once the data is mapped, the values from the Ext. sub account column will be copied to the Sub account ID column as per your mapping rules.
Resolved Issues
