Introduction
MYOB Advanced 2021.1.1 is a major release that adds a wide range of new features across the entire MYOB Advanced system.
This page provides an overview of the major new features in this release - for full information on all of the changes, see the 2021.1.1 Release Notes documentation:
New Features
Debit Adjustments for Subcontracts
In previous releases, users could not process a partial debit adjustment for a bill prepared for a subcontract with retainage because in the lines of the prepared debit adjustment, the quantities, unit cost and extended cost have been unavailable for editing.
As of this release, users can create a partial debit adjustment for a bill prepared for a subcontract with retainage.
UI Changes to the Bills and Adjustments Screen
On the table toolbar of the Document Details tab of the Bills and Adjustments screen (AP301000), an Add Subcontract Line button has been added. In the Add Subcontract Line window, which is opened when the user clicks the Add Subcontract Line button, Project Task and Cost Code columns have been added; the Subitem column has been removed, and the Subcontract Date has been renamed to Date.
Debit Adjustment Creation
A user can create a debit adjustment on the Bills and Adjustments screen (AP301000) and add particular lines or all lines of a subcontract to this document.
When the user clicks the Add Subcontract button, the system opens the Add Subcontract window, which lists the subcontracts of the selected supplier that have at least one non-cancelled line. For each subcontract, the system displays the following columns: Subcontract, Project, Supplier, Location, Date, Currency, Subcontract Total, Total Billed Qty., and Total Billed Amount.
When the user clicks the Add Subcontract Line button, the system opens the Add Subcontract Line window, which lists the non-cancelled lines of the subcontracts of the selected supplier. By default, the table lists the lines with a nonzero billed quantity and billed amount. The user can select the Show Unbilled Lines check box to also review the lines with a zero billed quantity and a zero billed amount).
For each subcontract line, the following columns are displayed: Subcontract, Project, Project Task, Cost Code, Supplier, Location, Date, Currency, Inventory ID, Ext. Cost, Unbilled Qty., Unbilled Amount, Billed Qty., Billed Amount.
In the Add Subcontract or Add Subcontract Line window, when the user selects the unlabelled check box for the subcontract or subcontract lines to be added, and clicks Add & Close, the system adds the selected subcontract lines to the debit adjustment. The following values are specified in the added debit adjustment lines:
-
Account, Subaccount, Tax Category, Project, Project Task, and Cost Code, which are copied from the corresponding subcontract line and can be overridden
-
Ext. Cost, which is copied from the Billed Amount of the subcontract line and can be overridden
-
Quantity and Unit Cost, which are equal to zero and can be overridden
-
Discount Percent and Discount Amount, which are equal to zero and cannot be overridden
-
Retainage Percent and Retainage Amount, which are equal to zero and cannot be overridden
On release of the debit adjustment, the system decreases the billed amount and billed quantity in the subcontract lines of the corresponding subcontract on the Subcontracts screen (SC301000).
If the debit adjustment line is linked to a subcontract line that was closed and completed, on the release of the debit adjustment, the system also clears the Closed and Completed check boxes in the subcontract line on the Document Details tab of the Subcontracts screen.
Company Groups
Starting in MYOB Advanced 2020.6, users could limit the usage of a customer record to a selected branch or a company. (Similar functionality has been implemented for suppliers in this release.) However, in some cases, multiple related companies may need to have access to the same set of customer and supplier records. For this purpose, MYOB Advanced 2021.1.1 introduces company groups. A company group is an entity that includes multiple companies that share the same customers and suppliers. For reporting purposes, a company can be included in more than one group.
The Company Groups Screen
The release introduces the Company Groups screen (CS102500).
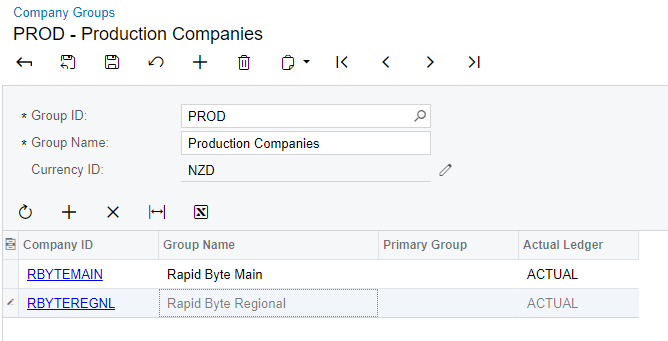
The screen is used for creating, viewing, modifying, and deleting company groups. The structure of the Group ID is defined by the COMPANY segmented key.
A Currency ID field appears on the screen, as shown in the screenshot above, if the Multicurrency Accounting feature has been enabled on the Enable/Disable Features screen (CS100000). The field is unavailable for editing and specifies the base currency of the current tenant.
The Company Groups screen has also been added to the quick menu of the Configuration workspace.
Changes to the Companies Screen
A Company Groups tab has been added to the Companies screen (CS101500), as shown in the following screenshot.
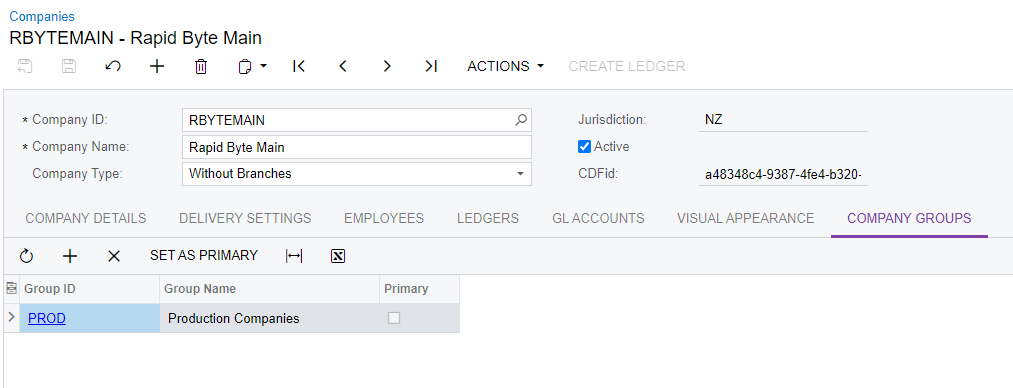
This tab appears on the screen if the Customer and Supplier Visibility Restriction feature has been enabled on the Enable/Disable Features screen (CS100000).
On the tab, a user can review the groups in which the company selected in the Summary area is included, add the company to a group, and exclude the company from a group (by deleting the row with the group). Also, if the company is included in more than one group, the user can or select the company’s primary group by selecting the Primary Group check box in the row of the group; only one primary group can be selected for a company.
Changes to the Drop-Down List of the Company/Branch Box
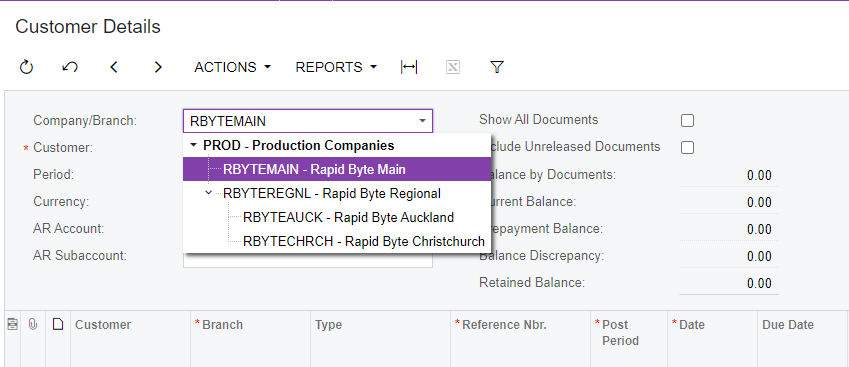
The multilevel drop-down list in the Company/Branch field on multiple screens has been modified to display company groups, along with companies and branches.
If a company is included in multiple groups, in the Company/Branch field, this company (and any branch within it) will be displayed multiple times—once under each of the groups in which the company is included. However, if a company or branch was previously selected in the Company/Branch field and a user opens the list, the company or branch will be highlighted under its primary group; non-primary groups can be collapsed if they contain more than three companies.
The following screenshot illustrates an updated multilevel drop-down list in the Company/Branch field on the Customer Details screen (AR402000).
Financial Dashboards
New financial dashboards are included in this release of MYOB Advanced. The following dashboards are now available for users:
-
AR Clerk (DBAR0001): A dashboard for the sales department (salespeople, adviser, account manager, customer services manager, or sales manager)
-
AP Clerk (DBAP0001): A dashboard for employees and managers performing supplier management activities
-
Controller (DBCA0001): A dashboard for the finance department
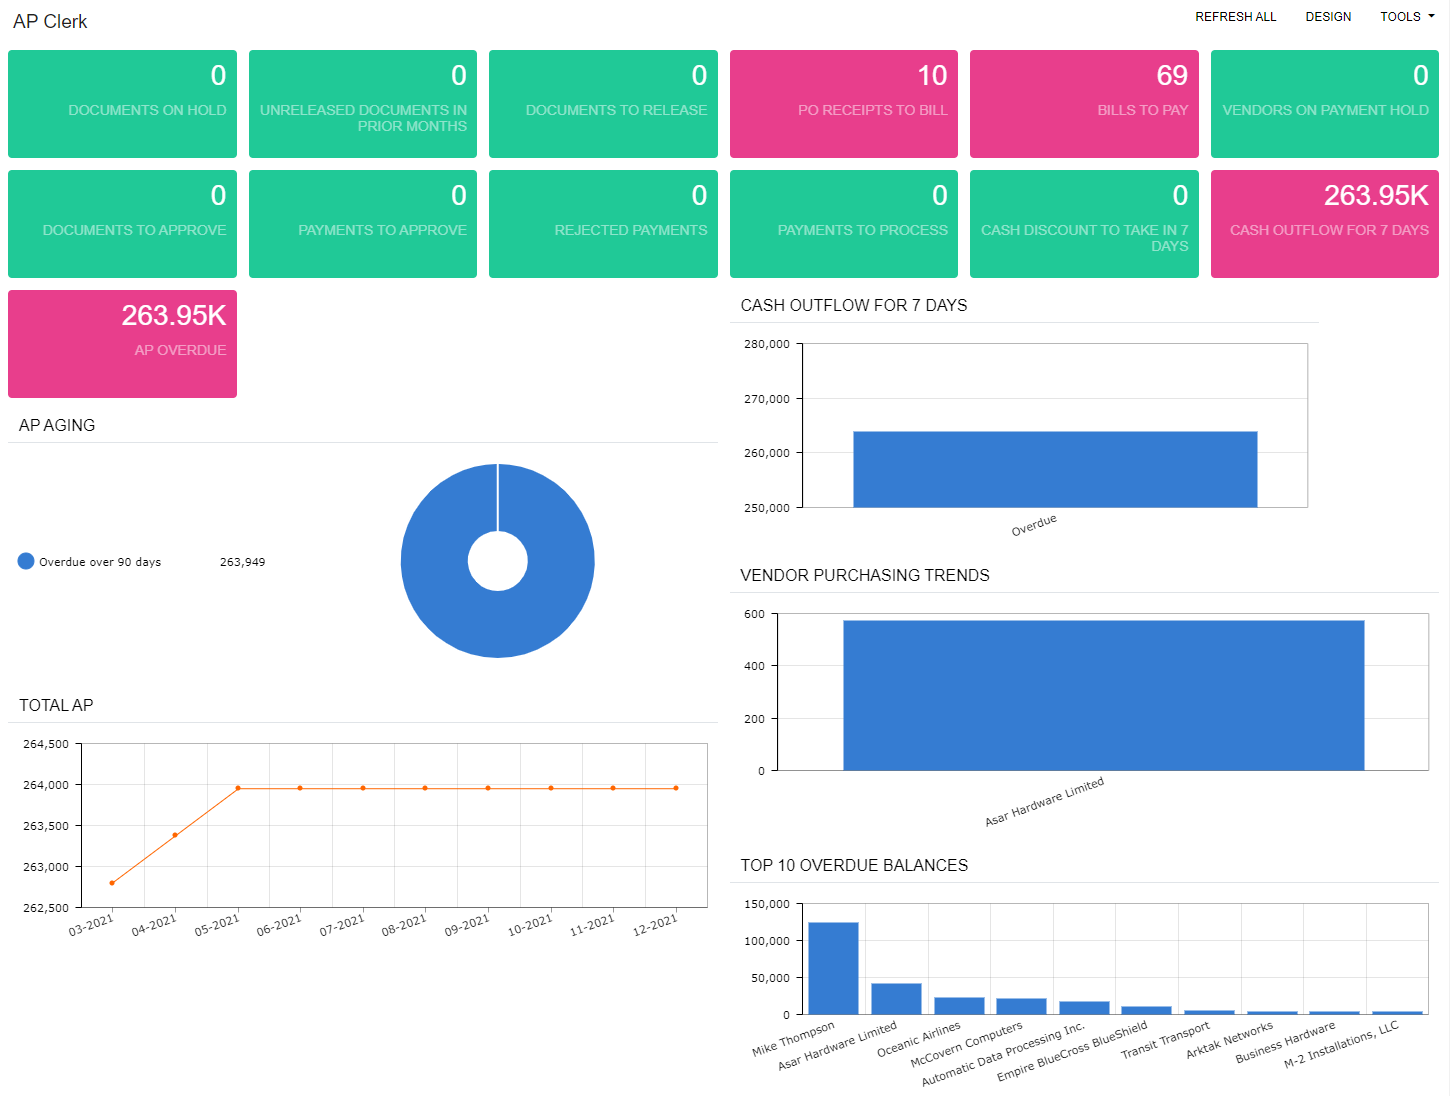
These dashboards include various key performance indicators (KPIs), metrics, and charts, and use generic inquiries to gather the underlying data. Users can access the dashboards from the Dashboards workspace, in the Dashboard: Finance category.
AR Clerk Dashboard
The AR Clerk dashboard (DBAR0001) is shown in the following screenshot.

AP Clerk Dashboard
The following screenshot illustrates the AP Clerk dashboard (DBAP0001).
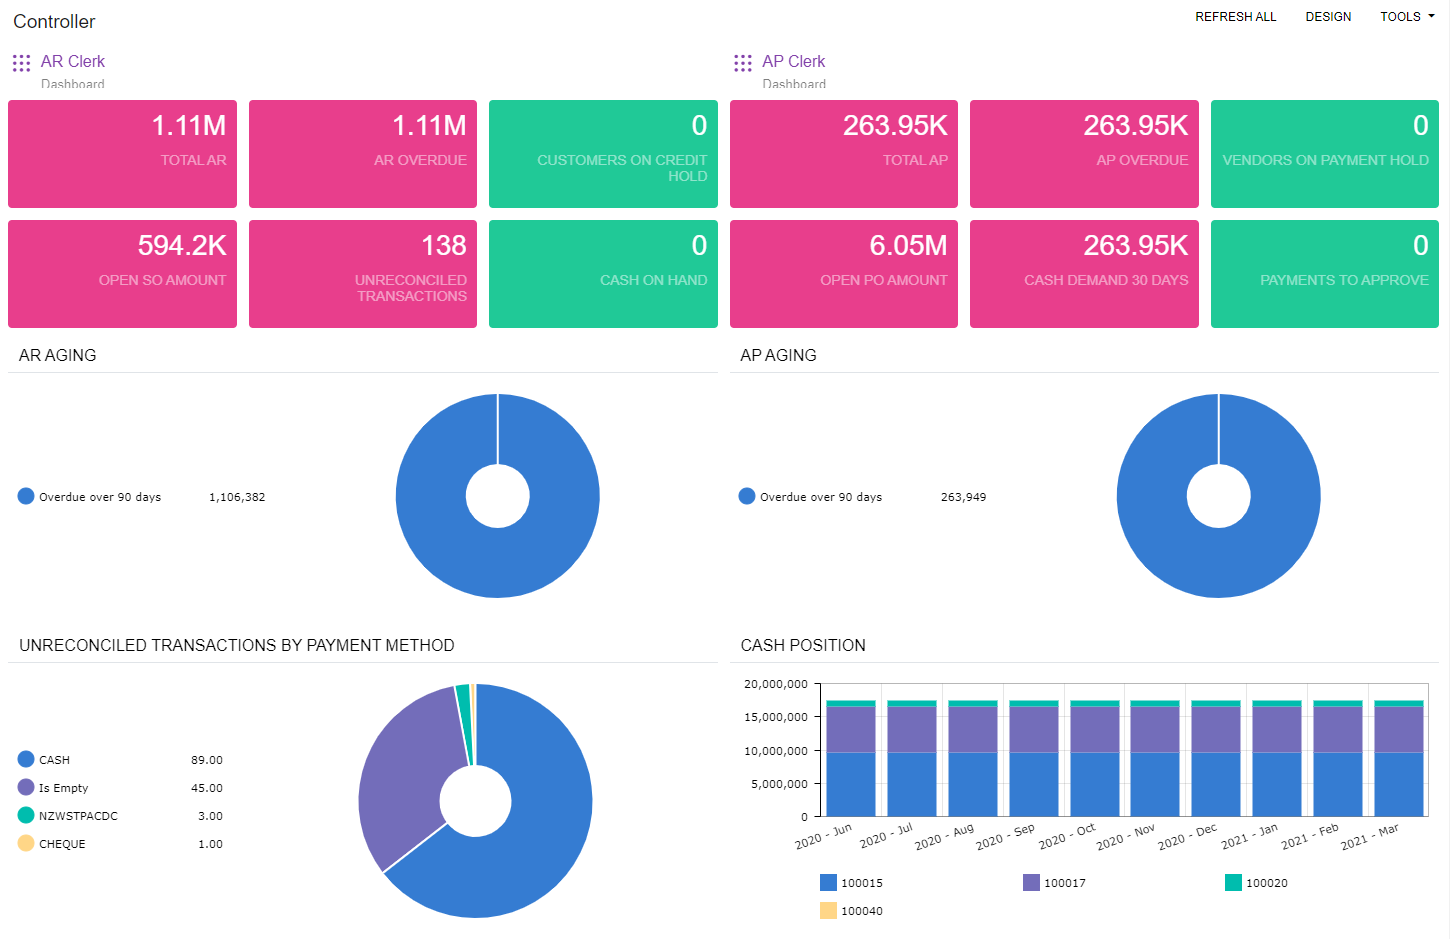
Controller Dashboard
The following screenshot illustrates the Controller dashboard (DBCA0001).
Capable to Promise Functionality
Manufacturing Edition
Capable-to-promise (CTP) functionality has been implemented In MYOB Advanced Manufacturing Edition, which will be valuable for organisations who use advanced planning and scheduling. This functionality provides these organisations with the ability to commit to delivery dates for customer orders based on production and on resource capacity and inventory.
CTP determines when delivery will be possible by using finite scheduling. It takes into consideration the constraints of the manufacturing system that might hinder production, such as accessibility of necessary resources, lead times for acquiring raw materials or purchased parts, and the ability to acquire resources needed for subassemblies or lower-level components.
This functionality is available only when the Advanced Planning and Scheduling feature is enabled on the Enable/Disable Features screen (CS100000).
Configuring CTP Functionality
For an organisation using the CTP functionality, we recommend that:
-
A specific production order type be created on the Production Order Types screen (AM201100) that is dedicated to CTP. The order type should be assigned to the Planning function and may have a different numbering sequence than the one used for other production order types. We also recommend that the Exclude from MRP check box (in the Order Defaults section of the General Settings tab) be selected for the production order type, so that the system excludes production orders of this type from the MRP regeneration process.
-
The order type dedicated to CTP should be specified in the new Capable to Promise Order Type field in the Data Entry Settings section of the General Settings tab of the Production Preferences screen (AM102000).
-
Also, to indicate that CTP functionality can be applied to a particular stock item, the new CTP Item check box must be selected on the Manufacturing tab (General section) of the Stock Items screen (IN202500).
CTP for Sales Orders
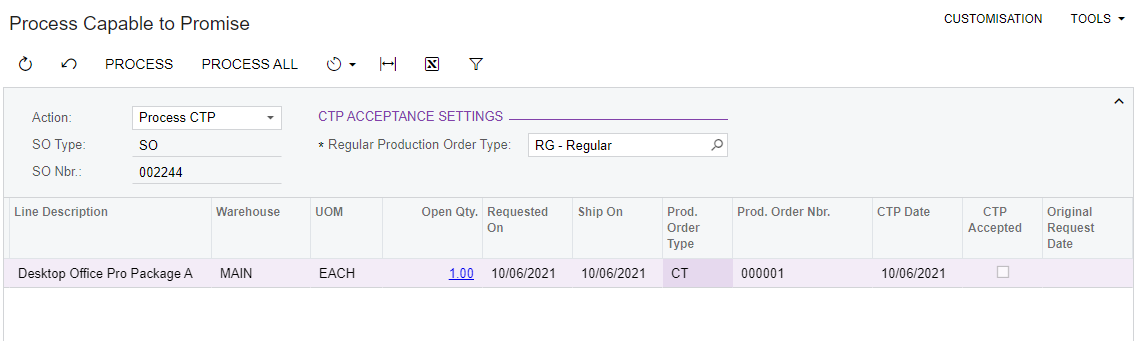
When a customer service manager creates a sales order on the Sales Orders screen (SO301000) with items to be produced and the customer expects to receive the items by a particular date (the Requested On date, which is specified in each line on the Document Details tab), the manager can estimate the projected date when the requested quantity of items can be shipped to the customer. To provide this capability, a Process CTP action has been added to the Actions menu of the Sales Orders screen; a manager can click it to open the new Process Capable to Promise screen (AM515000) with the lines of the sales order that have the CTP Item check box selected on the Manufacturing tab of the Stock Items screen (IN202500).
On the Process Capable to Promise screen, the customer service manager can select one line or multiple lines of the sales order (by selecting the unlabelled check box for each line), select the Run CTP action in the Action field, and click Process on the screen toolbar to calculate the projected dates for the items in the selected lines. When the system finishes the calculation, the projected dates are displayed in the CTP Date column (see the following screenshot). During the calculation of the projected date, the system creates a planning order, whose type and number are displayed in the Prod. Order Type and Prod. Order Nbr. columns, respectively (also shown in the following screenshot). The planning order can be viewed on the Production Order Details screen (AM209000).
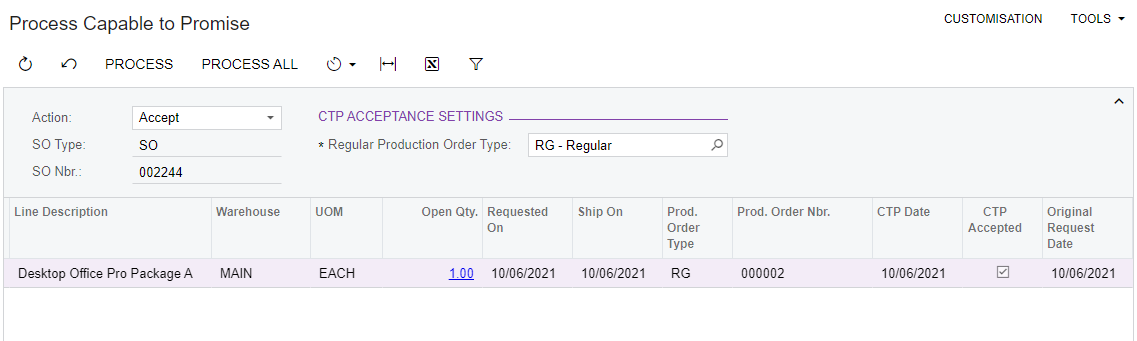
The manager can accept the dates by selecting the needed lines of the sales order (using the Included check boxes), selecting the Accept action, and clicking Process on the screen toolbar. For the accepted lines, the system creates a production order, whose type and number are displayed in the Prod. Order Type and Prod. Order Number columns, respectively, and selects the check box in the CTP Accepted column (see the following screenshot).
If any CTP dates do not meet the date requested by the customer, the manager can reject the dates by selecting the needed lines of the sales order (using the Included check boxes), selecting the Reject action, and clicking Process on the screen toolbar. For the rejected lines, the system deletes the planning order. In this case, the manager can negotiate with the customer to agree on new dates when the items in the order can be shipped; the manager can then update the requested dates in the sales order.
Also, the manager may want to find out how many of the item the company could actually ship to the customer by the requested date. The manager can click the quantity in the Open Qty. column of the needed line to open the Quantity Available window (shown below), which displays the following:
-
Requested: The requested quantity of the item
-
Available: The available quantity of the item (which is calculated based on availability calculation rules)
-
Supply Available by Requested Date: The quantity of the item projected to be available by the requested date (due to planned receipts of inventory not allocated to other orders)
-
Production Available by Requested Date: The quantity of the item projected to be produced by the requested date (based on the current available capacity of production and the demand)
-
Total Available by Requested Date: The sum of the values in the Available, Supply Available by Requested Date, and Production Available by Requested Date fields
Cross-Company Sales
This release provides the ability to process sales and purchase orders between companies or branches in the same tenant.
The cross-company sales functionality is available in the system if the Inter-Branch Transactions feature has been enabled on the Enable/Disable Features screen (CS100000).
All cross-company documents are created one to one. That is, for one cross-company purchase order only one sales order can be generated. For one shipment only one purchase receipt can be generated. The functionality works for purchase orders of the Normal type and for sales orders with order types that have the Sales Order (for sales) or RMA (for returns) automation behaviour.
The Cross-Company Sale Process
Suppose that the Head Office (MHEAD) of the Muffins & Cakes company regularly buys apple and orange jam for muffin toppings from the SweetLife Head Office and Whole Centre (HEADOFFICE) of SweetLife Fruits & Jams. To allow automatic creation of sales documents by the SweetLife’s sales managers, the MHEAD branch has been extended to a customer and the HEADOFFICE branch has been extended to a supplier in MYOB Advanced. The following example shows the general steps that users perform while processing a cross-company sale:
On the Purchase Orders screen (PO301000), the procurement manager of the purchasing company MHEAD enters a purchase order of the Normal type and specifies the selling company HEADOFFICE as the supplier in the purchase order.
On the Details tab, the manager adds two rows with the following details:
|
Branch |
Inventory ID |
Warehouse |
Quantity |
Unit Cost |
|---|---|---|---|---|
|
MHEAD |
APJAM96 |
WHOLESALE |
10 |
25 |
|
MHEAD |
ORJAM96 |
WHOLESALE |
10 |
19 |
The procurement manager saves the purchase order and clicks the Remove Hold button on the screen toolbar.
The system assigns the “Open” status to the purchase order and makes the Generate Sales Order action available in the Actions menu. Also, the purchase order appears on the Generate Intercompany Sales Orders mass-processing screen (SO504000).
A sales manager of the HEADOFFICE branch initiates the generation of a sales order for the purchase order on the Generate Intercompany Sales Orders screen. (Alternatively, the Generate Sales Order action can be selected on the Purchase Orders screen, or a schedule can be created on the Generate Intercompany Sales Orders screen.)
The system generates a sales order related to the initial purchase order with the Open status for the HEADOFFICE company on the Sales Orders screen (SO301000) and automatically copies the required details of the purchase order. In the sales order, the MHEAD company is specified as a customer.
On the Sales Orders screen, the system also does the following upon generation of the sales order:
-
Copies the purchase order number to the Customer Order Nbr. field in the Summary area.
-
Specifies the link to the purchase order in the Related Order Nbr. field on the Shipping tab.
On the Purchase Orders screen, the system does the following in the originating purchase order:
-
Copies the number of the sales order to the Supplier Ref. field in the Summary area.
-
Specifies the link to the sales order in the Related Order Nbr. field on the Other tab of the purchase order.
The sales manager of the HEADOFFICE company verifies that all the data has been inserted correctly, makes changes if necessary, and saves the sales order.
On the Shipments screen (SO302000), a worker of the WHOLESALE warehouse of the HEADOFFICE company creates a shipment for the sales order.
The system saves the shipment details in the sales order, and the sales order gets the Shipping status.
When the worker confirms the shipment, the system does the following:
-
Makes the Generate PO Receipt action available in the Actions menu of the Shipments screen
-
Displays the shipment on the Generate Intercompany Purchase Receipts mass-processing screen (PO504000)
The warehouse worker of the MHEAD company generates a purchase receipt for the shipment on the Generate Intercompany Purchase Receipts screen. (Alternatively, the Generate PO Receipt action can be selected on the Shipments screen, or a schedule can be created for the Generate Intercompany Purchase Receipts screen.)
The system creates a purchase receipt on the Purchase Receipts screen (PO302000). The purchase receipt contains the details copied from the shipment.
The system also specifies the following details:
-
On the Purchase Receipts screen, the shipment link in the new Related Shipment field on the Other tab
-
On the Shipments screen, the purchase receipt link on the Shipping tab
-
On the Purchase Orders screen (PO301000), the details of the purchase receipt on the PO History tab
An accountant of the HEADOFFICE company prepares the SO invoice for the shipment and releases the invoice on the Invoices screen (SO303000). The system assigned the Open status to the invoice.
The AR invoice becomes available on the Generate Intercompany Documents (AP503500) screen.
From the open AR invoice, an accountant of the MHEAD company generates the related AP bill on the Generate Intercompany Documents screen (alternatively, by using the Generate/View AP Document action on the Invoices and Memos screen (AR301000) or a schedule can be created for the mass-processing screen).
In the generated AP bill, the lines are linked to the related purchase order and receipt. The system also adds details of the generated AP bill on the Billing History tab of the Purchase Receipts screen for the related receipt.
The accountants process the financial documents in the system.
Changes to the Purchase Orders Screen
On the Purchase Orders screen (PO301000), a Generate Sales Order action on the screen toolbar and an Intercompany Sale section on the Other tab have been added. The new action and section are displayed only if the Inter-Branch Transactions feature has been enabled on the Enable/Disable Features screen (CS100000).
The Generate Sales Order action is available on the Purchase Orders screen (PO301000) if the supplier specified in the purchase order is a related company or branch extended as supplier. When the user selects the Generate Sales Order action, the system creates a sales order, in which the current branch is specified as the customer and the lines of the current purchase order are copied.
The Intercompany Sale section contains the following fields:
-
Related Order Type: The type of the sales order created for the selected purchase order on the Sales Orders screen (SO301000).
-
Related Order Nbr.: The link to the sales order created for the selected purchase order in the related company. When the user clicks the link, the system opens the document on the Sales Orders screen.
Changes to the Sales Orders Screen
On the Addresses tab of the Sales Orders screen (SO301000), an Intercompany Purchase section has been added. The section is displayed only if the Inter-Branch Transactions feature has been enabled on the Enable/Disable Features screen (CS100000).
The Intercompany Purchase section contains the following fields:
-
Related Order Type: The type of the purchase order for which for the sales order has been created.
-
Related Order Nbr.: The link to the purchase order for which for the sales order has been created. When the use clicks the link, the system opens the document on the Purchase Orders screen (PO301000).
Changes to the Shipments Screen
On the Shipping tab of Shipments screen (SO302000), the Intercompany Purchase section has been added. The section is displayed only if the Inter-Branch Transactions feature has been enabled on the Enable/Disable Features screen (CS100000).
The Intercompany Purchase section contains a Related PO Receipt Nbr. field, in which the system inserts the link to the purchase receipt generated for the shipment.
Changes to the Purchase Receipts Screen
On the Other tab of the Purchase Receipts screen (PO302000), the Intercompany Sale section has been added. The section is displayed only if the Inter-Branch Transactions feature has been enabled on the Enable/Disable Features screen (CS100000).
The Intercompany Sale section contains a Related Shipment Nbr. field, in which the system inserts the link to the purchase receipt generated for the shipment.
New Intercompany Mass-Processing Screens
The Generate Intercompany Sales Orders screen (SO504000), shown in the following screenshot, has been added for the mass generation of sales orders based on purchase orders from the purchasing company.
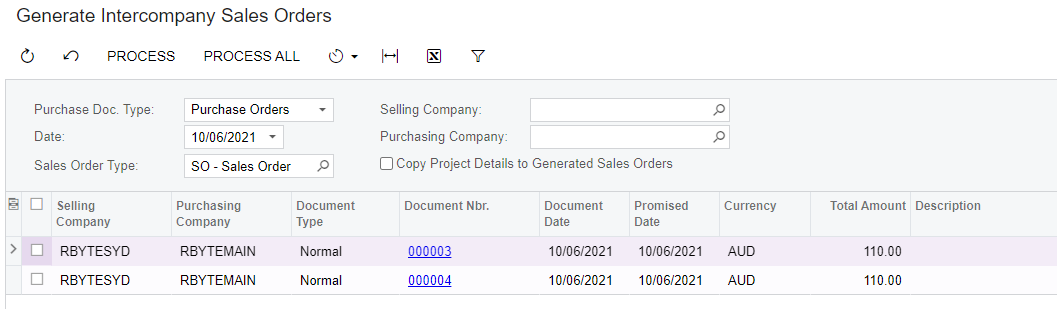
In the fields of the Selection area of the screen, the user specifies the selection criteria for the documents to be loaded in the table. The user can also manage the process of generating sales orders by using the Copy Project Details to Generated Sales Orders check box. The check box appears only if the Projects feature is enabled on the Enable/Disable Features screen (CS100000). If the user selects the check box, the values of the project from the purchase order will be copied to the created sales order.
The Generate Intercompany Purchase Receipts screen (PO504000), shown in the following screenshot, has been added for the mass generation of purchase receipts based on shipments from the selling company.
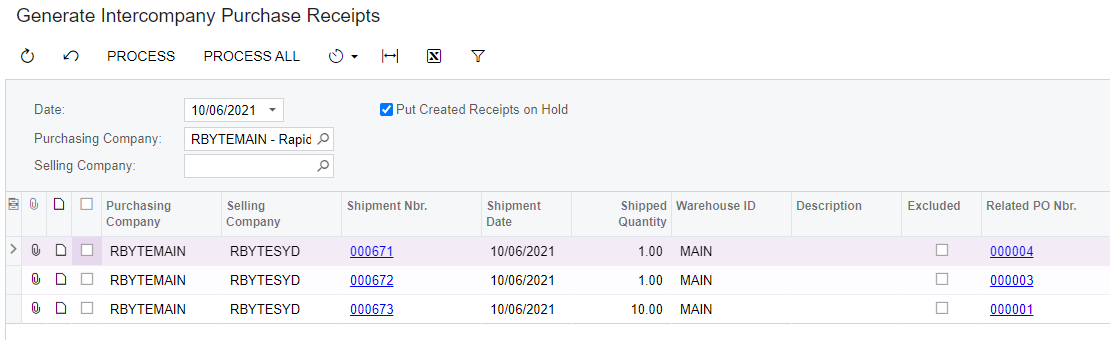
In the fields of the Selection area of the screen, the user specifies the selection criteria for the documents to be loaded in the table. The user can also manage the process of generating sales orders by using the Put Created Receipts on Hold check box. If the user selects the check box, the generated purchase receipts will be assigned the “On Hold” status on creation. If the check box is cleared, the generated purchase receipts will be assigned the “Balanced” status on creation.
Resolved Issues