2020.5 Release Notes
Introduction
The 2020.5 release adds a wide range of new features across the entire MYOB Advanced system.
This page provides an overview of the major new features in this release - for full information on all of the changes, see the 2020.5 Release Notes document:
New Features
NZ Leave Management
This release updates the Payroll module of MYOB Advanced to support the management of employees’ leave in New Zealand. This will help your organisation to manage your obligations under the NZ Holidays Act 2003. This includes Annual Leave/Holiday Pay, Sick Leave, Bereavement Leave, Family Violence Leave and leave on Public Holidays.
White papers detailing how to set up and use the Payroll module for leave management in New Zealand are available on the White Papers page.
Updates to Pay Items and Entitlements
For NZ companies, the Pay Item Liabilities screen (MPPP1025) includes the following new flags:
- Liable for RDP – the pay item will be included in Relevant Daily Pay calculations
- Liable for 4 Weeks OWP – the pay item will be included when calculating Ordinary Weekly Pay using the 4-week average method
- Liable for OWP Std – the pay item will be included when calculating Ordinary Weekly Pay using the Standard Pay method
- Liable for ADP (previously Add to Average Daily Pay) – the pay item will be included in Average Daily Pay calculations
A new Choose leave type dropdown is available when the Leave option is ticked on the Rules tab of the Entitlements screen (MPPP3300). Use this dropdown to specify the kind of leave that the entitlement applies to.
All existing leave entitlement records must have this field configured before you process leave requests.
The Valuation Method property on the Valuation tab of the Entitlements screen determines how the entitlement will be valued for all employees who have it.
Updates to Employees
A new RDP Definition column is available on Standard Pay of the Pay Details screen (MPPP2310). When a pay item is marked as Liable for RDP, the column contains a View Definition link. Clicking this link opens the RDP Definition window, which shows how the income item is interpreted when calculating the RDP rate for a leave day taken.
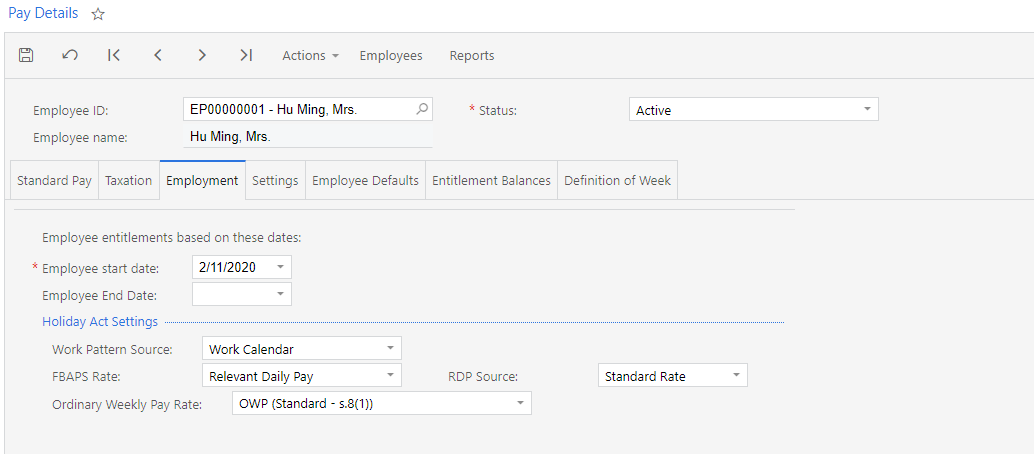
A new Holiday Act Settings section is available on the Employment tab of the Pay Details screen. The settings in this section control the “Hours requested” amount when leave is taken, the “Remaining leave units” on termination, valuing leave balances and liabilities as well as the rates for paying leave.
Employees’ Work Patterns
To be able to manage leave correctly, employers and employees must agree on what genuinely constitutes the number of hours per day/week an employee “normally” works, and employers must respond to changes in employees’ work patterns. New features have been added to the Payroll module to allow for this.
The new Work Pattern Source field on the Employment tab of the Pay Details screen (see above) lets you choose where the employee’s usual work hours are set: on a Work Calendar or on the new Employee Work Schedule screen (MPPP2260).
Using a calendar is best for employees who work exactly the same days/hours each week, or employees who work a defined number of hours per week but no fixed days or hours, where it’s been agreed to average the total hours across an agreed number of days.
Using the Employee Work Schedule screen is best for employees whose work patterns are cyclic or unpredictable, as it lets you specify the individual days when the employee does or doesn’t work:
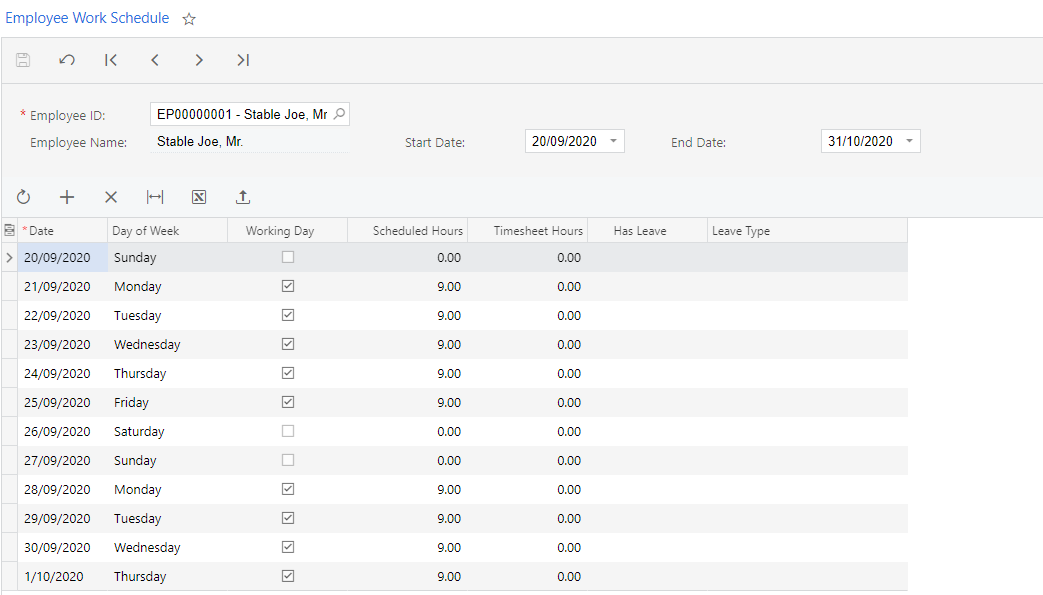
When an employee’s Work Pattern Source is set to “Employee Schedule”, you need to enter their schedule manually or import it via a CSV file; if their Work Pattern Source is set to “Work Calendar”, then entries will be entered automatically when a new pay run is opened.
Employees’ Definition of a Week
Every employee needs have a definition of what a working week means for them, which allows the system to convert between weeks and hours or days when calculating Annual Leave. A new Definition of Week tab has been added to the Pay Details screen, where you can define a week for the employee, and keep track of any changes to their definition:
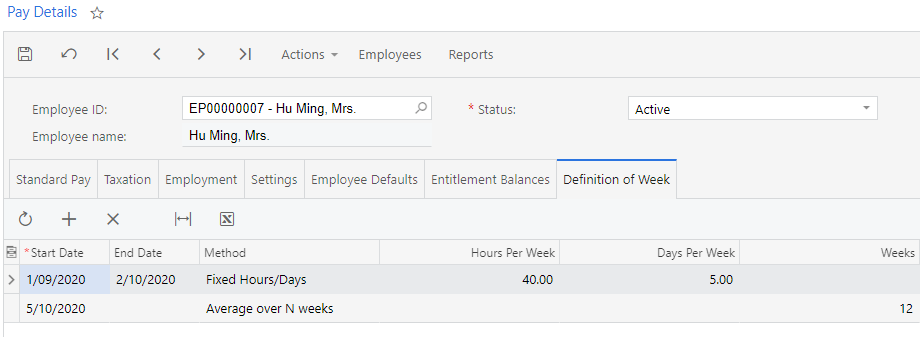
To enter the definition of a week for an employee, first enter the date when this definition comes into effect (the first record added should be the employee’s employment start date), then select the Method for defining a working week:
- Work Calendar: This method is intended to be used by those employees with fixed work patterns that fit within a seven-day cycle, whose Work Pattern Source is set to “Work Calendar”.
- Fixed Hours/Days: This method is intended to be used for employees whose Work Pattern Source is set to “Employee Schedule”. This option is suited to employees whose total hours or days worked each week are the same, but whose specific days worked or hours worked on a given day are variable from week to week.
- Average over N Weeks: This method is only intended to be used for employees whose Work Pattern Source is set to “Employee Schedule”. This option is suited to employees whose work pattern is highly variable and difficult to predict.
- Employee Schedule: This method is only intended to be used for employees whose Work Pattern Source is set to “Employee Schedule”. This option is suited to employees with regular cyclic work patterns.
If an employee’s definition of a week changes, enter and end date for the existing definition and add a new line to the table to show the new definition—this allows you to keep a record of how the employee’s definition of a week has changed over time. It also allows pay adjustments and reversals to use the correct date-effective records.
Updates to Employees’ Pays
For NZ companies, the Leave Summary button on the Employee’s Current Pay screen now opens a new Employee Leave Summary screen for NZ (MPPP4045, as opposed to MPPP4050 for the Employee Leave Summary screen).
Users can click on the links in the columns that relate to leave rates/amounts to view an inspection window showing how those rates/amounts were calculated.
NZ Terminations
The release adds support for terminations in NZ companies to the Payroll module.
A white paper detailing how to set up and use the Payroll module for terminations in New Zealand is available on the White Papers page.
A payroll administrator begins the termination process by clicking the Termination button on the Employee’s Current Pay screen (MPPP3130), in the same way as they would when terminating an employee in Australian company; however, the Termination window that opens is a new screen specific to NZ (MPPP5400, as opposed to MPPP5300 for the Australian Termination window).
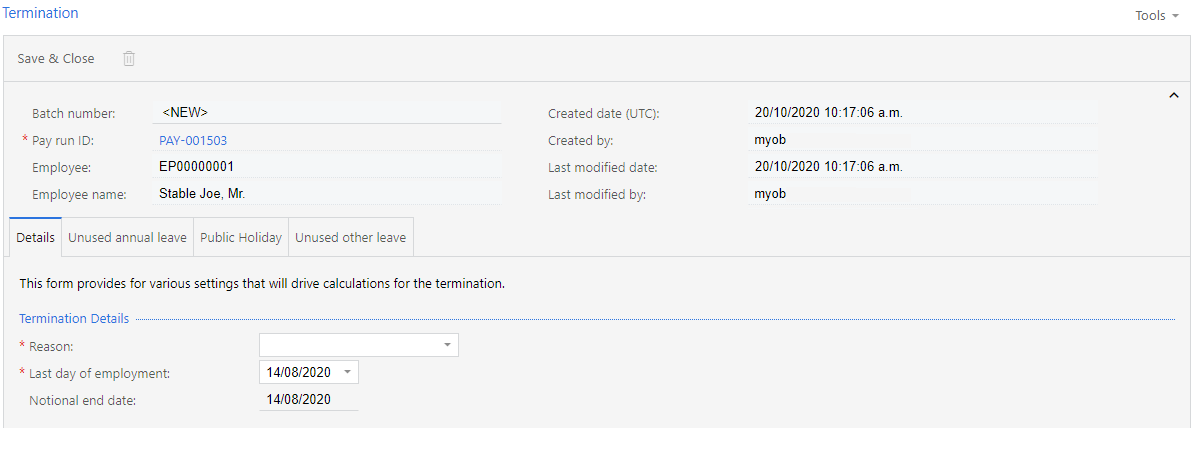
On the Details tab, the administrator can a select the reason for the termination. This is used for record-keeping and reporting, but does not affect how the employee is paid or taxed.
All unused leave balances for the employee are calculated and displayed on the tabs after the Details tab:
- The Unused Annual Leave tab displays earned and accrual amounts for the employee’s Annual Leave.
- The Public Holiday tab provides an overview of any public holidays that affect the employee’s termination payment.
- The Unused other leave tab provides an overview of any other leave to be paid out and can, depending on employment agreements, include pay items for sick, alternative, long service leave etc. Each item is rated according to the valuation method set on the relevant entitlement.
Once all details have been entered and checked, the administrator clicks Save & Close to update the employee’s pay with pay items for unused leave payments as required.
Payroll Payment Methods (AU & NZ)
In previous releases, the Payroll module was restricted to limited set of payment methods. As of this release, the Payroll module can use any payment method set up in MYOB Advanced, which allows for greater flexibility in how payment methods can be set up and used in the Payroll module.
Users can set up payment methods for use across the whole system, and create new payment methods to use with the Payroll module. The Payroll module can now use the same payment methods across multiple branches, and these methods can be associated with cash accounts without restriction.
These updates to the Payroll module have effects on the configuration of employees’ pay distribution, which make the system more flexible and easier to use.
Setting up Payment Methods
A new Use in Payroll option has been added to the Payment Methods screen (CA204000). Any payment method with this option ticked can be used in the Payroll module. Payment methods used by Payroll should also have the Use in AP option ticked, as the AP settings are also used by the Payroll module. When the option is ticked, a new Settings for Use in Payroll tab appears, providing configuration options specific to the Payroll module:
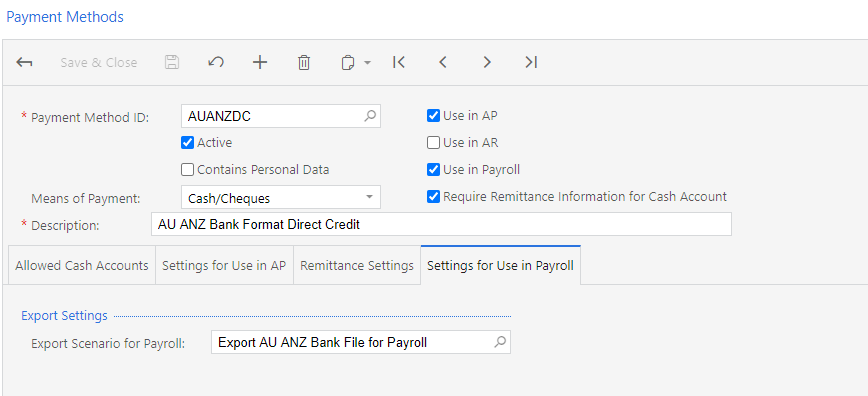
On the Cash Accounts screen (CA202000), a new Use in Payroll column has been added to the table on the Payment Methods tab. Previously, an employee could only be assigned a cash account with the same branch as them. As of this release, the Payroll module observes the Restrict Visibility with Branch checkbox for cash accounts, so it is possible for employees to use a cash account from a different branch (if the checkbox is unticked).
Updates to Pay Items
New fields are available on the Additional info tab of the Pay Items screen (MPPP2210) for Deduction-type pay items. These fields let you specify a supplier Location and Cash Account in addition to the payment method. You can override these settings in the footer of employees’ Standard Pays, which means that you can use the same pay item with different locations/accounts for different employees, rather than having to set up separate pay items for all possible location/account combinations.
A new Membership tab has been also added to the Pay Items screen. This tab shows all employees who have the pay item included in their Standard Pays:
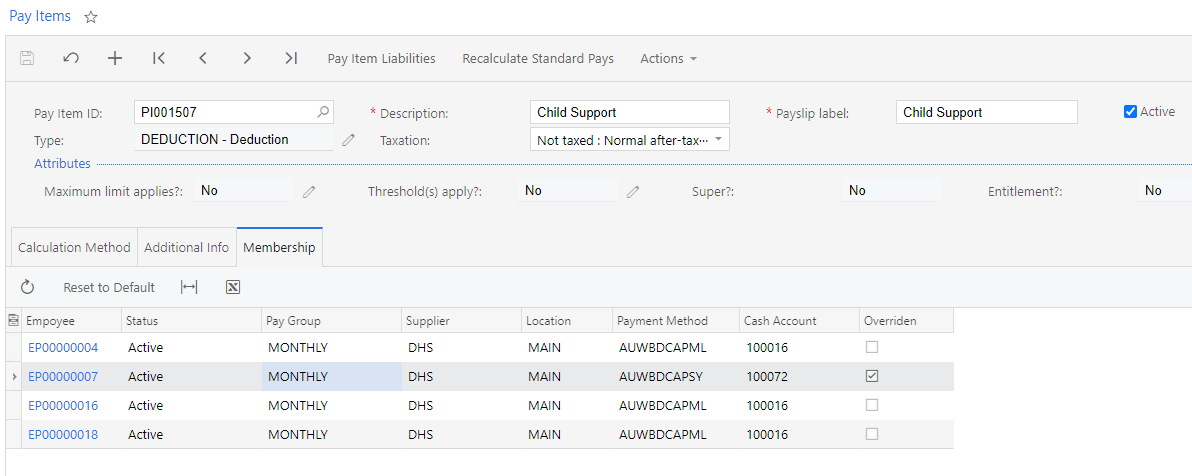
If the pay item’s details have been overridden in an employee’s Standard Pay, the Overridden column for that employee will be ticked. When an employee with overridden details is selected, the Reset to Default button becomes active—click this button to reset the employee’s details back to the defaults selected for the pay item on the Additional Info tab.
Updates to Superannuation Funds
The Superannuation Funds screens for NZ and Australia (MPPP2151 and MPPP2152) have been updated to allow the selection of a Location and Cash Account for each fund. As with pay items, these selections can be overridden at the employee level by editing the relevant pay item’s footer in their Standard Pay.
Updates to Pay Distribution
Pay distribution setup has been moved to the Pay Details screen (MPPP2310). A new Pay Distribution tab contains the pay distribution information for each employee:
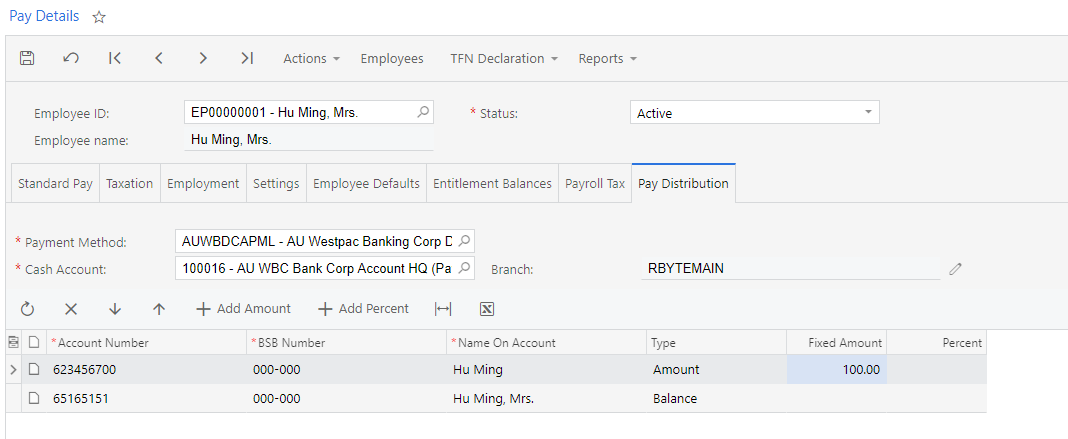
These changes mean that the Pay Distribution screen (MPPP2330) is no longer required. This screen is now deprecated—it still exists in the MYOB Advanced system, but it has been removed from menus and sitemaps.
A payment method and cash account can be selected on this tab—these will be used for the Payroll module only, overriding the payment method and cash account selected for the employee on the Financial Settings tab of the Employees screen (EP203000). Similarly, the banking details on the Balance line in the main table default to the details from the Employees screen, but these can also be changed. Changes made on this screen do not affect the settings on the Employees screen.
Updates to Payroll Preferences
The Pay Distribution section has been removed from the General Settings tab of the Payroll Preferences screen (MPPP1100). (In previous releases, these settings were used as the defaults for new employees—as employees now default to the details on the Employees screen, these settings are no longer needed.)
More settings are available under the Default Employee Payment Payments section of this tab, allowing you to set default values for new employees’ Reference (AU/NZ), Code (NZ) and Particulars (NZ) details.
Payroll Expense Allocation (AU & NZ)
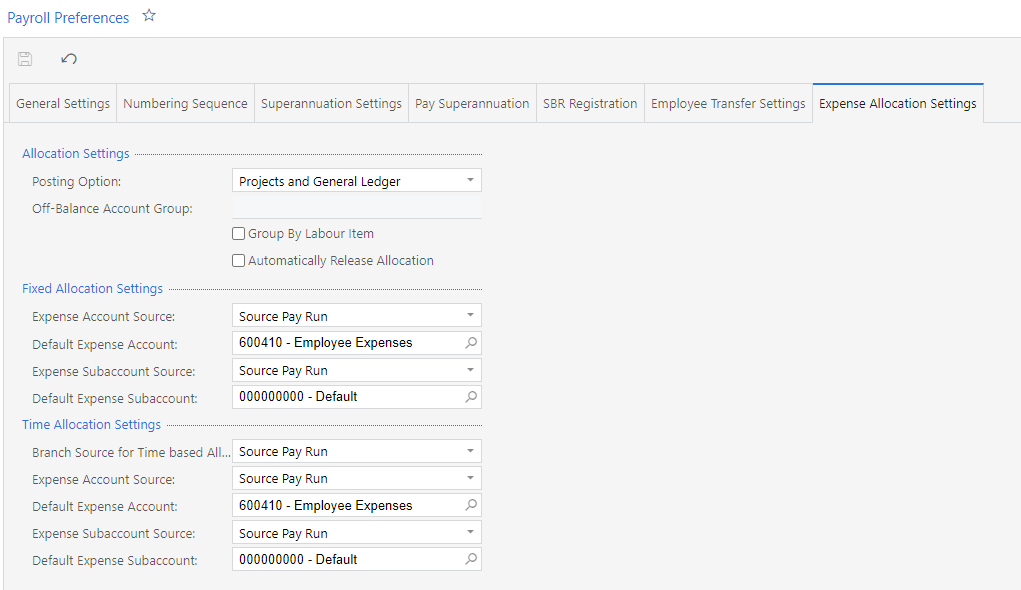
As of this release, it is now possible to allocate payroll expenses to projects and/or GL accounts. This allows payroll expenses to be brought into project accounting, and means that payroll costs can be allocated more flexibly throughout the MYOB Advanced system. Payroll expenses can be allocated on a fixed or time-based basis—this option is set for each employee. Payroll expense allocation batches are generated and posted after a pay run has been completed, so transactions generated by completing the pay run are not affected.
Setting up Payroll Cost Allocation
System Settings
A new Expense Allocation Settings tab has been added to the Payroll Preferences screen (MPPP1100):
Employee Settings
A Payroll Expense Allocation tab has been added to the Employees screen (ES203000):
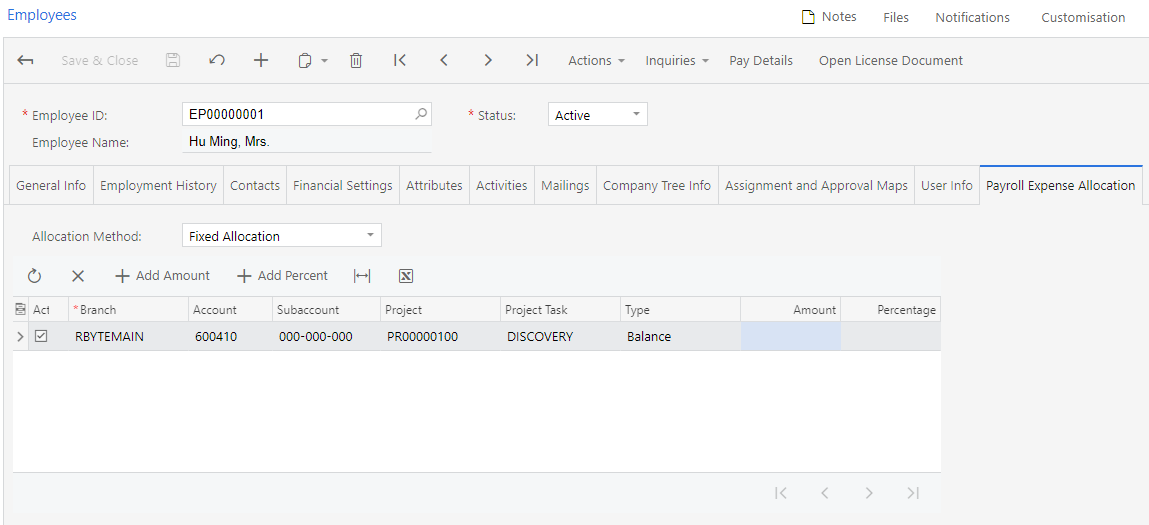
For each employee, select an Allocation Method:
- No Allocation – No payroll expenses will be allocated for the employee. This is the default.
- Time Allocation – Payroll expenses will be allocated for this employee as per their timesheets.
- Fixed Allocation – Payroll expenses will be allocated for to fixed accounts/projects for this employee.
When the “Fixed Allocation” option is selected, a table appears below, which you can use to set up how the employee's expenses are allocated by creating one or more allocation rules.
Pay Item Settings
Payroll expenses can be allocated from pay items with the type “INCOME” or “ALLOWANCE”. A new Exclude from Allocation setting is available on the Additional Info tab of the Pay Items screen. Amounts from any pay item that has this option ticked will not be included in payroll expense allocations..
Timesheet Import Settings
Settings have been added to allow allocation information to be imported from timesheets or from time cards in MYOB Advanced, for employees who are set to time-based payroll allocations:
- New “Project” and “Inventory Item” options are available in the Entity Type dropdown on the Data Maps screen (MPPP7020) so you can set up mapping for these records when they are imported with timesheets.
- New Project, Project Task and Inventory Items columns in the main table of the Import Timesheets screen (MPPP7030) show the details of project and inventory records imported with timesheets.
Allocating Payroll Expenses
A new Allocate Payroll Expenses action is available on the Pay Run Details screen (MPPP3120). This action is enabled for completed pay runs only.
Clicking the new action creates a batch of allocation transactions for the pay run. If the Automatically Release Allocation option is ticked on the Payroll Preferences screen, the batch will be release as soon as the batch is created; otherwise, it will need to be released manually from the new Payroll Expense Allocation Batches screen (MPPP3510).
As well as generating allocation batches from individual pay runs, batches can also be generated in bulk from the new Run Payroll Expense Allocation screen (MPPP5045):
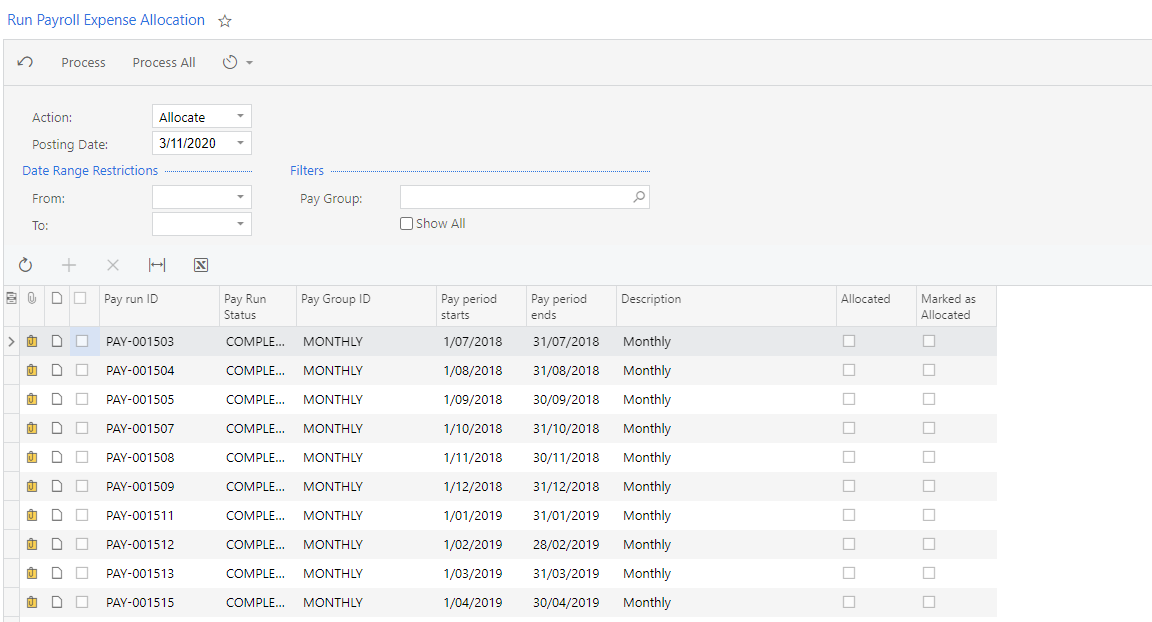
This screen displays all completed pay runs that meet the filtering criteria at the top of the screen. If the Show all check box is unticked, only pay runs that do not yet have an allocation batch are listed; if it is ticked, all pay runs that match the filters are listed.
Clicking the Process or Process All buttons performs the selected action on the selected/all pay runs in the list. Two actions are available:
- Allocate – Create allocation batches for the pay run(s)
- Mark as Allocated – Mark the pay run(s) as having been allocated, without actually creating allocation batches. This action can be used for historical pay runs
Once processed, allocation batches can be viewed and processed on the new Payroll Expense Allocation Batches screen (MPPP3510):
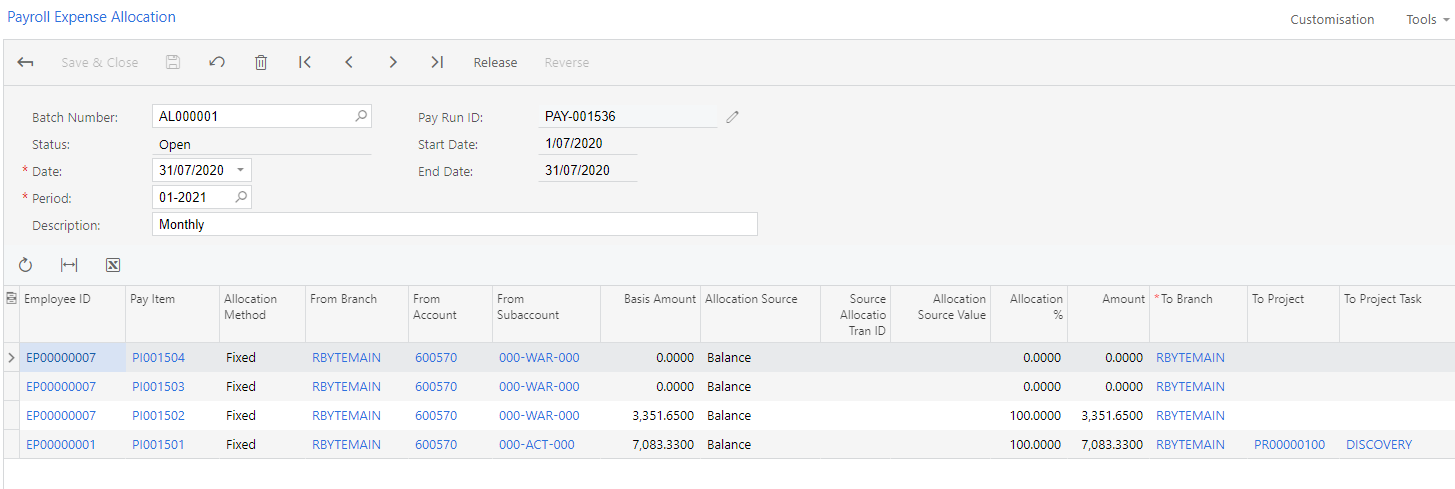
Each batch displays the ID of the pay run it was generated from and lists all transactions in the batch. The transactions are generated as per each employee’s Allocation Method.
Once allocation batches have been generated for a pay run, the new View Allocation Batches option in the Inquiries menu of the Pay Run Details screen becomes available. This option displays an Expense Allocation Batches window, which lists any batches related to the pay run.
Resolved Issues
The following table details the issues that are addressed by this release.
